Looks like you’re lucky enough to be visiting Siem Reap – you’re going to love it! I only wish you had more time to explore, but you will love spending 4 days in Siem Reap. You can’t see it all, so take it slow and allow yourself to see things fully. Check out this guide on the things you can’t miss during your 4 days in Siem Reap–I promise you’ll see just enough to want to come back!
Angkor Wat from Above
Table of Contents
Is your time flexible and you're wondering if 4 days is enough? How many days should you spend in Siem Reap to get the most out of your trip? Find out here.
Pocket Guide to Siem Reap
When I think of Siem Reap...
I'm dripping sweat but brought to tears by the magnificent ancient history, and the horrific recent history.
Where To Stay
Near Pub Stree (Best for party people)
Wat Bo (Digital nomads & chill people)
French Quarter (Best for artsy accommodations)
When To Visit
March-April is brutally hot. If you can, go during Spring/Autumn Equinox for the Angkor alignment.
Things To Do
Explore the Angkor Complex (of course)
See how daring you are with street food
Cozy crafts and history at the Lotus Silk Farm
Hold a life-saving rat at APOPO Visitor Center
Every purchase through these links keeps this blog alive and thriving—thank you for being an amazing supporter, and please support small, ethical, and local!✨ Learn More.
Day 1 // Welcome to Siem Reap
Your arrival in Siem Reap has to start with a friendly tuk-tuk ride from your drop off points. The city is small, so use day 1 in Siem Reap to get familiar with it. Once you settle in, walk around and you’ll find arts, events and shops that pull you in.
Try some delicious street food, watch the impressive local artists, and shop around…and good luck to the young men dodging the constant ‘massage’ calls, the tables have turned. Walk through Pub Street as it comes alive just to take in the madness, but don’t be out too late! Day 2 is an early one…
Angkor Wat at Sunruse
Day 2 // Temple Time
Finally, the reason that brought you to Siem Reap – Angkor Wat ( and the massive complex). This day will take some preparation and planning, since there are a few ways to experience it, and all of them start at 4am!
There are 70 major temples in the 400 square km area, and over 1,000 sites in total. So it’s important to do some pre-research to determine which ones you want to see. You can’t miss Angkor Wat, Bayon Temple, and my favorite, Ta Prohm.
Get your tickets at least a day before to save yourselves some time in the morning. Tickets can be purchased online or in person off Aspara Road. Aim to get to a good spot at least 30 minutes before scheduled sunrise, it can definitely be crowded!
1-day = $37 | 3-day = $62 | 7-day = $72
Walking the Temple Roads near East Gate
Self Guided
My favorite way to explore the complex is on a solo-adventure, moving at your own pace, admiring in peace…but I did go 5 different days! If you have a motorbike or a bicycle, you can go in the complex at any time with a valid pass. However, you don’t get the history explanation and significance that you would with a guide, (unless you listen to the history with a podcast like I did).
The small circuit can be done in a half day or a full day tour, most easily booked through your accommodation. It is great for first timers, since it goes to all the “main” sites.
The Small Circuit loop, includes Angkor Wat, Angkor Thom, Bayon, Ta Prohm, and Phnom Bakheng. You can find tours that go at different paces with different style of travel (bikes, tuk-tuk, bus with A/C).
Large Circuit
If you’re buzzing off the ancient history and architecture here, then you won’t want to miss the hidden gems on the Large Circuit. This requires at least 1 full day, probably more, and
The full day tour hits the “Large Circuit”, everything you get in the small circuit + Preah Khan (one of my faves), Ta Som, East Mebon, and Pre Rup.
I didn’t do a full-day tour, but most of the people I knew who did, were absolutely exhausted after, granted it was 110F/40C. If you’re traveling in the hottest months of March-May, do yourself a favor and plan to break up the days!
If you still have some temple energy in you, you can go back in with the same ticket! Head to the Phnom Krom Viewpoint for sunset views. Or, get a 3-day pass and go again!
Tour guides know the best photo angles
Biking through the Gate of the Dead
Day 3 // Culture, Crafts, & History
Siem Reap is famous for the Angkor Complex, but the other historic and creative aspects of the city shouldn’t be overlooked – they will be hard to miss! From painting classes in the traditional style, Khmer ceramics class, Cambodian cooking classes, or understanding the brutal (recent) history, take time to really sink into an aspect of this rich culture.
One of my favorite things I did in Siem Reap, was go to the APOPO visitor center. I first heard of the nonprofit when someone explained it as a “rat retirement home”. Obviously I was excited, but it was so much more!
There, you’ll learn about the Khmer Rouge, and how they use trained rats to sniff out the landmines.
History + humanitarian nonprofit + big rats = a great day.
A HeroRAT at APOPO
The one regret I have from my time in Siem Reap is not going to the Lotus Silk Farm. Perfect for all ages, learn how to weave a silk scarf, make jewelry out of the lotus flower seeds, and enjoy the day surrounded by a picturesque lotus farm. Through this experience, you get beautiful DIY crafts to take home, plus you help the empowerment of local women and their heritage. Don’t skip out on this, you will be left regretting it like me!
Day 4 // Temples Take 2
From the first temple day, you’ll realize that you’re only scratching the surface. Especially if you’ve done a 1/2 day or self guided tour, you’ll be left wanting more!
If you did a full day tour and you’re more tempted by the other parts of the city, then take the day to explore. There is so much more to do here to immerse in the local culture, landscape, and food scene.
While there are a lot of things for tourists to do in Siem Reap, some leave the land and people worse than before. I suggest you avoid doing these things, for ethical reasons.
This is something you’ll feel silly for wondering, because once you arrive you’ll see just how many tuk-tuks there are, you’ll never struggle to find a ride! It can cost about $5 to get across the city in tuk-tuk. If you like your driver, feel free to ask for their WhatsApp number in case you ever need to call for a ride!
If you want a motorbike, there are plenty of places to rent them for about $20/day, but do be aware that police do look for tourists and have been known to be corrupt. If you’re renting a motorbike, be sure to have your international driver’s permit.
Reminder to never carry too much cash on you, it can be extorted.
Summary - Best Way to Spend 4 Days in Siem Reap, Cambodia
There is so much you could pack into 4 days in Siem Reap. Although the city itself is pretty tiny, you could go off in any direction and explore something magical. You won’t want to skip out on the temples. I suggest at least 1 full day there, I spent 5 half days and could have kept going back!
Don’t miss the APOPO center or the Lotus Silk Farm for a full appreciation of the local history, people, and culture for an unforgettable time in Siem Reap! As always, be sure to drive safe, trust your instincts, and respect local culture <3
Welcome to the tropical paradise of Okinawa, where aqua-blue waters, white sandy beaches, and lush green landscapes await your arrival. This guide will help you spend the best one week in Okinawa
Use this itinerary any way you want – it isn’t a step-by-step guide to walk you through your one week in Okinawa, but rather a guide where you can take what you want and leave what you don’t. There may be more listed for a location than what time allows, and you definitely shouldn’t rush through your trip to Okinawa.
Whether you’re a history buff, a nature enthusiast, or simply looking for a tranquil escape, Okinawa has something to offer for everyone. Explore the historic Shuri Castle, a UNESCO World Heritage Site, and delve into the rich history of the Ryukyu Kingdom.
Take a stroll along the picturesque Kokusai Street, where you can shop for traditional crafts and sample delicious local delicacies. Feel the warm sand between your toes as you relax on pristine beaches or dive into the crystal-clear waters of the Kerama Islands for an unforgettable snorkeling or scuba diving experience.
With its vibrant coral reefs, breathtaking sunsets, and friendly locals, Okinawa is a destination that will leave you in awe. Get ready to explore a place like no other as we uncover the hidden gems of this tropical paradise in the perfect itinerary for one week in Okinawa.
Table of Contents
Every purchase through these links keeps this blog alive and thriving—thank you for being an amazing supporter, and please support small, ethical, and local!✨ Learn More.
Pocket Guide to Okinawa
When I think of Okinawa...
I'm warm on a beach, still wet and salty from the crashing waves, enjoying a sweet sunset date with Matt & fresh sashimi. so happy 🙂
Where To Stay
Naha (Best for first-timers and city lovers)
Onna (Best for beaches and diving
Nago (Best for families)
Yomitan (Best for culture)
When To Visit
Late march to early may / October to November. Summers (June-August) are hot and humid, with typhoons in late summer.
Things To Do
Swim or snorkel almost anywhere on the coast
Visit Churaumi Aquarium
Enjoy local food like Okinawa traditional soba & sata andagi
Welcome to Okinawa! - Arrival in Naha
No matter where you’re coming in from, you’ll land in Okinawa in the main city of Naha. Here, you’ll see a lot of military personnel, and use this as your starting point whether you continue north on the main island, head over to neighboring Kerama Islands, or take off to any of the other 160 islands in the Okinawa Prefecture.
You will come to Okinawa and leave from it through Naha, so it doesn’t matter if you stop there first or last! Just be sure not to miss the rich history, lively city sights, and everything else waiting for you in Naha.
The highlight of Okinawa is Shuri Castle. A UNESCO Heritage Site, this is a symbol of the Ryukyu Kingdom that used to dominate the area and a must-see in your one week in Okinawa. Although the castle tragically burned down in 2019, you can observe the reconstruction process and learn about its history.
Surrounding Shuri Castle are more highlights to see, like a traditional Japanese-style home, an old steep stone road, and many shrines, temples, and ancient artifacts. Take some time to walk around the area! If you’re interested in the arts, check out this unique art of dyeing fabrics with coral, located right near the castle!
Cost: ¥400 / $2.70 Time: 2 hours
Shuri Castle, Okinawa | Image from Atlas Obscura
Kokusai Dori Street
Kokusai Dori Street felt like a mini Vegas. Neon lights, street vendors, trinkets, and tourist stores galore. However, if you head down some of the side streets and the covered market, you’ll get a better taste of local life.
Kokusai Street is a perfect place to try some Habushu, a liquor made with Habu snake venom (with the snake right in the jar)! However, some places can be a bit of a rip-off, so check reviews online first, and don’t be afraid to get off the main strip!
Cost: Free Time: 1-2 hours
Kokusai Dori | Imagr from Good Luck Trip
Peace Memorial Park
There is no denying the intense and graphic history that WWII has left in Okinawa. The Peace Memorial Park is the best way to learn and pay remembrance to the Battle of Okinawa, one of WWII’s bloodiest conflicts. Established in 1975, the park honors over 240,000 lives lost through its moving monuments.
Witness the Eternal Flame’s continuous glow ignite a spark of hope for a world free from war. Delve deeper into the battle’s human cost at the Peace Memorial Museum, where artifacts and personal stories paint a vivid picture of the era. Take a guided tour or explore at your own pace, reflecting on the horrors of war and the preciousness of peace. Remember, respect and modesty guide your visit to this significant site.
You may not consider thrift shopping as a fun thing to do on holiday, but thrift shopping in Japan is next level, especially if you know where to go. You can pick up a traditional kimono for less than ¥1,000 / $6.75.
For the best selection, head to “Hard Off / Off House Okinawa Awase”, where they have 3 rows of kimonos of every style, size, color, and material. You can take your kimono to a retail shop that sells them to learn more about the one you bought, learn how to wear it, fold it, and more about its history. Okinawans are very proud to share their culture and kimonos with foreigners!
Where To Eat In Naha
Drink Habushu (the local specialty of malt liquor with a Habu snake in it)
Conveyor Belt Sushi, whichever one is near you (and has good ratings)
King Taco – they serve Taco Rice which is an Okinawan favorite
We stayed at Hotel And Rooms Naha Port the night before flying out of Okinawa, and it was perfect. Their onsens opened at 6:00am, perfect for a pre-flight soak and relaxation. This hotel is unfortunately anti-tattoos, so be aware of this in case you have tattoos that cannot be covered without a bodysuit.
Onna - 2 Days
Onna is the best first-stopping place to rest from travel and take in the beauty of the island. Instantly, you’ll see how blue the water is. Onna is a resort destination with soft sand beaches and snorkeling off the coast! Before exploring the rest of this historic and bustling island, take some time at Onna to chill out under the sun and explore the blue water.
Snorkeling is one of the best things to do in Okinawa, but there is also so much more! Check out the full list of everything you can't miss.
Dive Blue Cave
The highlight of water activities is snorkeling or diving at the Blue Cave on Cape Maeda. This area is teeming with travelers in the peak summer months, but a perfect place to explore in the shoulder season. Water temperatures are always comfortable, but the conditions can fluctuate to near dangerous, especially in the winter.
If you’re looking to go on a tour, then you’re in good hands! If you’re more up for traveling at your own pace, then be sure to check out the Cape Maeda website. At the bottom, you’ll find the day’s guidance on whether swimming is allowed or not, with a live cam of a hanging flag.
While there isn’t anyone monitoring the area per se, the cape is known to have a gnarly current and some rough waves so I suggest you heed the advice online. If you can’t swim, it’s still worth some time exploring the area!
Cost: ¥100/hour for parking Time: 3 hours
Diving at Blue Cave | Image from Klook
Surfing / Beach Day
Onna is the best place to have a chill beach day. If you stay at a resort, chances are there is a beach right outside! While there are beaches all over Okinawa, they are not all the same. Some have rough coral and rocks, while others are as fluffy as almond flour. The area along Onna and towards Churaumi Aquarium is the best for beach chilling. Also conveniently, a perfect place to watch the sunset.
There are some expert surf instructors in Okinawa – if you stay at the Tropical Surf House listed below, you’ll be staying with the top surf instructor, and kiteboard instructor in all of Japan!
The Best Beach Days in Onna
Cave Okinawa
A tourist attraction, but also very cool to explore. These limestone caverns are a great way to learn the foundations of these dramatic islands, and fun to do with the whole family! They will often put on light displays, but these geographic features are pretty nifty themselves.
Parking is free and it’s a fun thing to do if you have extra time or a rainy day. If you’re interested but don’t have the time while you’re in Onna, there are a few of these cave excursions around the island!
Cost: ¥500 / $3.37 Time: 1 hour
Okinawa World | Image from Japan Travel
Cape Manzamo
Cape Manzamo is the perfect place to see the sunset. The visitor center is modern and nice with a lot of local food options and free to explore. There is a small walking trail that goes out onto the cape for a small fee, but so worth it to see the unique cliffs!
The area does get a bit busy, so go earlier rather than later. If you’re still up for an adventure then head just 5 minutes south and check out Mermaid’s Grotto on the beach! This area is not for swimming, but it does have cool tide pools to check out!
Cost: ¥100 for small lookout hike Time: 30 minutes
Head to the 3rd floor of the visitor center (near the escalators) and you'll find a private outdoor deck. There are no signs for it, but you can get impressive views for free!
Cape Manzamo Viewpoint
Where To Eat in Onna
Orchid Ryukyu Cuisines – Not the best for food, but it sure is a local experience with a show while you eat!
hale’aina HOA – Not Japanese, but the best food we’ve have in a long time (and great for remote working)
Agu Shabu-Shabu and Okinawa Cuisine Kafuu – $$$ but a fun local experience
Be aware in touristy areas - some restaurants will give you an appetizer or beer you didn't order.. if you take it, you buy it.
We stayed at the Tropical Surf House and loved it. It was affordable, easy going host who is a kick ass kite board instructor, and close walk to the beach & Lawson's <3 Plus, he had the cutest dogs, Shiro & Kuro, who loved coming to the beach with us, (see Kuro featured above).
Nago - 2 Days
Nago is like the capital of northern Okinawa. A great jumping-off point to both the tourist activities and heading north into the Yanbaru National Park. There are a lot of traditional restaurants in Nago and fun modern things to do.
Churaumi Aquarium
The Churaumi Aquarium is a must-do for every traveler in your one week in Okinawa, even if you try to skip the touristy stops as we do. This was the most incredible aquarium I’ve ever seen! Not only because of the amount of education and conservation efforts that are taken by the aquarium but also because of the massive Whale Shark that is there.
Although I usually don’t support large mammals in captivity, all of the animals that are there either cannot be released into the wild due to injury or human habituation. The dolphins that are in the show are never forced to perform and only spend a few years in the aquarium before being released (with a few extra tricks to show off to their pod).
The owner of the budget accommodation below used to work at the aquarium, so if you stay with him you’ll get the ultimate tour!
Cost: ¥2,180 / $14.69 Time: 3 hours
You can buy discounted tickets at convenience stores close by to save a few dollars!
Hike Mount Katsudake
The best views over Nago and the surrounding peninsula & islands are from Mount Katsudake. There is a network of trails that lead to mountain peaks with incredible views. Parking is free and it is never busy!
This is one of the best-hidden gems in Okinawa and a great way to explore outside without heading all the way north into the denser rainforest. The trek is free and beautiful any time of year, but don’t underestimate the strength of the sun!
Cost: Free Time: 1.5 hours
Katsudake Mountain View
Snorkel Gorilla Chop
Our favorite snorkeling location was Gorilla Chop, a must-do during your one week in Okinawa. It is an easy drive to get there, and just a few meters from a public bus stop! Parking is free, and once you’re on the beach, it’s only a few meters into the water until you’re in one of the best snorkeling spots in Okinawa! Here you may see turtles, octopuses, unique and colorful fish, and of course, other divers.
This is a popular place since it is sheltered from the wind and waves, and it’s easy to access. Although there are a lot of scuba divers, the depth never got more than 10 meters, so it’s very easy to snorkel! Visiting Gorilla Chop in the morning or shoulder season is the best way to experience it with fewer people and less water disturbance.
Cost: Free Time: 2 hours
Do Not feed the fish. The animals were habituated to people as a result of tours feeding them. If you go with a tour group, make sure it isn't one that supports unethical animal encounters!
Gorilla Chop Coral Reef
Nakijin Castle Ruins
The Nakijin Castle will take you back in time to the 14th century. Here you can explore a UNESCO World Heritage Site and a testament to the Ryukyu Kingdom’s legacy. Explore the sprawling ruins, imagining the royal court, temples, and defensive structures bustling with life. Climb the observation tower to be rewarded with breathtaking panoramas of the Motobu Peninsula and East China Sea.
Wear comfortable shoes as you navigate the uneven terrain, and remember sunscreen and water during warmer months. Consider this historical gem as part of a day trip exploring nearby wonders like Kouri Island!
Cost: ¥600 Time: 1 hour
Nakijin Castle Ruins | Image from Japan Travel
Where To Eat in Nago
Annetai Chaya Hammock Garden – Incredible views right next to the more touristy Pizza in the Sky
Miyazato Soba – One of the oldest Soba restaurants in Okinawa, a traditional meal
Sashimi from a fish market – Perfect for a sushi date on the beach, our favorite was at 483 Nakaoshi in Nago.
Orion Brewery – Not really a place to eat, but this is the beer of Okinawa. Take a tour to see where it’s made and try it yourself!
We stayed at Guest House Sumire for a few days while waiting for our long-term rental in Onna. Here you're hosted by Koichiro, a kind-spirited, laid-back man who loves surfing, traveling, and great conversation. We saw him many times during our stay in Okinawa, and he was such a highlight of the island. <3
Kunigami & Yanburu National Park - 2 Days
This is the least explored part of the island, but our favorite by far. You can drive deep into the ancient jungle, see more wildlife, and explore on foot. This is the best hiking area and home to most of the island’s waterfalls!
Northern Okinawa is only accessible via driving your own car, or on a guided tour. Check out the rules for driving abroad below, or check out this tour so you can explore worry free!
Explore Daisekirinzan & Cape Hedo
The northernmost point of the island has insane views and history. Daisekirinzan is a low-cost way to explore the unique topography of the area and learn about the people who used to live here. There are 3 hiking trails, banyan trees, ruins, and so much natural beauty and spiritual lore which only takes about 90 minutes to walk.
Further north is Cape Hedo, a great lookout and viewing area to see the insane geography of the area you just hiked! Down on the beach is popular for surfers, but waves can get pretty big so beware!
Cost: ¥1,200 / $8.00 Time: 2 hours
Mountains of Northern Okinawa
Hike Hijio Falls
If you’re going to do any waterfall hikes within your one week in Okinawa, let it be Hijio Falls. It is the biggest on the island and the suspension bridge you cross to get there is so dreamy. If you go early morning or closer to sunset, you won’t have much of a crowd. The park closes at 17:00, with the last entry at 15:30 so don’t wait too long!
Although swimming is not permitted, you can still feel the mist from the viewing area at the base of the falls. There are a few spots to enter the water further downstream, just watch out for Habu! If you want to swim at the falls, then check out Ta-Taki – just as beautiful and with swimming permitted.
Cost: ¥500 / $3.40 Time: 2 hours
Hijio Falls
Mangrove Kayaking
If you’re keen to explore out in nature, then get up and close with a mangrove kayaking excursion. Located on the eastern coast, the Higahi-son Fureai Hirugi Park is a perfect place to get on a kayak and float among the trees.
You’ll be amazed at the life that lives in these coastal ecosystems, and your guide will educate you on all the birds, fish, insects, and plants that rely on each other to thrive. Mangroves keep coasts protected from erosion, tsunamis, hurricanes, and everything else that the ocean throws at us… crazy how so many places rip them out for ‘a better view’!
If you don’t want to get in the water, you can still walk along the boardwalk and get a glimpse! But your best option is to take a Mangrove Kayaking Tour.
Cost: Free park entry, kayak tour booked privately Time: 1 hour
Okinawa Mangroves | Image from Japan Travel
Where To Eat In Kunigami
Emi no Mise – Best traditional options, recommended by many locals!
Satsukimaru – Great local food when you’re exploring the far North
Agachi Mui – Perfect for a break to take in the ocean views
Ogimi Sky Terrace – Incredible views over the bay with a walk-out viewing deck
Where to Stay in Yanbaru
There aren’t a ton of accommodation areas in the North, but there are some if you want to stay in the lush forest!
The Yanbaru National Park and entire Northern Region is best experienced on day trip explorations from accommodation in Nago. You will need a rental car to get around, since public transport does not go into these region.
Getting Around in Okinawa
Okinawa is best traveled by rental car. Especially if you want to explore the northern part of the island where public buses don’t run, you’ll need a car. Many hosts have one for rent, or may know someone that can provide it! Also, Japanese drivers are extremely courteous… like too kind. So drive slowly, and be courteous in return!
Be sure to have your International Driver’s Permit with you, as driving laws are very strict in Japan. Read this full guide to getting an IDP, so you won’t hit any issues on the road (no pun intended).
The public bus is useful, but only as far an Nago – anything further north is not accessible. The buses work on a pretty regular time clock, although the drivers barely speak English so be ready to know where you’re going!
Best Time To Visit Okinawa
Okinawa is a beautiful tropical paradise any time of year. However, depending on what you’re looking for out of your perfect one week in Okinawa, some times are better than others.
In general, the best time to visit Okinawa is in the shoulder seasons of April & May, or September & October. These months you will still have ideal weather, but without the intense heat and big crowds.
Explore the other destinations waiting for you in Asia!
Summary - Perfect One Week Itinerary in Okinawa
You can do so much within this one week in Okinawa. This island has a rich history, incredible food, lush nature, and friendly people.
One week may not seem like enough, we spent 45 days there and still wanted to stay longer! Especially if you want to go to any of Okinawa’s smaller islands, you’ll want to divide your time considerably.
Between the capital city of Nago’s rich history at the Shuri Castle, WWII memorials, and the northern region’s Yanbaru National Park, there is something for every traveler.
You cannot go to Okinawa without exploring the life under the water in the vibrant coral reefs. Also, be sure to try as much of the local food as you can – that may just be the secret to the Okinawan’s vitality and long-lifespan!
Exploring the vibrant city of Pula, Croatia? Discover the best things to do in Pula that blend rich history, stunning landscapes, and coastal relaxation.
From ancient Roman amphitheaters to hidden beaches, this guide highlights diverse activities catering to every traveler’s interests. Join us in uncovering the gems that make Pula a must-visit destination, seamlessly combining culture, history, and coastal allure for a memorable experience.
Table of Contents
Anything purchased through the links on this page helps me maintain this blog going. Thanks for supporting – Learn More.
If you are spending some time in the city to see the historical sites, look into getting a ‘Pula+ Card‘ for access to 6 attractions and sights.
The card grants access to the Arena, Zerostrasse, Temple of Augustus, Historical and Maritime Museum of Istria, Sacred Hearts Museum, and Museum of Contemporary Art of Istria!
Swing by the local Tourism Office to get your card when you arrive!
€14 for adults, €6 for students and children under 5 to see the top sites in Pula!
Roman Ruins
Like every town and city in Croatia, the ‘Old Town’ has ancient architecture dating back to the days of the Romans and before. The history that has walked these streets is breathtaking, and the region has done so well to preserve the structures and atmosphere of its rich past.
The following are some paid and unpaid attractions to get a taste of the city’s history.
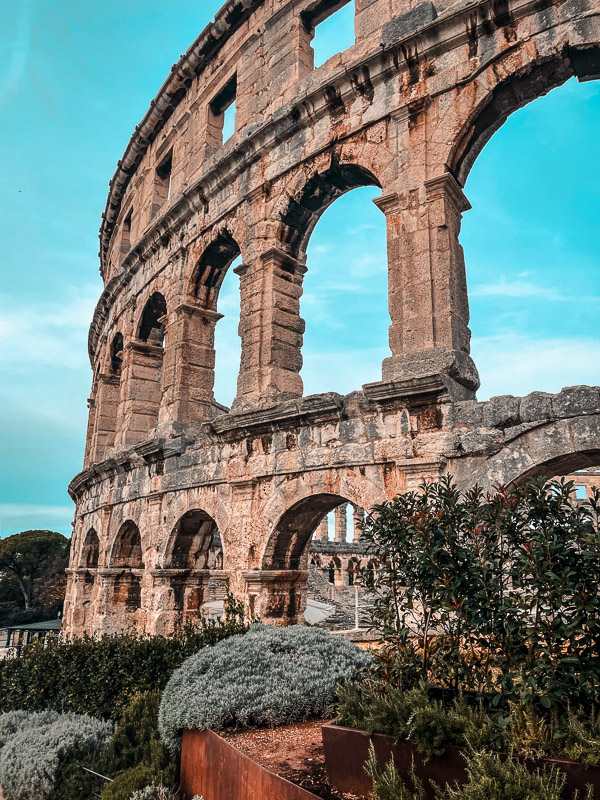
Pula Arena
Pula, Croatia is home to one of the most well-preserved Roman Arenas in the world, and arguably one of the best things to do in Pula! Built in 1 AD, this arena has seen centuries of bloodshed and battles and is still used today where it hosts concerts, the Pula Film Festival, sporting events, and more!
The magnificence of this arena can be experienced from the outside, with the ability to walk 360 degrees around the perimeter. Seated right near the main harbor, this is a must-see destination in Pula!
Cost: €10 for adults, €5 for students and children * Included in Pula Tourist Card
Source - History Hit
Fortress Kastel (Pula Castle)
Built on top of a hill in the old town, the Pula Castle has a great vantage point for travelers to explore the city views and rich history that lies within the walls.
The fortress was constructed by the Venetians in the 17th century, and today it is home to the Historical and Maritime Museum of Istria. The fortress can be walked around the outside, where you’ll also get a glimpse of the Roman Amphitheater, and still get a taste of its impressive size and unique shape.
On your winding walk down from the castle, stop by Jupiter Pizza for what I can personally confirm as the best pizza in town!
Cost: €2.70 entry tickets * Included in Pula Tourist Card
Zerostrasse
Directly under Fortress Kastel, there is a series of tunnels that were used as a bomb shelter during the First World War.
Constructed by the Austro-Hungarian empire, these tunnels have 4 entrances that link the city into this underground 2.5 miles of tunnels. Today the tunnels host signs walking you through the history of this underground world, and occasionally there are some other events held inside!
* Included in Pula Tourist Card
Check out @PulaNightLife on social media for any events or music shows happening inside the Zerostrasse tunnels!
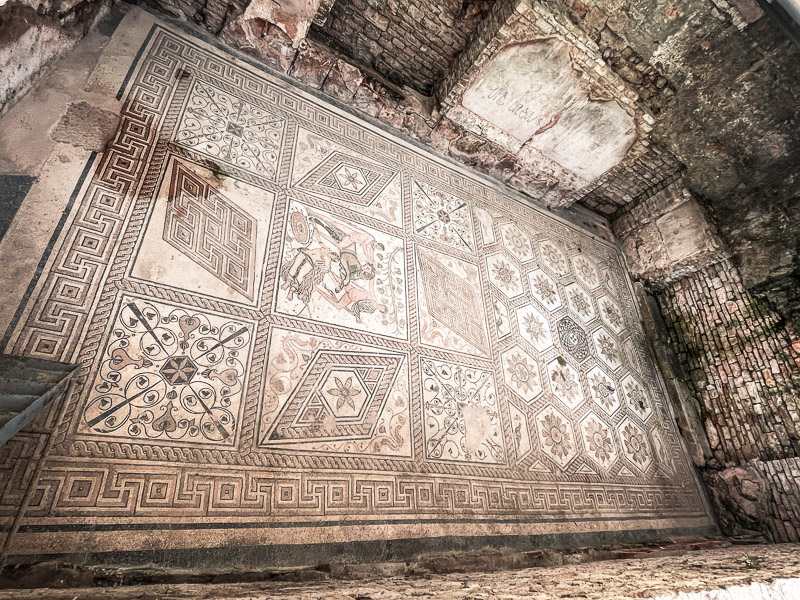
Roman Mosaic
The Roman Mosaic isn’t an excursion per se, but it’s definitely a fun thing to seek out in the city as you explore the weaving streets, alleys, and staircases that connect the Old Town.
Explore the city streets and find the authentic remnants of the rule of the Roman Empire. They’re a bit tricky to find, but amazing to see the craftsmanship that has lasted centuries.
The mosaic is totally free to see and a fun thing to add to your day of exploration!
Roman Mosaic in Pula
City Bike Ride
Around the city, you’ll see Tier-branded electric bikes and scooters available for rent for a crazy good price!
West of the Old Town, there is a network of paved, dirt, and gravel paths that will lead you to abandoned forts, coastline access, and incredible views in every direction. You can also see the well-known Galebijana Cave, but to fully explore it you’ll need to get into the water!
We loved that the bikes were electric because we felt we could ride around all day.
To rent them, you need to download the Tier Bike and Scooter apps, where you can track down their locations, the battery levels, your ride history, and pay for use.
There are plenty of parking areas in this area, which allows you to ditch the bike or scooter whenever you want to keep exploring!
Cost: €1.50 / 30 minutes
They have to be returned to a proper parking area shown on the map of the app, otherwise, you could incur a €26 fee!
Galebijana Sea Cave
Pula has an incredible sea cave that is so easy to get to, and when you go in the off-season you’re guaranteed to have the cave all to yourself! This was by far one of the best things to do in Pula.
The best ways to get there are by bike rental or sea kayak! Even in the off-season, sea kayaking is very comfortable and fun (maybe less so if you plan to get into the water)!
The Galebijana Sea Cave is easy to get to, and a must-see for anyone in Pula no matter the time of year.
We took a sea kayak, which cost €50 for a 2-person kayak and was worth every penny. In the off-season, contact Istria Kayak Tours via email at istriakayaktours@gmail.com, or by calling +385 098 802 349.
Pula Sea Cave
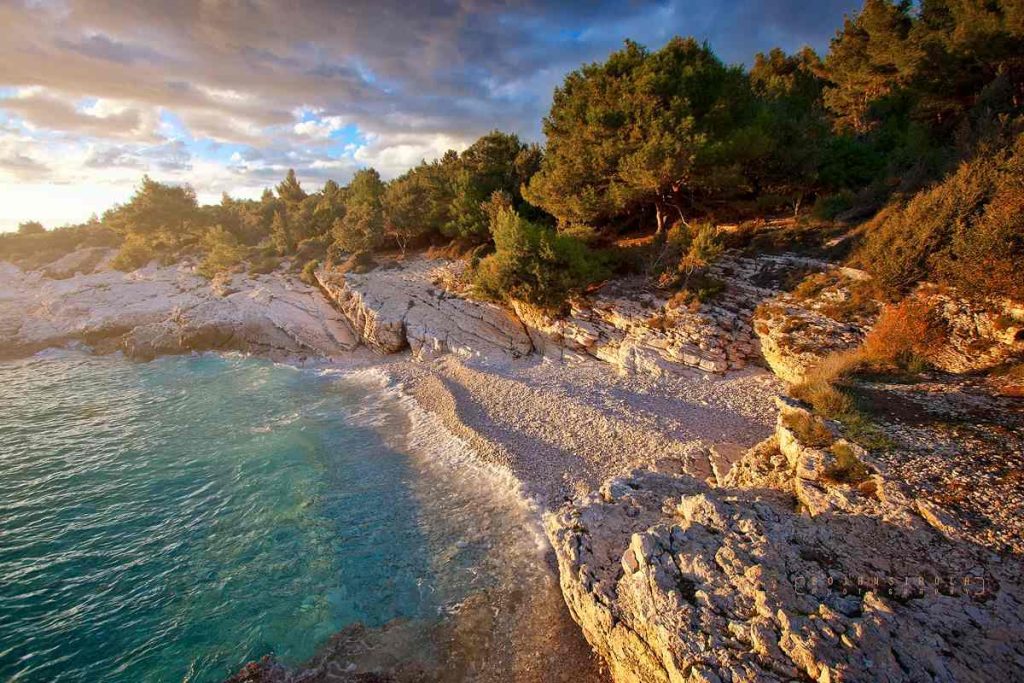
Beaches
Although you won’t find any white sand beaches around Pula, or any of Croatia for that matter, the beaches here offer a much different experience!
The rocky coast and limestone sea caves offer a more adventurous type of exploration. Be ready to dive into the water (safely, of course) to see what is waiting for you along the Istrian coast!
Lookout for 'FKK', a German word - Freikörperkultur (don't ask me how to pronounce it). This essentially translates to Free Body Culture, AKA, Nude Beach! These are common all around Europe!
Kamenjak
While not directly in Pula, the beaches on the Kamenjak Peninsula, including Safari Bar Kamenjak, are renowned for their natural beauty and unique features.
The Kamenjak Peninsula and Premantura Nature Park offer a variety of beaches with rocky cliffs, hidden coves, and crystal-clear waters.
The surrounding natural reserve provides opportunities for exploration, and the diverse beaches cater to different preferences, making Kamenjak a favorite for those seeking adventure and a connection with nature.
Image from Prementura.net
Havajsko Beach (Hawaii Beach)
Havajsko Beach offers a blend of pebbles and rocks, creating a picturesque setting closely resembling Hawaii, as the name suggests.
The clear waters are perfect for snorkeling, or just taking in the breathtaking views. The beach is relatively secluded, offering a more intimate experience away from the bustling crowds.
Be sure to explore around the Verudela area, and you can’t miss the Verudela Canyon, a favorite swimming spot!
Image from PulaCroatia.net
Pula Market
Exploring the Pula Market is a much when exploring the city. See how locals shop, sell, and purchase what they need from local vendors, one of the best things to do in Pula for a local experience.
Here, you will find fresh produce, meat, cheese, and items like clothing, and gifts. This is a bustling marketplace and a perfect spot to people-watch!
Even better is the building the market is located in. Although typically these types of markets are located outdoors, the Pula Market is in a 3-story century-old building, filled with local art, and natural light, and always busy with shoppers!
Open daily from 7 am – 2 pm, closed on Sunday, and always free to walk around!
The Pula Aquarium is a great way to experience the diverse aquatic life of the Adriatic Sea and inland freshwater ecosystems. It is located in the 130-year-old Austro-Hungarian Verudella Fort on the coast just south of Pula.
The Pula Aquarium is committed to the rich biodiversity of its natural heritage and is persistently working to rehabilitate and release endangered and at-risk species.
Normally I wouldn’t recommend animals in captivity, but the Pula Aquarium doubles as a wildlife rehabilitation location!
Cost: Entry is €17 for adults, and €13 for students and seniors. **Check out their website to find current discounts!
Brijuni National Park
Brijuni National Park is just off the northwest coast of Pula and hosts intriguing features and activities that will interest any traveler who passes through! The park is a bustling place to visit in the summer months with hotels on the island, a golf course, and many land and water tours.
Everything is accessible on foot, but if you’re not interested in walking a few miles to see it all there are bikes and golf carts available to rent! In the off-season, you’ll have a massive island to explore at your pace with so many things to see.
The park has so many things to do, including a Safari Park, exposed 130 million-year-old dinosaur footprints on the rocky beach, a 1,600-year-old Olive tree, picturesque ‘Pine Valley’, and miles of serene walking paths!
Cost: €22 for ferry to the island and National Park access + Additional €4 for the bus ride to Fažana
Getting to Brijuni National Park
To get there, first, you’ll need to take a 15-minute bus ride from Pula up to Fažana, a quaint coastal town just North of Pula.
Near the main harbor area, you’ll find the Brijuni National Park information center where you can purchase ferry tickets to get across to the main island. The ferry ticket also grants access to the National Park and all of the free excursions offered.
The ferry runs at specific times so be sure to check the timetable for the dates you wish to visit.
Istrian Food
Nothing brings you closer to a culture’s roots than through food. Especially with a region as old as Istria, explore the ancient methods of processing and preparing their cultural offerings with the locals themselves!
Olive Oil Tour
Participate in an olive oil tasting tour to learn about Istria’s renowned olive oil production. Learn how to incorporate it into your diet, read the labels, and sample the varying aromas.
There is no better place to experience the history and importance of Istria’s olive oil than at the ‘House of Istrian Olive Oil‘.
For only €15, get a tour of the process and an all-inclusive tasting. This tour lasts 50 minutes and can be longer for a more thorough experience!
Wine Tasting
Wine tasting anywhere is always a fun time, but when a region has been making wine for thousands of years, you can trust they know what they’re doing.
Wine tasting in Croatia is a must, especially in Istria where the majority of the country’s wine is made! Check around for any tastings and tours that suit your preferences, or include this as a day trip from Pula when you head further North into the heart of wine-country.
Cooking Class
There is no better way to experience the food of an area, than cooking it yourself! There are so many options for a cooking experience in Croatia, but it’s always best to find one that includes shopping for the local ingredients at the market, and always includes local wine 😉
The fun doesn’t stop there! Although this is a curated list of my top 14 suggestions, so much waits for you in and around Pula!
Rent a car and take a day trip from Pula – the best way to see the rest of Istria!
Or, check out some of the highest-rated tours in Pula.
Summary - Top 14 Things to Do In Pula, Croatia
Pula, Croatia is a must-visit for anyone visiting the coastal country on the Adriatic. The charming culture, cobble-stone streets, and Roman architecture leave you in awe. Not the mention the aqua-blue water with hidden gems tucked along the coast!
Pula is a must-see location, leaving the only question; what will you do first?!
Explore the other destinations waiting for you in Europe!
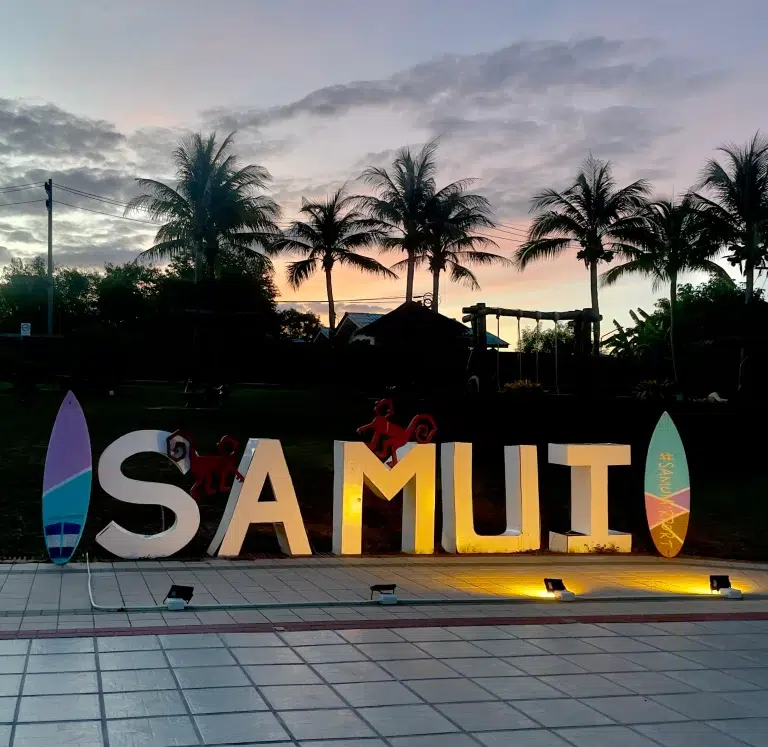
Planning your escape to the Gulf of Thailand? The first step of the journey is figuring out how to get to Koh Samui, the largest and most convenient of the archipelago, so you can hit the beach and start your tropical vacation!
In this guide, we’ll break down the different route options, cost estimates, and considerations, pros, and cons of each, so you can pick the plan that best suits you. Book your tickets directly from here and start your journey to the island paradise of Koh Samui!
Table of Contents
Getting to Koh Samui by Plane
For those prioritizing speed and convenience, flying is the most direct route to Koh Samui. Not to mention that the Koh Samui airport is possibly the most beautiful in the world!
Direct flights from Suvarnabhumi Airport (BKK) in Bangkok to Samui Airport (USM) take approximately 1 hour and 15 minutes. However, this convenience comes at a cost, with flight prices ranging from 3,000 to 6,000 Thai Baht.
It’s recommended to book your flight well in advance, especially during peak travel seasons, to secure the best deals! Learn the secrets of booking the cheapest flights!
Pros
Speed: The quickest way to reach Koh Samui so you can hit the beach ASAP!
Comfort: Direct flights provide convenience and comfort.
Airport: Koh Samui Airport is by far the most beautiful airport I’ve ever seen!
Cons
Cost: Generally more expensive compared to other options.
No Scenery: You will miss the beauty along the way that you get with a bus, train, or ferry.
Carbon Intensity: Flying is usually the least sustainable mode of transport.
Getting to Koh Samui by Ferry
For a more scenic route, ferry travel to Koh Samui offers a more adventurous journey. The main ferry terminal on Koh Samui – Nathon Pier – is centrally located on the west coast. However, there are a few ferry ports so double-check which one you will arrive at to coordinate your arrival!
While most ferries depart the mainland from Donsak Pier, 2 other options exist that may be ideal for your travels. Other ferry options depart from Surat Thani or Chumphon on the mainland, connecting to Nathon Pier in Koh Samui.
From Donsak Pier
Donsak Pier is the most common port to leave the mainland and ferry over to Koh Samui. Located in Surat Thani, 275 km northeast of Phuket, getting there may require a bus or train ride from a main city, so be sure to consider that into your cost!
The ferry ride itself takes anywhere between 45 minutes and 1.5 hours for 450-240 Baht. Typically the ferry runs 2x a day, mid-morning and mid-afternoon, so be sure to plan every leg of the journey with the other.
There are 3 main operators; Lomprayah, Donsak Raja, and Seatran. Not all of them operate year-round, and prices and speeds differ between them so be sure to check them all!
Use 12Go.Asia, or Bookaway to easily compare and find the best travel options for you!
Since getting to the pier may require some extra travel, I will briefly go over some ways to get there! Depending on where you’re coming from, you can choose between bus, train, or flight to Surat Thani
By BUS
Bus is the most common way to travel on land between cities in Thailand. No reservations are required in many cases, with different options for your ride to suit your preferences (VIP, A/C, standard). The best part, is the buses will take you directly to the Surat Thani ferry terminal, unlike the train and plane options below.
Bus from Bangkok – Surat Thani: 600-900 THB / 9-16 hours
Bus from Phuket – Surat Thani: 380 THB / 6 hours
Bus from Krabi – Surat Thani: 450 THB / 4 hours
By TRAIN
The train is a great way to see the countryside, with affordable options! This is great if you’re coming from Bangkok, and want to lock it in for a long ride down the coast. You can get a sleeper car for extra comfort, but be sure to book your ticket at least 5 days in advance!
Train from Bangkok – Surat Thani: 1,000 THB / 9-12 hours
By PLANE
If you don’t want to miss all the action on the ground, you can combine a flight to Surat Thani Airport and a ferry out to Koh Samui! Often, this is cheaper than flying directly to Koh Samui, although it does add some time to your travel. Consider the cost to bus from the airport to the ferry terminal + the ferry cost, to see if it outweighs flying directly to Koh Samui.
Pros
Scenery: You get to see Thailand’s beauty along the way!
Budget: Ferries are much more affordable than a flight, saving you money.
Carbon Intensity: A ferry is a more sustainable option than a flight.
Cons
Duration: Depending on where you’re coming from, this can be a much longer route.
Limited Ports: There are only 3 ports that operate between the mainland and Koh Samui, requiring a potential extra leg of travel to get there.
Transportation on Koh Samui
Upon arriving on the island, transportation options are abundant and affordable. Taxis, scooter rentals, and shared trucks, known as Songthaews, are readily available and great for exploring this tropical island.
Taxis are convenient for quick point-to-point travel, with costs ranging from 300 to 500 Thai Baht for short distances. Since flights and ferries arrive on the island at regular intervals, they are often waiting to pick up any travelers who have just arrived. Be sure to have some Thai Baht in cash on you so you’re ready to catch a ride!
Scooter rentals provide an eco-friendly and flexible means of exploration, most of which will require you to leave your passport with them. Scooter rentals are located all over the island, but you can also ask your host for some recommendations. Cars are also available, but much more expensive and less easy to navigate this mountainous island.
Songthaews offers shared rides with affordable fares. This is basically sitting on a bench in the back of a pick-up truck, but a great local experience to have, and usually very affordable!
Upon arrival on Koh Samui, be sure to ask your accommodation if transport is included for pickup from the airport or ferry terminal. Often, it is included in your stay, relatively affordable, or a great way to find a contact to have someone available to get you when you arrive!
Get an International Driver's Permit before leaving your home country so you're able to rent abroad with no problem, covered by insurance, and won't be extorted for money by local law enforcement!
Transportation to Koh Phangan & Koh Tao
Your journey in the Gulf of Thailand doesn’t have to stop at Koh Samui. Continue venturing north to the other 2 islands in this archipelago; Koh Phangan & Koh Tao. Since neither of these islands has an airport, Ferry is your only option to get there!
Koh Phangan is famous for its Full Moon Party, less-touristy atmosphere, and spiritual communities. My favorite destination in all of Thailand!
Koh Tao is an underwater paradise for snorkelers, scuba divers, and free divers. Although a much smaller and further island, don’t discount this little gem’s attraction!
Getting to Koh Samui offers a variety of choices catering to different preferences. Whether opting for the swiftness of air travel or taking the scenic journey by ferry, each mode comes with its own set of pros and cons.
Once on the island, the diverse transportation options ensure that exploring Koh Samui is not only convenient but also environmentally conscious. Consideration of the environmental impact, advance ticket booking, and embracing sustainable transportation practices collectively contribute to a well-rounded travel experience on this tropical haven.
Discover the hidden gems in the tropical archipelago of Koh Samui, Koh Phangan, Koh Tao – a two-week adventure designed for the budget-savvy adventurer.
From the lush waterfalls and spiritual retreats of Koh Samui to the vibrant markets, legendary parties, and tranquil beaches of Koh Phangan, and finally, the adventure-packed adventures beneath the waves and atop scenic viewpoints of Koh Tao, prepare for an unforgettable journey in the heart of the Gulf of Thailand. Embrace the charm, discover hidden gems, and immerse yourself in the magic of these tropical havens.
Table of Contents
Anything purchased through the links on this page helps me maintain this blog going. Thanks for supporting – Learn More.
Arrive In Koh Samui
Since this is the only island with an airport and the most direct access to the mainland, it’s easiest to start your travel in Koh Samui! Koh Samui is a popular tourist destination and relatively easy to get to from the mainland!
Koh Samui is the most touristy, and expensive, and has the least to offer of the 3 islands in my opinion – we are still talking pristine beaches, clear warm water, delicious Thai food, and vibrant exploration!
You can get to Koh Samui via ferry from the Raja Port, or via plane from any nearby airport including Bangkok and Phuket.
Day 1-2 - Koh Samui (West & South)
Na Muang Waterfall
Begin your island adventure at the enchanting Na Muang Waterfall on Koh Samui. A moderate hike through the lush jungle leads to the two-tiered cascade, surrounded by vibrant greenery.
Cost: 30 THB
Time: 2-3 hours.
Samui Elephant Sanctuary
Connect with majestic elephants ethically at Samui Elephant Sanctuary. Take a guided tour, providing an opportunity to feed and bathe these gentle giants while contributing to their conservation. You can volunteer to feed the animals, and learn about their rehabilitation process!
Cost: From 1,500 THB
Time: Half-day.
Not all animal experiences have ethical actions for the animal. Do not support places where: animals are forced or coerced into interacting, there is no education or conservation efforts, and if the animals are used for profit rather than awareness.
Get an unparalleled panoramic view of one of the best beaches in Koh Phangan – the crescent-shaped Bottle Beach. The viewpoint is accessible by a well-marked trail that winds through the lush jungle. Wear comfortable hiking shoes, and bring a camera to capture the breathtaking scenery from the viewpoint, and maybe you’ll be lucky enough to spot some monkeys overhead! This is a budget-friendly way to appreciate the natural beauty of Koh Phangan.
To continue to Bottle Beach, you can either continue the trek for a total 5-6 hour trip or head back to the lot and catch a lift for only 150 THB!
Cost: Free!
Time: 2-3 hours round trip
Thongsala Night Market
Immerse yourself in the vibrant Thongsala Night Market. Located in the island’s main port town, the market comes alive in the evening with a myriad of stalls offering everything from street food to handmade crafts. The market is free to explore, and prices for food and souvenirs are budget-friendly. Sample traditional Thai dishes, indulge in local delicacies, and soak in the lively atmosphere. Consider bringing a reusable bag for your purchases and an adventurous palate for trying new flavors.
Cost: Very affordable Time: 2-4 hours in the evening
Spiritual Escape in Srithanu
Indulge in the serene atmosphere of Srithanu with budget-friendly yoga classes. Drop-in classes start from 300 THB, offering a rejuvenating experience for the mind and body. Join experienced instructors in open-air studios surrounded by lush greenery. Bring comfortable clothing and an open mind for a session of relaxation and self-discovery. Experience an authentic Ecstatic Dance at Pyramid Yoga, or a healing sound bath at the Dome Sauna.
Cost: From 300 THB
Time: 2-6 hours
Thai Cooking Class
Explore Thai cuisine (my favorite) with a budget-friendly cooking class in Koh Phangan. Learn the art of Thai cuisine using fresh, local ingredients. Classes typically include hands-on instruction, a visit to a local market to source ingredients, and the joy of savoring your creations. Classes are suitable for all skill levels, and instructors provide insights into the rich culinary heritage of Thailand. We went to Muai’s Thai Traditional Cooking Academy and it was an incredible experience!
Cost: From 800 THB
Time: Half-day
Full Moon Party
Join the legendary Full Moon Party on Haad Rin Beach, an iconic monthly celebration that draws revelers from around the world. The party kicks into high gear during the full moon, transforming the beach into a pulsating dance floor. Entry is free, and drinks are available for purchase at various beach bars. Bring comfortable beachwear, dance under the moonlight, and immerse yourself in the electrifying atmosphere of this must-attend event. For budget-conscious travelers, it’s an unforgettable night of music, dancing, and vibrant energy.
Cost: Free entry, drinks available for purchase
Time: Nighttime festivities
Stay Safe! Stay out of the ocean for safety and hygiene (it becomes a toilet), wear shoes since there ends up being broken glass, and be aware of undercover cops selling drugs.
Haad Rin Rock Viewpoint
Hike to Haad Rin Rock Viewpoint for a mesmerizing perspective of Koh Phangan and the Gulf of Thailand. Accessible by a scenic trail, the viewpoint offers breathtaking vistas, especially during sunrise or sunset. The hike takes approximately 1-2 hours from a paved road, but you can get right to it on an off-road bike. Head to the lighthouse after the FMP to get a view from above!
Dive into the crystal-clear waters of Tanote Bay for an unforgettable snorkeling experience. Tanote Bay boasts vibrant coral reefs and an abundance of marine life. This is a common scuba dive location, but all of the beauty can be experienced from the surface! Pack sunscreen, a hat, and some extra cash for a fresh coconut after the water.
Cost: Snorkel gear rental around 200 THB
Time: Half-day
Scuba Dive Trip
Koh Tao is known as a prime destination for scuba diving. With the migration of Whale Sharks, unique topography, and vibrant reefs, diving here is unforgettable. Stop by Black Turtle Dive shop to check out their work in Coral Restoration projects and see how you can get involved!
Be sure to save a day to take a trip to the postcard-perfect Koh Nang Yuan. Boat trips start from 600 THB and typically include snorkeling, beach time, and a hike to the iconic viewpoint. The island’s pristine beaches and crystal-clear waters make it a must-visit destination for those seeking a slice of paradise. Budget-friendly and easily accessible, Koh Nang Yuan is a jewel in the Gulf of Thailand. Although it looks close and accessible by a kayak, the locals thought we were crazy for trying! If you do make it this way, be sure to let me know in the comments!
No matter which way you arrive on Koh Samui, it’s hard to miss the ‘Big Buddha’, which has become an icon of the island overseeing the ports and airports on the northern coast. Since this is an active Buddhist temple, entry is completely free, but visitors should be respectful of the customs while in this religious space. After exploring the temple’s grounds, head to any of the nearby shops and cafes to shop the local artisans or a refreshing drink!
Cost: Free
Time: 1-2 hours
Fisherman's Village
Discover the charm of Bophut Fisherman’s Village, where traditional Thai architecture meets modern boutiques and eateries. The village comes alive in the evening with a vibrant night market, while the day time offers peaceful and laidback living on the beach. The area is definitely well-maintained and nice, and the prices reflect that! So be aware that you’ll be paying US prices in this area since it does attract a wealthier crowd.
This comprehensive two-week itinerary invites budget-conscious travelers to savor the best of Koh Samui, Koh Phangan, and Koh Tao. From the serene waterfalls and cultural gems of Samui to the vibrant markets and nightlife of Phangan, and the thrilling adventures and underwater wonders of Tao, each island unfolds a unique chapter of the Thai archipelago. Embrace the diversity, relish every moment, and let this tropical odyssey create memories to last a lifetime.
Welcome to the ultimate guide to responsible diving in Koh Tao, where ocean enthusiasts and conservationists unite to explore the depths while preserving the underwater ecosystem. Whether you’re a seasoned diver or planning your first underwater adventure, this guide will equip you with the essential knowledge to enjoy this breathtaking destination responsibly.
In this article, we’ll dive into the importance of responsible diving practices, providing tips on minimizing your impact on the environment and protecting the marine life that calls Koh Tao home.
Learn about the initiatives taken by local organizations, the best dive operators promoting conservation efforts, and the must-see dive sites around the island. From coral restoration projects to marine life protection programs, find out how you can get involved and make a positive impact during your visit to Koh Tao.
Let’s dive in, explore the depths responsibly, and leave a legacy for future generations to continue enjoying this marine wonderland.
Table of Contents
Importance of Responsible Diving
The marine ecosystem in Koh Tao is a delicate balance of coral reefs, vibrant fish species, and other fascinating marine creatures. These coral reefs provide shelter and sustenance for countless species, contributing to the overall biodiversity of the area. Irresponsible diving, such as touching or damaging corals, can have severe consequences for this ecosystem.
Responsible divers play a vital role in protecting this underwater paradise. By following ethical diving guidelines and making eco-conscious choices, they minimize their environmental footprint. It’s not just about having a memorable dive; it’s about ensuring that future generations can enjoy the same beauty.
Responsible Dive Practices
Local Restrictions
Koh Tao has established specific regulations and guidelines to safeguard its marine environment. These include “no-touch” policies, preventing people in the water from touching marine life, restricted areas, and requirements for dive certifications.
Koh Tao also has a “no-fin policy“, limiting snorkelers’ ability to use fins to protect coral reefs! If you’re looking to just snorkel from the shore, keep this in mind as you will have limited swimming abilities.
PADI Conservation Specialities
PADI is a global leader in dive practices, with multiple specialized conservation programs. Explore Coral Reef Restoration, Dive Against Debris, and AWARE (Aquatic World Awareness, Responsibility, and Education).
To support the global efforts:
Never touch aquatic life!!
Reduce your waste on land to prevent it from ending up in the waterways
Support operators committed to responsible diving
Get involved and participate in conservation efforts
Before choosing a dive operator, do your homework. Look for dive centers with a strong environmental commitment. You can find online reviews and recommendations from responsible divers who have experienced these operators firsthand.
When inquiring with dive operators, ask about their equipment and practices. Do they prioritize sustainability? Are they involved in marine conservation initiatives? Selecting a dive center that shares your values is crucial.
Black Turtle Dive Center
If you’re interested in conservation diving, nothing compares to Black Turtle Dive Center. Located right near the main port of Koh Tao, the friendly staff is ready to greet any eager traveler to educate you about life under the sea.
Whether you’re here to take a course and expand your diving, or just want to go out with a fantastic team of passionate conservationists, Black Turtle dive center is the best on the island!
Located to the west of Koh Tao, Chumphon Pinnacle is renowned for its stunning coral formations and diverse marine life. It’s a popular site for spotting schools of barracuda, giant groupers, and reef sharks. Conservation efforts here have focused on preserving the delicate coral structures and protecting the marine inhabitants.
*Advanced Open Water Certification Required
Sail Rock
Positioned between Koh Tao and Koh Phangan, Sail Rock is a vertical pinnacle that attracts divers and underwater photographers. Here, you can witness the remarkable chimney swim-through and potentially encounter schools of chevron barracuda and whale sharks during certain seasons. While Sail Rock remains a hot spot for divers, responsible operators have been proactive in preventing overcrowding and damage to the site.
Hin Wong Pinnacle
Hin Wong Pinnacle is ideal for divers seeking underwater landscapes adorned with massive boulders, gorgonian sea fans, and colorful soft corals. It’s a location where you can explore swim-throughs and observe various species of fish and marine creatures. Conservation initiatives in this area aim to protect the diverse marine ecosystem and coral formations.
White Rock
White Rock is suitable for divers of all levels, with its shallow areas teeming with marine life. You can encounter clownfish, moray eels, and schools of snappers. While it’s a site appreciated for its accessibility, responsible divers are encouraged to respect the marine environment and refrain from disturbing the delicate coral formations.
Japanese Gardens
Located in shallow waters, Japanese Gardens is perfect for snorkelers and novice divers. The site is named after its resemblance to a tranquil Japanese garden, with intricate coral structures and colorful fish. Conservation actions aim to protect the site’s beauty and ensure the ongoing health of the coral and marine life.
Marine Conservation Efforts
While Koh Tao is a stunning dive destination, it faces several conservation concerns. Overcrowding, coral bleaching, and marine pollution are significant issues. The increasing number of divers and tourists can lead to physical damage to corals and overfeeding of fish, disturbing the ecological balance. In 2019, Thailand enacted the “Marine and Coastal Resources Act,” aimed at protecting and restoring its marine ecosystems. This includes stricter regulations on fishing practices and marine pollution. In Koh Tao, these efforts are reflected in the numerous marine conservation initiatives and projects led by both local and international organizations.
Save Koh Tao
Organizations like “Save Koh Tao” have taken the lead in coral restoration efforts and marine life preservation. Volunteers, including divers, participate in activities such as coral planting, reef monitoring, and underwater clean-up initiatives. Sustainable dive operators and conservationists collaborate to ensure the long-term health of Koh Tao’s underwater environment.
Summary - Ultimate Guide to Responsible Diving in Koh Tao
Responsible diving in Koh Tao is not just a choice; it’s an obligation. The positive impact of responsible diving is evident in the preservation of Koh Tao’s natural beauty. By embracing sustainable dive practices and supporting marine conservation efforts, we can ensure that this underwater paradise remains a sanctuary for divers and marine life alike.
Welcome to Singapore, a kaleidoscope of culture, nature, and innovation! If you’re lucky enough to have a few extra hours to spend in Singapore during a long layover, this guide is for you. The best part is – you don’t even need to leave the airport for the best adventures (well you don’t need to go far anyways). The Changi Airport is a perfect representation of how architecture is inspired by art and a showcase of how innovative and creative the Singapore style is. Check out this Singapore Itinerary for anyone with a long layover!
Let’s dive into the best ways to spend your long layover in the best airport in the world, complete with specific attractions, ideal sleeping locations, and free airport excursions.
Table of Contents
No matter which terminal you arrive at, or what time of day, this itinerary can be sliced and diced however works best for you! Transportation between terminals is completely free on the Airport Rail and can be reached via walking. Take what you want and leave out the rest to create the perfect day of exploration for you!
Keep reading to find out about the FREE Singapore Tours, a list of the best excursions by terminal,and info about navigating the airport!
Free Singapore Tour
For those looking to get out of the airport and explore, Changi offers FREE tours of the city! All tours take 2.5 hours, and attendees must be present 75 minutes prior to the tour start time to ensure a timely tour for all participants. This is available for anyone with a layover between 5.5 hours-24 hours, and a ‘Singapore Arrival Card‘ must be filled out. See the following table to ensure the reporting and returning times work for your travel itinerary!
Experience what it feels like to live as a Singaporean, through an exploration of the charming east side of Singapore, away from the hustle and bustle of the city. This is great for people who have seen the main sites already or those that prefer a more authentic local experience.
The first stop is at Tampines New Town, which received the UN World Habitat Award for its high-quality affordable housing. You’ll then make your way to the Tampines Central Park to enjoy the green social space and some uniquely designed playgrounds! The third stop on this tour is at the Our Tampines Hub, the largest community and lifestyle hub in Singapore! Make your way to the Changi Village, a popular recreational hub with plenty of Hawker stalls and quiet village walks. Finally, the tour stops by Changi Beach Park where you will enjoy pristine white beaches and a serenity rarely found in this bustling city.
See the modern side of Singapore, catching all of the iconic highlights. Get a photo of the Merlion against the city skyline and marvel at the magical, Avatar-like Supertrees at Gardens by the Bay. Almost every picture you’ve ever seen of the famous city of Singapore will be seen on this tour!
The tour starts at City Hall, where you’ll see the famous Raffles Hotel (home of the Singapore Sling), as well as St. Andrew’s Cathedral. You’ll then make your way to the Civic District where you can see the distinction between old national monuments against the modern skyscrapers in the Central Business District. Walk across the Jubilee Bridge for a spectacular view of Marina Bay, as you head towards the Merlion Statue – Singapore’s icon! Enjoy the sun at Merlion Park, as you learn about Singapore’s history in trade and fisheries. In the distance, you’ll see the Gardens by the Bay, a Singapore icon (the constructed trees that make you feel like you’re in the Avatar world of Pandora). If you’re lucky enough to take the tour at night, you’ll get to watch this area come to life with lights and colors! Before returning to the airport, the tour concludes with Marina Bay Sands, a convention center that hosts over 200 luxury outlets, a Skypark, and incredible rooftop views of the city!
Step into a multi-dimensional destination combining retail, dining, and attractions, and immerse in a lush green sanctuary through this 2.5-hour walking tour.
This tour starts in Terminal 3, where visitors will get a chance to see the Changi Control Tower which is at the heart of the airfield operations, allowing the airport to be a central hub for eastern travel. Next, you’ll hop onto a train and venture into the Jewel to take in the serenity of the Shiseido Forest Valley – where mist-covered lush greenery bathes in the filtered light. Central to it all, is the HSBC Rain Vortex – the icon of all of Changi and the tallest indoor waterfall in the world! Explore some of the foreign and local heritage brands in the 6 story shopping plaza, and find your way to the Changi Experience Studio – a digital attraction that allows you to immerse yourself in games and the world of aviation. The tour concludes after a trip to the Canopy Park, located on the top floor of the Jewel.
*Admission to Canopy Park is included in the tour, with discounts available to the individual attractions in Canopy Park & Experience Studio.
Discover Singapore’s colonial past and cultural heritage through a visit to the historic Civic District, Chinatown, and the picturesque Kampong Gelam.
The first stop is at Marina Bay, where iconic landmarks such as the Merlion and city landscape show the modernization of Singapore. The next stop is at the Central Business District, where the tour will feast on local (and very cheap) food from the famous Hawker stalls. Chinatown is just a short walk away, a destination you definitely can’t miss here! You will find iconic places of worship, shophouses, and street murals depicting the daily lives of local people. The Singapore River is where this nation’s economy grew from a small fishing region to the powerful trading center that it is today. The final stop on this tour is Kampong Gelam, a traditional neighborhood with strong Malaysian & Arabic influence – the street art is insane here!
* All tours except the Jewel Tour must accompany the group back to the airport. If you wish to explore longer than the 2.5-hour time slot, you must go out on your own!
Terminal 1
Water Lily Garden
The Water Lily Garden is the perfect destination to head towards to start the day. Nearby you’ll find a ton of local cuisine options, where you can get the local special; Kaya Toast & a Soft-Boiled Egg (try it, you may be surprised at how good it is!)
Grab the food to go and eat outside in the pleasant surroundings of a pond filled with water lilies, open 24 hours a day!
Cost: FREE
Discovery Garden
A perfect place to move your legs and get some fresh air – the Discovery Garden features a winding trail that takes you to different heights of the trees they encircle. Located on the second level of Terminal 1, this is a great place to pause and stroll through, especially since it’s open 24 hours a day!
Cost: FREE
Cactus Garden
When you’re ready for some fresh air, head to the upper floor in Terminal 1 and you’ll find the Cactus Garden – where succulents and cacti from around the world are ready to be explored! This is a great place to reset, it’s not every day that you find a state-of-the-art cactus garden in the middle of the tropics, or in an airport!
Cost: FREE
Rooftop Pool
For those of you that don’t want to walk all day, you may find yourself craving a lounge chair to kick back and relax while you wait for your next flight. There is no better place than the rooftop pool in Terminal 1, where you can hang out in a cabana with a book and a Singapore Sling, soaking up the sun (don’t forget your sunscreen!)
Cost: S$23
Terminal 2
Sunflower Garden
Located on the roof of Terminal 2, the sunflower garden is a great place to relax and reset before the next leg of your journey! Soak up the sun, read a book, or stretch your body in this floral paradise. Don’t skip this at night either – head to the rooftop to see a spectacular show of lights and colors, open 24 hours!
Cost: FREE
Enchanted Forest
The Enchanted Forest is a cute installment featuring impressive orchids and floral arrangements, a walking platform that leads to a little pond area, and nature-inspired art installations. You’ll notice the forest come to life as you walk through, thanks to the interactive exhibit that will make you feel like you’ve been transported to the world of Avatar.
Cost: FREE
Terminal 3
Butterfly Garden
Now, for my absolute favorite attraction at the Singapore airport; the Butterfly Garden. Walk into this creative space where butterflies get to feast on fresh fruit and flowers, drink water from a waterfall feature, and you can witness it all!
Cost: FREE
To get to the Butterfly Garden, you have to pass through a Hawker-style food court. Stop by and see what's on the menu for an authentic taste of Singapore!
Long Bar by Raffles
You have probably heard of the Singapore Sling – a refreshing blend of dry gin, cherry brandy, and lemon juice, created in 1915. The original location is located at the Raffles Hotel, but this local icon is available to you at the Long Bar. At the Raffles Hotel, you can get a Singapore Sling for around S$30 (insane), but they are complimentary for travelers right here in the airport!
Stop by between 3 pm – 11 pm, and get your first drink on the house!
Cost: FREE Singapore Sling Cocktail
Climbing Wall
There’s no better way to spend a layover than moving your body and getting on a climbing wall! Even if you’ve never done it before – there are package options for guided or un-guided sessions so you. can learn or play as you want.
Located in the basement of T3, open between 10:30 am-9:30 pm! For more info check out the Climb@T3 webpage.
Cost: S$19
Giant Slide
The Changi airport is home to the world’s tallest indoor slide, designed with kids & adults in mind, take the chance to zip down this 4-story slide!
*Located land side, meaning you will have to go through security to leave the airport
Jewel
The Jewel is an attraction that is visited by locals and travelers. However, since it is not on the air side of the airport, you must exit the airport by going through security and immigration. If you don’t have enough time to explore the Jewel fully, make sure to hop on the Skytrain connecting Terminal 2 and Terminal 3! This rail goes through the center of the Jewel, with an up-close view of the waterfall.
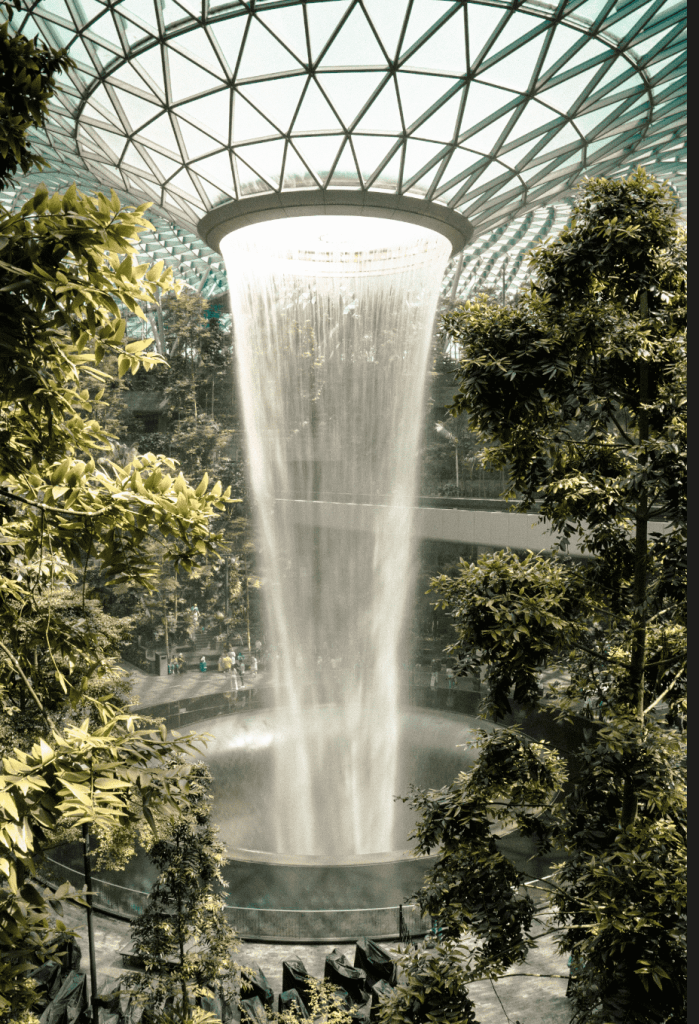
Rain Vortex
The main attraction of the Jewel is the HSBC Rain Vortex – a 40m tall waterfall that flows through the center of the roof straight down, 3 floors below the first floor. This spectacle is lit up in vibrant colors at night – an attraction everybody should see!
The best part is the central area of the Jewel where you can marvel at the waterfall is completely free to enter. There are seating areas and a walking path that encircles the dome building, so you can get a glimpse of the vortex from different heights and angles before checking out the rest of the attractions!
Canopy Bridge
Get the highest view of the Jewel & the Rain Vortex, by walking across the Canopy Bridge. The bridge is suspended 23 meters above the ground floor, with glass floors and the best vantage point! Open from 10 am – 10 pm daily.
Cost: S$14
Changi Experience Studio
Join this interactive exhibit where you can learn about the airport, play immersive games and so much more! This is where technology, education, and fun all come together to create an experience perfect for any traveler. Located on L4 of the Jewel complex, this studio is open throughout the week.
If you join the Free Singapore Tour – Jewel, you will receive exclusive discounts to the Changi Experience Studio & FREE entrance into Canopy Park!
Additional Attractions in the Jewel
Canopy Park Walk – Discovery Slides, Petal Garden, Foggy Bowls, Topiary Walk – S$8
Bouncing Net – L5 Canopy Park – S$25
Walking Net – L5 Canopy Park – S$19
Hedge Maze – L5 Canopy Park – S$14
Mirror Maze – L5 Canopy Park – S$19
Sleeping in Changi Airport
If you’re traveling on a budget, you likely haven’t booked a cozy hotel to get some rest. Luckily, Singapore has a lot of options for sleep to fit every traveler’s budget and travel style. Changi hosts rest zones, hotels, and lounges, and they used to have sleeping pods pre-COVID (not sure when/if they’re coming back)!
The best sleeping place for you will depend on which terminal you’re arriving at the airport from, and what time. The snooze zones fill up quickly, where sleepy passengers lounge in recliners. Check out the Lounge Buddy app to see what deals and offers are happening in the airports you’re traveling in!
We arrived at 11 pm, so all these areas were occupied. We wandered around a bit and found a quiet corner where we slept on the floor (we never travel without our eye masks & headphones)! Give yourself some time to explore and find the best spot for you!
For more specific details on seeping areas, head over to the expert – Sleeping in Airports.
Luggage Storage
If you have any bags that you don’t want to lug around with you in or outside of the airport, check out these luggage storage options! Anything can be stored for a cost between S$5-S$18, per 24 hours. There is a storage location in each of the 4 terminals, but during this writing, T2 & T4 are out of use!
Check out this Baggage Storage link for updates and exact locations!
Summary - Ultimate Singapore Itinerary - Long Layover
Too often the airports are a boring to-do that comes with travel. But when you find yourself in Changi with extra time to kill, you will be amazed at everything you can do! You can spend days here, and still not see it all while keeping your budget as low as you need to.
My favorite spots in Changi were sitting in the Jewel just watching the vortex, the Butterfly Garden, and taking the Skytrain to get up close to the falls. What things are you excited to explore in Singapore?
If you’re interested in breathtaking landscapes, friendly local people, and cheap prices, Bali should be at the top of your travel list. How do you even plan where to begin with so much available? Check out this Ultimate Itinerary for 2 weeks in Bali that will take you to the vastly different corners of Bali.
Create your perfect holiday with waterfalls, temples, local food, beaches, snorkeling, hiking, and meeting other travelers in this destination hotspot.
Cliff Side Views in Nusa Penida
Table of Contents
Have more than 2 weeks in Bali? Check out this list of the top eco-friendly activities in Bali to get more connected to the land and the people.
Anything purchased through the links on this page helps me maintain this blog going. Thanks for supporting – Learn More.
Arrive in Denpasar
The most straightforward and simple way to get to Bali is by flying into I Gusti Ngurah Airport. The airport is big but easy to navigate through immigration and out to the exit. Getting from the airport to your first destination depends on where you’re going. You will have 4 main options:
Driver Provided. Your first accommodation may provide an airport pick-up included in your nightly cost, or for an additional fee (always ask!).
Driver Hire. If they don’t you can hire a driver yourself through various ways online, or by asking your host if they have any driver contacts.
Taxi. Bluebird Taxi Group has a pretty good system set up in the airport, with a pre-fixed rate based on your destination. Taxi’s stick to the southern area closer to Denpasar, so you won’t get much further than Canggu or Ubud.
Walk to get a Grab / Gojek. Gojek and Grab drivers are not permitted to pick up passengers at the airport, but with just a 10-minute walk you can be off the property, and good to catch a ride to your stay.
Be prepared for your trip by setting up a data plan before your arrival. Check out these options so you can choose the best phone plan while abroad.
Day 1+2 - Canggu
Canggu is a bustling area northwest of Denpasar, filled with surfers, digital nomads, and more surfers. This area has definitely been a hotspot in recent years, with a ton of new and trendy restaurants, bars, and shopping! Canggu is a great place to land to start meeting some fellow travelers, and get to the beach to relax and ease into the new atmosphere.
Surf at Batu Balong
Canggu is the best place for surfers of all levels in Bali. On the main beach of Batu Balong, you’ll find dozens of booths offering 2-hour surf lessons to get you into the water and riding the waves in no time! While you can surf at any time, there are definitely better and worse times to give it a go. I suggest connecting with an instructor at least 1 day before, to set the best time based on the tides and the crowds.
Surfing lessons cost around 300k-350k IDR ($25 USD), but worth it for the 2-hour coaching lesson. We had an awesome instructor, who was also the owner of the Salty Shakas Bungalows where we stayed!
An absolute must-see in Canggu is the Tanah Lot Temple, only 25 minutes by motorbike up the coast and only 60.000 Rupiah to enter. This temple is built near a cliff side, making it appear to be on an island during high tide. Travelers are not permitted to enter the temple, unless they are a practicer of Hinduism and wearing traditional Bali clothing, however walking around the grounds is definitely worth it.
While at the Tanah Lot Temple, keep your eyes peeled for ‘Ular Suci – Holy Snake’. This is an experience you won’t want to miss! Inside this elusive cave, you’ll find a snake charmer sitting with holy snakes, that you can touch and make a wish. These snakes are venomous (Blue-Lipped Sea Krait), however, they have never bitten anyone!
Dusk at Tanah Lot Temple
Pasut Beach
One of the best beaches you’ve never heard of is a 40-minute bike ride up the coast, at Pasut Beach. If you need a break from the hustle of Canggu, get out to nature on this black-sand beach, where you can freely drive your motorbike, swim, and, actually relax. This is a hidden gem of the area, and a great getaway when you need one! There is a 2.000 Rupiah fee to enter the area, and a small stand selling local food, coconuts, and bintangs near the parking area.
Where To Stay In Canggu
Canggu is a town with trendy cafes, surfing, beach bars, and amazing food. It is a digital nomad hotspot, marketed toward younger Western travelers. It basically felt like San Diego if that’s your thing! If you want to be in the heart of it, stay near the beach – anywhere between Old Man’s restaurant and Finn’s Beach Club.
If you’re looking for something a bit quieter (and authentic), find a location that is a bit more inland along the rice terraces, or coastal heading northwest from Canggu (southeast is Seminyak – also very crowded and westernized). Canggu still has a lot of charm, you just have to go a bit more out of the way to find it.
Either way, it’s a great place to land after your flight to get your feet in the sand and start to get to know the Bali culture. The town is really well-connected, so with a motorbike or ride from Gojek or Grab, you can get anywhere in under 15 minutes!
* We stayed at the Salty Shakas Bamboo Stay and absolutely loved it. It was a place you could be social over a shot of arak, relax in your bungalow, take a swim, work, and more. Plus, get personal surf lessons with the owner!
Day 3+4+5 - Ubud
Depending on where you’re coming from, you may feel a bit jet-lagged, and Ubud is the perfect mix of relaxation and exploration, surrounded by the rainforest. Ubud is the “love” in “Eat, Pray, Love”, where you can explore your mind, healing, and spirituality through different avenues. But don’t let that fool you, Ubud is a place for adventurers too! Ubud’s central location on the island is also a great jumping-off point to explore somewhere for the day!
Ubud Monkey Forest
Located in the heart of Ubud, is the Sacred Monkey Forest, where Macaques roam around temples and ruins. While this is a classic tourist stop, it’s for a good reason. Where else can you stroll around a rainforest with hundreds of monkeys casually eating bananas and swimming?
These monkeys are very intelligent, so do be cautious with what you bring to the forest. They know how to open backpacks and pockets, and they really like jewelry, so be aware of what type of attention you’re attracting from the locals!
Entrance tickets cost 50.000 IDR, and can be purchased at the door. Get there at the opening to beat the crowds!
Yoga & Meditation
You will find yoga culture everywhere, which is great to try out a new style or go to your first class! If you’re a. veteran in the yoga world, go a bit off the beaten path, you will find a more authentic experience to connect with whatever you need! The Yoga Barn is famous for its unique and high-quality classes, and it’s where you’ll find the most popular Ecstatic Dance in Bali!
If you’re looking for a more local experience, my favorite place is Bali Swasthya, led by an Indonesian teacher. There is a spiritual allure in Bali, which led me to eventually get my 200 hour Yoga Teaching Certification in India! If you’re considering this in your journey, check out my experience and why I would definitely recommend to go to India!
Opening Ceremony offerings at Mimamsa Yogshala
Waterfalls
There are so many waterfalls to explore that are only a quick drive from Ubud! While the bigger waterfalls are further north, you can find lush tropical falls that are perfect for a swim and to get that Instagram shot. While these falls do get crowded since they are closer to the main areas if you go earlier in the morning you can avoid most crowds! Check out the best waterfalls in Ubud, a perfect way to refresh from the jungle heat.
Tegallalang Rice Terraces
One of the main attractions in Bali, the Tegallalang Rice Terraces is just 20 minutes by motorbike north of Central Ubud. This is where you can get your photo taken in those iconic swings, or just meander along the impressive terrace walls. You will likely get stopped for a 10.000 Rupiah entrance fee for the maintenance of the fields, and once you’re in you’ll be funneled to a stand where you’re urged to purchase a drink for $1 to support the farmers. Have some extra cash on you!
Tegallalang gets extremely crowded, but you can avoid the crowds and go for sunrise! Also, if you're really looking to escape the crowds, head just a few hundred meters north to the Abian Desa Rice Terrace.
Dancing in the rice fields in Bali
Where To Stay In Ubud
Ubud has a very congested center, located around Jl Raya Ubud, and extends south along Jl Monkey Forest. Where you stay can change your views on the area depending on your preferences. On these main streets, you may be checked into an idyllic zen guesthouse, but have the sounds of motorbikes and crowds in the background. It’s in the middle of the noise, so be prepared!
If your main focus is getting some peace and time for reflection, you’ll want to look a bit more on the outskirts of town. Ubud is surrounded by the jungle and rice fields, creating the perfect environment to reconnectwith nature.
If you’re looking for a little bit of both, I suggest looking near the Ubud Yoga House, where quiet shalas are tucked along rice paddies, and Ubud Center is only a short ride away. Motorbikes are great to have in Ubud, but the traffic congestion and way of driving aren’t for everyone. Plenty of Gojek’s, Grab’s, and taxi’s are available in the main areas. Check out everything you need to know about transportation in Bali.
Munduk is a lesser-known region in Bali, located west of the ‘twin lakes’. This area is a bit colder and less crowded than others in the best way possible. Unlike much of Bali, Munduk has retained its authentic charm, so you feel completely immersed in the culture and life there. Its removal from the main tourist areas in Bali, combined with its higher elevation has made this area one of the best for stargazing at night!
Waterfalls
Northern Bali is home to the most impressive waterfalls on the island. While you can definitely take the trip up from Canggu or Ubud, you’ll wish you stayed right in the heart of the area to explore as much as possible.
Let’s cut to the chase with the waterfalls. You see them everywhere online, but not all of them are how they appear. Of course, with dozens to choose from, there are some that are untouched gems hidden in the forest, and others that are filled with mini photoshoots followed by a lot of edits. I can’t speak for all of them, but do your research and ask travelers and locals which ones are worth the drive (and payment) to see!
Some of the most popular include Gitgit, Sekumpul, Banyumala Twins, and Aling-Aling. If you’re going for a photo shoot, get a local guide, they’re also the best photographers and hype men to capture your beauty!
Photo by @mattcognac
Twin Lakes & Ulun Danu Bratan Temple
Located in the caldera of an ancient volcano, the twin lakes of Bayun & Tamblingan offer a serene escape from the crowds of Bali. To further explore the area, rent a traditional wooden canoe and get a different perspective of the mountainous area.
Ulun Danu Bratan Temple is a must-see in the northern region and a highlight for many travelers, primarily for its unique location. The temple appears like it is floating on the water, as the land it was built upon protrudes from Lake Bayun’s shores.
The entrance fee to the temple is around 75,000 IDR. It is a picturesque photo spot, so be sure to beat the crowds for those early morning sunlit photos.
Coffee Plantations
Bali is known for its coffee and cocoa. If you have enough time in your schedule and you like coffee (who doesn’t?), seeing the creation from the start is an incredible experience. Many coffee plantations offer tours, tastings, and even unique experiences to get involved!
Maybe you’ve heard of the famous Bali Luwak Coffee, known to be the most expensive in the world. It’s exclusivity is due to the production process, where a Luwak animal eats the coffee beans, ~digests it~, and then is used for a perfect brew.
Where To Stay In Munduk
Munduk is a quiet area, and with a motorbike, you can get just about anywhere. This is a great place to not worry about what you’re near, but rather find the perfect space for you to have a peaceful time in the jungle. Since it is higher in elevation, the views from this area are top-tier, so keep that in mind when finding your perfect stay!
Amed is a quiet town in the far east of Bali, where lava flows meet the ocean and the sunrise kisses the coast. This is a less-traveled to location, but it is gaining popularity among tourists for good reason. There are many attractions in this area, so why not save some driving and stay for a bit to soak it all in!
I stayed here for 2 months, where I snorkeled every morning, and worked from the best cafes in Amed – all with insane Mount Agung views. Amed is one of my favorite places in all of Bali <3
Scuba Dive & Snorkel
One of the best dive sites is the Liberty Shipwreck, an American cargo ship that was sunken during WWII by Japan, and then carried into the sea during the Mount Agung eruption of 1962. This wreck is the host of aquatic life including coral, tropical fishes, turtles, rays, and even reef sharks!
While you can take a dive trip to this site from anywhere on the island, it’s about a 2-hour drive one way from Ubud and Canggu. By staying in town, you can explore Amed’s snorkeling spots and best reefs along the coast… a morning swim followed by a fresh coconut is a good life, trust me.
An Instagram icon, the Lempuyang Temple is a must-see for travelers with so much more to see than what’s online. The temple entrance is 30 minutes from Amed and has a perfectly framed view of Mount Agung, hence the western name of the “Gates of Heaven”.
The cost for entrance is 100.000 IDR, plus a 50.000 IDR shuttle ride to the entrance. The famous photo spot is in the first temple, just 5 minutes from the entrance. However, the grounds host 7 temple sites, and worth the exploration! It takes about 4 hours, so plan accordingly with water and sunscreen.
Since this is a Hindu temple, be mindful of your behavior – no drone photography, keep your shoulders and knees covered, and no PDA.
Mount Agung Trek
As of June 2023, Ascending Mount Agung is no longer permitted - A Response from direspectful tourist actions... Don't be "that guy"
The one thing you’ll notice while you’re in Amed is the massive volcano sitting back in the distance. That is Mount Agung, and for the adventurers out there, it’s definitely worth looking into a hike!
The trek takes about 10 hours round trip, starting around 11 pm so you can summit at sunrise, around 5:30 am. You can imagine the perfect sunrises in Amed, but now picture it from the highest point on the island at 3,031 meters. You must hire a guide for your safety, but it is well worth the money. By far one of my favorite things I did in Bali, and a travel bucket-list item.
Photo by @mattcognac
Where To Stay In Amed
Amed is a laid-back area that hugs the coastline, filled with divers, yogis, and locals. The town is built around steep rock ledges that create a mountainous landscape. The main area of Amed is located right next to Amed, but don’t expect anything like you experienced in Ubud or Canggu in this quiet town! Whether you’re looking for beach-front views or serene inland getaways, there is plenty of options around Amed.
Nusa Penida is a perfect island to explore within a few days. It is located off Bali’s southeast coast, with 2 main ports through Sanur or Padang Bai. The ferries have a limited schedule, varying costs, and destinations on Nusa Penida, so getting over will take a bit of research.
Planning the ferry can be a bit confusing. Chances are, your host at your accommodation and help you book your ticket, and give you any information you need to plan your trip! Once you arrive, plenty of people will ask you to rent one as soon as you step off the ferry! A fair price is about 300.000 Rupiah but definitely use your haggling skills.
Snorkel Manta Point
One of the highlights of Nusa Penida is the ability to swim with 5-meter (& completely safe) Manta Rays. This island hosts a reef that serves as a manta rays cleaning station! There is a symbiotic relationship between these ‘cleaner fish’ and larger aquatic life including Manta Rays to swim through and be cleaned of any bacteria and other little critters.
As with anything in nature, nothing is guaranteed to happen, and it is wild. While you may go out on a snorkeling trip, you may see 0 Manta Rays, while the day before you saw hundreds. It’s always a gamble to see a specific thing in nature – be patient!
Beaches
Nusa Penida is home to some of the most iconic beaches in Bali. The most famous (and popular) is Kelingking Beach, also known as ‘Cap de T-Rex’. This area costs an additional 25.000 Rupiah to enter, and it is madness with the number of people. The iconic photo spot is on the stairs descending down the cliff, but there will likely be people in all of your photos. You can venture down to the beach, but be warned.. it is definitely not easy. I consider myself an advanced hiker, but this route is steep, slippery, and takes about 30 minutes each way!
If you’re looking for an easier famous beach, then look no further than Atuh Beach. This is located on the southwest coast of the island, but definitely worth the drive. Atuh is located right next to Diamond Beach, but if you don’t have all day to explore, Atuh is way more worth the trek down. Diamond Beach is littered with trash (sad), very rocks, and compared to Atuh, it’s just okay.
Atuh Beach (mistaken for Diamond beach) in Nusa Penida
View of Kelingking Beach in Nusa Penida
Hidden Gems
While you’ve seen some of the iconic points from Nusa Penida, there are a lot of amazing places you haven’t heard of. These are amazing because there are fewer tourists, you can get an authentic taste of Nusa’s beauty and culture, and who doesn’t love an original experience?!
You have to make a stop at the natural springs at Guyangan Waterfall, where freshwater falls into the ocean and you can sit back and relax. Don’t let the stairs deter you, it is well worth the walk and completely free to visit if you have your own sarong (rental = 15.000 IDR).
Temeling Beach is another one that is easily missed, but this incredible spot takes you down a steep road where a forested spring opens up to the vastness of the ocean. The drive down is steep, which turns away a lot of tourists, but you can pay a local to drive your bike down for only 50.000 IDR!
Don't be fooled by Nusa Penida's size. It takes a lot more time than you realize to get around the island, due to the lake of connecting roads and steep terrain. Be sure to route-check your destination in Nusa Penida, to be sure you can fit everything in without rushing the journey!
* We stayed in the Treehouse View, located right at the top of the Guyangan Waterfall! The rooms were basic, but the view was incredible.
Day 13+14 - Uluwatu
Uluwatu (locally called “Ulu”) is the perfect place to end your trip, catch some of the best sunsets in Bali, and reflect on your travels before heading back to the airport. This area south of Denpasar has a relaxed surfer vibe, with incredible hidden gems. It can be a bit of a pricier area, so if you’re on a budget, look at menus ahead of time online to save!
Uluwatu Temple & Kecak Dance
A stay in Uluwatu would not be complete without stopping at the Uluwatu Temple (Pura Luhar Uluwatu). This 11th-century temple has major spiritual importance for the Bali Hindu people and boasts panoramic views of the steep coastline.
Entry is 50.000 IDR to explore the grounds and take in the ocean views. Every day at sunset, a group of local people put on the traditional Kecak Dance, which is a must-see in Bali!
Beaches
Ulu is built on top of 70-meter limestone cliffs, making the beaches a bit harder to come by without knowing where to go.
One of the most picturesque beaches is Suluban Beach, where connecting coves, surfing, and a shipwreck come together for a hidden escape. Padang-Padang is also a great beach, which first came to fame as it was featured in ‘Eat, Pray, Love’.
Nyang-Nyang Beach is a 1.5km stretch of white sand, that is a bit more difficult to reach. For committed travelers who aren’t afraid of a bit. of a steep climb, it is a beautiful beach with far fewer tourists!
Overtourism has drastically impacted Bali - many beaches, lookouts, and restaurants, and beaches have been closed, monetized, or changed ownership post-COVID. Check recent reviews and photos!
Sunset Viewpoints
As the furthest south point in Bali, the sunsets here are unmatched. No matter what your day looks like, you should definitely have a location in mind to watch the sunset on the horizon. The best part is you can view the sunset while floating in a pool with a Piña Colada, or basking in the impressive design of nature on a cliff-side.
For a natural location, check out the Karang Boma Cliff, located on the southwestern corner of the peninsula. This area is off the beaten track so you can take in the beauty of the colors, for only 10.000 IDR entry. Alternatively, you can go to the place that seems the best for sunset viewing: Sunset Point. Creatively named, this area has relaxed beanbags and simple drinks so you can sit back and chill.
If a beach bar is more your vibe, you have to check out Single Fin’s or El Kabron Cliff Club. However, these spots don’t come for free. You can expend a minimum spend to be upwards of 1-3 million IDR ($65-$200).
Where To Stay In Uluwatu
To be close to where all of the highlights are in Uluwatu, you’ll want to stay in the southwestern corner of a region called Pecatu. This area is definitely a bit pricier than any other region listed in Bali, so factor in that for your budget on accommodation and food.
Navigating across Bali’s rugged landscape is possible in a few ways depending on your comfort, cost, and baggage. I typically opt for a motorbike rental to navigate on the mainland of Bali. It is affordable, efficient, and so much easier to flow with traffic vs., a car or driver. The island was built for motorbikes (well, actually it was built for a horse-drawn cart), but definitely not the easiest for cars. Learn more about Everything To Know About Transportation In Bali
For longer drives where you may not feel comfortable driving or have too much baggage with you, a driver can be hired. Check Grab or Gojek in your area (but don’t rely on them, they are restricted in some areas). You can also use these apps to get a price idea of what you should be willing to pay.
If you’re in Ubud looking for a motorbike – contact Gusti If you’re in
Try renting a motorbike in Bali, split with a friend. This will cut the cost and emissions of using 2 bikes, or a car which just gets stuck in traffic! From Ubud - South, contact Gusti: In Amed: contact Made:
By the Sea
There are consistent ferry rides available to many islands including Nusa Penida, Nusa Lembongan, The Gili Islands, Lombok, Java, Komodo Island National Park, and more! There are multiple ports in all of the islands, so know which one you need to depart from for the best routes. I always go to Rome2Rio to get an idea of the cost, time, route, and timing of any transport, followed by some Google searches.
Have More than 2 Weeks in Bali?
Lucky you! That means you can take it reeaaal slow. You may enjoy simply adding a night or 2 to each of these destinations, so you can move at a slower pace and take in everything on your path! There are plenty of things to see in Bali that are not included in this itinerary, but check out what other eco-friendly activities there are in Bali.
There are also plenty of places to explore near Bali, including Java, the Gili Islands, Lombok, and Komodo Island! The world is big, just don’t spend all your time trying to get to the next spot.. enjoy where you are!
Now that you know where you’re going, check out this essential packing list for Bali, so you will be prepared for any adventure!
Explore the other destinations waiting for you in Asia!
Summary - 2 Weeks In Bali - The Ultimate Itinerary
If a trip to Bali is in your future, there are so many destinations and places to choose between it can be overwhelming! You’ve seen a ton about Bali on Instagram, both good and bad, so it is essential to know about the different areas before you go.
My top destinations to explore would be Munduk, Amed, and Nusa Penida, as these areas are not yet as Westernized as areas like Seminyak and Canggu. The best part about Bali for me is the charm of the local people, which can get lost under foreign investment and luxury holiday stays.
Renting a motorbike is also essential in Bali, so you can travel and your pace and wherever you want to go! Be sure to travel lightly, so your luggage doesn’t hold you back from taking in the beautiful surroundings.
Traveling opens the doors to new experiences, cultures and so much to learn! Nobody is saying that isn’t a super cool opportunity, but it can definitely be hard to choose what you want to do while exploring the world. Next time you’re in Bali, check out this list of the top eco-friendly activities in Bali.
Even if you’re a full-time traveler, our time is always limited and we will never be able to see it all. But how do you choose what you want to do with so many options? This list will help you organize your trip so you can spend your time and money where it matters most, so you can experience the best of Bali!
Table of Contents
Anything purchased through the links on this page helps me maintain this blog going. Thanks for supporting – Learn More.
What Is Eco-Tourism?
As people are getting more aware of their global impact, it is especially important to consider your choices while traveling. Eco-tourism is the conscious effort to prioritize the well-being of the local environment and economy. This includes decisions about activities, accommodations, transportation, and purchases made while traveling! By choosing options that focus on being in nature, and connected with the local culture, you will put your money and time where it is benefited most.
Watch Balinese natives perform mesmerizing Kecak dances complete with swirling flames and traditional costumes, all while the Uluwatu sun sets in the background, with this entrance ticket. This show sells out fast, so don’t wait on this one!
Explore the Sacred Monkey Forest Sanctuary in Ubud on a guided walking tour. Meet some monkeys and observe and learn how the concept of “Tri Hita Karana” is practiced to preserve the park.
Learn how to prepare authentic Balinese dishes at an organic farm in the tropics of Ubud. See the sights at the local market, then work with a chef to prepare a traditional or vegetarian lunch.
Swim with the majestic manta rays of Nusa Penida on an amazing snorkeling trip from Bali. Stop at the famous Manta Bay, discover Crystal Bay’s natural beauty, and go to Mangrove Point for the perfect snorkeling adventure in the Indian Ocean.
Get spectacular views of the mountains and forests of Bali with minimal effort on an exciting bike ride. Cycle from the slopes of the Kintamani volcano. Stop at the famous rice terraces.
Join a challenging Mount Agung hiking experience to witness a spectacular sunrise over 10,000 feet above sea level. Admire views of Mount Rinjani on Lombok Island and the Caldera Batur crater from the highest point in Bali!
Look for Komodo Dragons and other wildlife on a private 2-day tour of the Komodo islands. Go for a jungle trek in the habitat of the giant lizards, discover a beach of amazing pink sand, and spend the night on a boat.
Enjoy the serenity of the bountiful Gili Islands, featuring gorgeous white sandy beaches, turquoise crystal clear blue waters, and more turtles than you can count! Escape the crowds that gather on Nusa Penida, and experience this tropical oasis.
Gili Islands (North – East of Bali) 3 Days Rp 6,212,299
Experience Bromo and Ijen on a 2-day tour from Probolinggo. Witness the sunrise from Bromo Tengger Semeru National Park, hike to stunning viewpoints, and see the blue flames of Ijen’s sulfur mines.
Unsurprisingly, not all activities are created equally. Some are even harmful due to the over-tourism that is experienced, exploitation of the local people and environment, and destructive nature. This is a brief list of things to try to avoid while in Bali to maintain an eco-tourist mindset.
Your choices as a traveler can greatly impact the local area by bringing money and attention to what matters most. Read more about how to be an Eco-Friendly Traveler in Bali.
Mount Batur Trekking
One of the most beloved attractions in Bali is the Mount Batur sunrise trek. It is enjoyed by over 1,000 people per day! While this is an activity to get out in nature, this trail is extremely over-exploited. This is damaging to the soil, with many tourists using the mountain as a toilet and a garbage can (gross). Mount Batur is trekked by so many for its relative ease, but there are other options! If you’re not up for the hike of Mount Agung, check out Mount Abang located on Lake Batur as well!
ATV Tours
ATVs, 4-Wheelers, and Dirt Bikes are extremely damaging to the soil and trails on which they ride. Trails inevitably get wider from people avoiding holes and muddy puddles, wearing down the trail. While ATVs and other exploration vehicles are fun and easy to navigate through nature, they create one of the worst types of pollution; noise.
Bali has a breathtaking landscape, with locals working in the rice fields, Hindu ceremonies, and wild animals. The last thing anyone wants is to hear the roar of a pack of engines plowing through nature. If this is something you’re interested in, be mindful of where you ride! Or, look into other adventure activities like rafting, horse back riding, and cycling.
Elephant Experiences
There are a handful of places in central Bali that have rescued Sumatran elephants – critically endangered due to poaching. You will see every single place in Bali with elephants preaching their ‘ethical practices’… and then show photos of tourists riding on one. This is a clear example of the brainwashing that happens too often to tourists, providing a damaging experience that you don’t know any better!
Riding on an elephant can cause permanent spinal damage, as they are not capable of bearing the weight of a human. Please do a lot of research into an experience, and never just take their word that this is the ‘most ethical practice’!
Many of the Waterfalls
Bali is known for its impressive waterfalls in the dense rainforest. While you see many of these on Instagram, you don’t see the corruption that operates them. Many of the most popular waterfalls are controlled by a local mafia, which isn’t afraid to rough up a few tourists if you’re not willing to pay whatever they demand. Typically, this fee is requested in the parking area, ranging anywhere from Rp 60,000 – 200,000.
While I’m all for paying towards the upkeep and maintenance of an area, I’m not here to line people’s pockets. There are quite a few waterfalls that have a worthy system in place, but not all of them!
Summary - Eco-Friendly Activities in Bali
Bali is filled with activities and excursions for every traveler. Get lost (mentally, not physically) in the lush rainforest, vibrant culture, and hidden gems that cover this island paradise. Whether you only have a few days, or you’ll be in Bali for a few months, you will have the opportunity to create your perfect experience!
There are plenty of things to do in Bali in just a few hours, or a few days away. Start planning and get ready to immerse yourself in the exploration available to you in Bali!
Venice is a city that we’ve all heard of; the romantic Gondola rides through weaving canals, festive masks, art, and ancient tales about an underground order. There is so much to see in the historic city within just 24 hours in Venice!
Located in the Venetian Lagoon, Venice’s unique construction has replaced traditional roads and cars, with boats and canals.
Venice is a world-renowned city for its unique construction using shallow canals. It is romantic, beautiful, accessible, and has so much history for you to get a glimpse of in one day in Venice. Explore churches, basilicas, gardens, and beautiful viewpoints to take in this coastal city!
Check out my top suggestions for what to do & see in Venice, with helpful guidance on getting to the city and parking as well! Spend less time planning, and more time seeing with this guide on 24 hours in Venice.
Table of Contents
Know Before You Go
There are no cars or scooters, so there will be a lot of walking! Wear comfortable walking shoes.
There are stairs to cross over the canals, make sure everyone you’re traveling with is comfortable with a lot of stairs.
Venice experiences a lot of over-tourism. If you are planning to visit, go in non-peak times like the winter and weekdays.
Plan to arrive in the city early, parking and the streets fill up quickly.
Watch out for the seagulls! They will shamelessly steal food straight out of your mouth.
Check the conditions of the canals. If you’re planning a Gondola ride, look at the schedule of the tides & plan your ride during high tide.
As with any city, watch for pick-pocketers and stay safe!
Be respectful of the culture 🙂
Climate change has caused some major changes to the Venetian canals, and overtourism is making things worse. In recent years, the city has faced intense flooding, and this past year a drought has struck the area. Do your part to reduce your carbon footprint so world heritage sites like this can be maintained!
Venice Visitor Fee
The city of Canals will officially be imposing a tourist fee for daily visitors. All non-residents will be required to pay a €5 daily fee during peak travel times including summer months and weekends. This is their latest overtourism solution to help reduce the impact that excessive travelers cause in the city.
This is different from the Tourist Tax, which is required by all travelers staying in the city of Venice.
24 hours in Venice Must-Do's
Things to do if you have extra time
Parking Areas
Morning in Venice
If you are lucky to have some early-morning time to explore Venice before the crowds roll in during your 24 hours in Venice, use it well! Find yourself a nice cappuccino and croissant, and hit the city to explore. Since there are a few iconic sights that everyone hustles to get to, I suggest getting there early so you can enjoy them all without the crowds.
St. Mark's Square
The most iconic place in Venice is St. Mark’s Square. Here, you will be surrounded by historic buildings including St. Mark’s Basilica, Doge’s Palace, and the Procuratie Vecchie. By far the most popular, it is also the most crowded, especially in the afternoon. This is a perfect first stop during your 24 hours in Venice!
This serves as the religious, political, and social center in the city of Venice. Take some time to experience the grandeur.
Cost: FREE Time: 30 minutes
St. Mark's Square | Image from Viator
St. Mark's Basilica
The most notable building in Venice is St. Mark’s Basilica. Construction began in the 9th century and was continuously expanded over 8 centuries with impressive detail and accuracy. Access to the Basilica is FREE for an adult, with possible add-ons if you want to explore fully so I highly recommend it! Entrance lines can be over 45 minutes of a wait, but you can purchase ‘skip-the-line’ tickets for only €6 between April-November!
While in the Basilica, no photos or videos are permitted, audio guides must be through headphones, and appropriate clothing must be worn (no bare shoulders or shorts). The Basilica is open 9:30-17:15 Monday-Saturday, and Sunday is 2:00-17:15. The Basilica also houses the Pala d’Oro alter (€5) and a Museum (€7). The Basilica’s bell tower is also by extra ticket only, for €10 (*see below).
If you don’t want to spend the time and money to go inside the Basilica, you can still marvel at the artistic masterpiece from the front. Grab some gelato, sit back, and look in awe at the work done over generations to create the centerpiece of the city.
Located next to St. Mark’s Basilica on the waterfront, Doge’s Palace is another iconic destination in Venice. This palace was constructed with a unique Venetian Gothic style and used as the residence of the Doge (seat of the government). There have been centuries of history in these walls, which you can now explore in the Doge Palace Museum!
Take a quick peak at the Bridge of Sighs connecting the back of the Palace to an old prison!
*If you are doing Doge’s Palace & St. Mark’s Basilica, check out the combined tours to save!
Doge's Palace | Image form Viator
Giardini Reali Garden
Now that you’ve seen the best sights before the busy afternoon, take a moment to sit back in this serene garden and relax (and rest your legs, you’re not done yet)! A city this compactly built doesn’t have a ton of green space, so it’s nice to take it when you can!
While you’re letting some of that art and history sink in, you may start to feel your stomach grumbling ready for lunch. Check out the bottom of this article on some of my top recommendations for food in the city before you head off for some more exploring.
Near St. Mark’s Square, you’ll find medieval gardens lined with benches in the shade. This is a perfect place to sit down with a slice of pizza, do some planning, or sit back and listen to an audio tour of the area.
Afternoon in Venice
Rialto Bridge
The Rialto Bridge is the most notable bridge that spans the Central Canal. This is a great place to watch the boats come in from above, and it’s totally free! However I will say, this bridge is usually packed with tourists all trying to get the best photo.
In my opinion, the best photos are taken from the small bridges in the private narrow canals where you can see Venice in a more intimate setting, but with only 3 bridges crossing the Grand Canal, you’ll inevitably cross Rialto at some point within your 24 hours in Venice!
Rialto Bridge | Image from Viator
Gondola Ride
Now that you’ve seen the iconic gondolas in the canals, it’s time to check it out yourself. It is time to take a ride in the famous Gondola where you get serenaded by a local in a striped shirt, as you weave through the old city. You get many different perspectives of the city, and experience how the city was designed to be used – by boat!
Typically a gondola ride costs €80 for 40 minutes (€100 after 19:00). Be sure to agree on the cost and duration before getting into the boat! If you want your driver to sing, that will cost extra. There are places to book online in advance, which may be necessary for peak season, but in the off-season, you will see the gondoliers standing on the sidewalks waiting for someone to want a ride.
Cost: €80 Time: 45 minutes
T Fondoca Terrace
One of the best free attractions in Venice that you cannot miss out on! The T Fondoca Terrace is completely free of charge, but you cannot enter without a reservation, so make sure you plan!
Fondaco dei Tedeschi is a luxury retail area, that has an awesome opportunity to sightsee as well as shop! The terrace can be reached by a spiral staircase or an elevator making it accessible to everyone.
If you don’t mind spending a little bit of money for a unique experience, check out ‘Scala Contarini Del Bovolo’ below in the honorable mentions!
By this time in the day, you’ve seen a lot of the ‘main attractions’. But, in my opinion, the best of Venice lies within the smaller side streets that tourists usually pass over. Venice has some very well-known spots, some of which are on this list, but it’s always refreshing to get off the beaten trail a bit and see the city more authentically.
Take some time to explore local glass-blowing shops, a local claim to fame. Find yourself a classic Venetian mask and learn about the interesting history and people behind it, or check out the second-hand stores with one-of-a-kind gems! This city is filled with so much beauty and history, that you could fill your entire 24 hours in Venice by just wandering around.
Download a Venice walking audio tour from Voice Maps, and check out the other best travel apps to get the most out of your travels!
Evening in Venice
Sunset Cruise to Church of San Giorgio Maggiore
This is the only attraction listed here that you cannot access by walking, so no better way to explore it than a sunset cruise to the island! San Giorgio is an island to the south of the central part of Venice, which boasts a huge white church with a tempting black door. This is a great spot to go to escape the crowds and get off the beaten path.
Entry to the church is free, and you can go into the bell towers for €8 to get the best views! To get here, you’ll need to take the water bus or a water taxi.
Live Music @ Venice Jazz Club
The best part about having a whole 24 hours in Venice is being around for the night life. Venice hosts a vibrant jazz scene with many clubs around the city. Although I haven’t been myself, the Venice Jazz Club stands out as a fan favorite. Check out some of the upcoming performances so you can grab dinner and a show!
Performance at the Teatro la Fenice
If you’re a theater lover, then you can’t miss the chance to witness a performance at the Teatro la Fenice – a world-renowned performance hall. Here, you can find operas, ballets, orchestras, and concerts, all for a reasonable price! Although the theater isn’t my cup of tea, it’s always fun to join in on the local affairs!
Teatro La Fenice | Image from official website
Grab a drink at a Bacaro
A bacaro is a traditional Italian tavern with a laid-back atmosphere, small bites, and nice cocktails. It gives the feels of what it could have been like during the prohibition era, and it’s a great way to tap into the underground scene in Venice. Usually, there is a tasteful selection of live music, making it a perfect stopping point before going out for dinner!
Other Things To Do In Venice
The world is big and you will never see it all, so I am a huge proponent of seeing a few things fully! Since this is focused on just 24 hours in Venice, some awesome options were left off my list. However, they are still worth mentioning so you can plan your trip exactly how you want!
Bridge of Sighs. Cross the Ponte della Paglia bridge to get a glimpse at the eerie covered bridge where inmates used to walk.
St. Mark’s Campanile. Get unique views of the city from the top of the tower that stands in St. Mark’s Square, for only €10!
Scala Conarini Del Bovolo. Featured in the classic film, Othello, this funky spiral staircase feels like old Italy, accessible for only €8.
Libreria Acqua Alta. For any book lovers, this is a must-see. A library filled with quirky set-ups including books inside of boats and gondolas to protect them from the frequent flooding.
Glass Blowing Class. Venice is renowned for its glass arts. Get your hands involved and try it out for yourself, earning a self-made souvenir to take home with you!
Getting To Venice
The Old City of Venice is a car-free zone, leaving a few limited options to get into the city. You can either take a bus/train across the lagoon, park your car just outside the city, or take a boat from the mainland (but I don’t recommend that last option).
If you have 24 hours in Venice, try to find a parking location that offers rates by the day, since hourly prices will get pretty steep!
For more info on parking prices, check out Parkopedia.
Parking Inside the City
Piazzale Roma – the closest you can park, but it costs €4/hour and is limited to 1 hour, not leaving enough time to explore
Autorimessa Comunale – Parking garage just across Liberty Bridge costing €35/24-hours, limited to 2.2-meter tall vehicles
Garage San Marco – Various rates based on the length of stay (€20/5 hours, €32/10 hours, €45/24 hours). There are 2 lines for shorts vs long-term parking so be sure to get in the right line!
Park 280 (RECOMMENDED) – A little bit further to walk into the city but it only costs €4/hour, perfect for short-term visitors. Be aware: once you come to the entrance of this parking lot, if you don’t enter, you have to go back across Liberty Bridge… it happened to us 2 times!
Parking Outside the City
If you don’t want to risk not finding a spot across the Liberty Bridge in Old Venice, you will have plenty of options in Mestre on the mainland of Italy. Here you will find much more affordable options, with cheap and convenient public transport that will drop you off as close as you can get!
The best option is Venice City Park SRL at only €5.5/day, and is located right next to a bus stop! There are a ton of options around here, including Parcheggio via Righi Venezia and Park Petroli.
From Mestre, you can take either the bus or tram across the Liberty Bridge, with daily times available at the parking gate.
Summary - 24 Hours in Venice
Venice is a city of romance and unique architecture, with a medieval history (and the Illuminati, but you didn’t hear it from me). No matter what you may have seen in photos or heard in stories, this is a city that needs to be explored in person to get a feel for its beauty and impressive construction.
Even if you only have 24 hours in Venice, you can see a lot! With only a few hours, get a good parking spot that will give you the freedom to explore for as long as you want. Weave through the city towards Rialto Bridge, where you’ll get your first glimpse of the Grand Canal. Cross over the Bridge and check out the city from above at the T Fondaco terrace!
From here, make your way to the main attraction; St. Mark’s Square. Take some time here to sit and marvel at the beauty of the Basilica before you head inside!
Head towards the Grand Canal and find a restaurant where you can sit outside and watch the boats go by with a Cappuccino. And then, head down the nearest side street until you find a Gondolier to take you out on the boat!
If you want more than just 24 hours in Venice, find ways to take on more slow travel, so you can see the sights without racing through them!
Explore the other destinations waiting for you in Europe!
Any time in Barcelona will be time well spent. This city is filled with lively music, art, and history, sunsets over the Mediterranean, and a comfortable arid climate you can enjoy year-round. Check out all of the awesome things you can do and see in just one week in Barcelona!
This city has it all; world-class art museums, upbeat Spanish dancing, local seafood, and the friendliest people. This city is easy to travel to, easy to get around, and has so much to offer.
Check out what is waiting for you in the Catalan capital, with this guide to spending one week in Barcelona, Spain!
Table of Contents
When To Visit Barcelona
Barcelona is beautiful year-round, with a mild Mediterranean climate that allows for your favorite activities no matter the season. The major factor in determining the time of travel is the tourist crowds.
May-September is peak tourist season when summer vacationers fill the city and beaches.
January and February are the coldest months in Barcelona, and when the city experiences the lowest tourism. This isn’t a bad time to visit, but you may not fully enjoy a beach day or an outdoor adventure when it’s 40-50 degrees Fahrenheit (4-10 Celcius).
While October-December are decent times to visit, this is the rainy season in Barcelona, and the temperatures drop significantly after the peak of summer.
In the springtime, temperatures are warming up, nature is coming to life, and you’ll still beat the summer crowds and prices. That makes March-May the best time to visit Barcelona due to the low tourism, low prices, and fair weather that won’t negatively impact your vacation!
Where To Stay
Whether your style is a homey hostel filled with other foreign tourists, a hotel with a view, or an Airbnb in a neighborhood, Barcelona has options for every traveler. Since there are great options all around, the biggest decision is based on the neighborhood you want to be located in.
No matter where you stay, keep in mind the following things:
Check to see how far the nearest Metro Station is
Check the location on Google Maps street view
Be aware of the Barcelona Tourist Tax
Gothic Quarter
Characterized by tightly woven streets, with a Gothic style of architecture, the Gothic Quarter is a central location for sightseeing and events. This area is more on the busy & crowded side, so you can expect some noise as well as a lot of action! These streets which were once filled with medieval events, are now hosting trendy restaurants, bars, and shopping.
Eixample
Pronounced: “eye-shampla”, this neighborhood hosts broad courtyards and boulevards, where trees line the streets. This is a large neighborhood that extends from La Plaça d’Espanya, all the way to La Sagrada Familia! There are excellent food markets, dining and shopping options all in close walking distance to the city center.
El Raval
Directly west of the Gothic Quarter is El Raval, a vibrant neighborhood with authentic restaurants and amazing second-hand shopping. This area is known to have a bit more crime, so be aware of your surroundings, and avoid suspicious areas. Don’t walk alone at night and wear your bags in front of you, pick-pocketers are professionals here!
El Barceloneta
Located right by the water, El Barceloneta has a lively scene at night, amazing fresh seafood, and sandy beaches! This area can definitely get crowded, touristy, and expensive, so it’s best to explore more of the other areas for your daily exploration, but who doesn’t love a view of the ocean?
Poble Sec
One of the most lively areas in Barcelona is Poble Sec. Located near the Montjuic Castle & Fountains, Poble Sec is less-touristy, allowing you to have a more authentic experience. This area is filled with green spaces, and parks and is close to the water! I highly recommend checking out Poble Sec!
Barcelona Tourist Card
Like every major city, Barcelona has a card you can purchase to get major discounts to amenities and attractions across the city. Barcelona has 3 options, based on the amount of time the card is active for.
You can get a tourist card for 3 days (€48), 4 days (€58), or 5 days (€63), with discounts for children. Cards can be purchased on the website, and picked up upon arrival at any of the tourist offices listed here, including at the airport!
This card offers major discounts, including free public transport, free access to 24 museums and attractions (including Picasso Museum), as well as discounts to 33 attractions (including a few of Gaudi’s creations).
Rather than listing them all out, check out this massive list of discounts and savings below!
No matter what interests you, Barcelona has it all. History amidst impressive architecture. Beaches and natural sanctuaries. Incredible (and secret) bars, and some of the best food in Europe!
Regardless of the amount of time you have in Barcelona, you will most definitely never be bored in this bustling city of color and art. While you could spend months if not years exploring the vibrant and historical city, be sure to check out the best things to do in Barcelona!
Attractions
Things to see while exploring the city
Restaurants & Bars
Best places to eat and drink in the city
Day Trips
Best destinations that can be visited in a day trip from Barcelona
Attractions
1. La Sagrada Familia
La Sagrada Familia is Barcelona’s most famous and unique structure. It is often associated with renowned architect Antoni Gaudi, who transformed modern architecture with his unique style and ability to merge faith and nature in monumental ways.
Construction on this basilica first began in 1882, and it has been under continuous construction ever since! Plans for completion are estimated to be in 2026 after 5 generations have watched this temple be erected over the city of Barcelona.
The ticket includes entry, a downloadable audioguide, as well as the option to add on the ability to access the cathedral’s towers for an extra €10. Tickets must be bought online before your visit, with a designated time for arrival. The towers are steep and narrow to come down (you take a lift up), and must book that at a specific time as well. Pro tip: Try to get the towers booked for sunset for incredible city views!
Time: 2 hours Cost: €26 without towers, €36 with towers
Green Tip - Gaudi's biggest inspiration for his architectural creations is nature. While you explore his buildings, reflect on your connect to the Earth.
La Sagrada Familia Windows
La Sagrada de Familia Ceiling
2. Casa Batllo
La Sagrada Familia architect, Antoni Gaudi is also the mastermind behind Casa Batllo. This is an example of living architecture, where different areas feature a multitude of immersive experiences. Unlike La Sagrada Familia, Casa Batllo is more like a museum, where the art is the building’s creation.
Casa Batllo was designed around Gaudi’s primary inspiration; nature. The spaces are designed to invoke various emotions by the experiencer and amaze the senses.
You’d be right to think Gaudi’s creations didn’t stop there. Yet another of his impressive design is Casa Mila, only 5 minutes walk from Casa Batllo. This building’s most impressive feature is the self-supported facade of stone which can be enjoyed for free.
Declared a UNESCO World Heritage Site in 1984, it can be enjoyed in many different ways. There are 9 options to experience this architectural landmark, including a virtual tour, at sunrise before it opens to the public, or at night with a colorful show.
Yet ANOTHER Gaudi creation, Palace Güell was Gaudi’s first true commissioned structure for entrepreneur Eusebi Güell in the late 1800’s. This neo-gothic-styled building features a basement that feels like you’re in a castle and a funky rooftop with mosaic spires.
While this is an awesome attraction, that’s a lot of Gaudi! If you weren’t looking to do them all, I recommend that Güell be the first off your itinerary.
Time: 90 minutes – 2 hours Cost: €12, (discounts for students, people under 25, and over 65) *Barcelona Tourist Card: 25% discount
Note: Free admissions on the first Sunday of every month!
5. Catedral de Barcelona
Built in the 14th and 15th centuries, the Catedral de Barcelona is the seat of the Archbishop of Barcelona. This gothic cathedral is often overshadowed by La Sagrada Familia, but just as impressive, and of higher importance to the city.
Entry tickets will allow you access to the main temple, the cloister (an outdoor atrium featuring a pond and 13 geese), as well as the rooftops. For an additional fee, you can experience the rooftops at night to see the spectacular city skyline.
Catedral de Barcelona | Source: Italian Trip Abroad
6. Picasso Museum
Pablo Picasso was born in 1881 and lived for over 90 years. In that time, he created an estimated 13,000 paintings and 100,000 prints and engravings. Picasso has distinct eras in his artwork, including his ‘Blue Period’ which showcases art with a depressing undertone, as well as the self-created abstract style of cubism.
Over 4,250 of Picasso’s pieces live in this museum and are visited by millions every year. Take a walk through to halls and check out Picasso’s unique style and skill.
Time: 90 minutes – 2 hours Cost: €12, (discounts for students, people under 25, and over 65) *Barcelona Tourist Card: Free Entry + 50% discount on tour
*The Picasso Museum offers free entry on specific days, including every Thursday after 4 pm. For a full list of free dates of admission, click here.
7. Parc Güell
Named after Eusebi Güell (owner of Palau Güell above), this park features unique art pieces and over 20 hectares of protected landscape. The space is limited to 1,400 visitors/hour to avoid overcrowding, as this is one of Barcelona’s top attractions (so book your spot online!)
This park is also a UNESCO World Heritage Site, and fills up fast throughout the day so be sure to grab your tickets early ahead of time! There are large areas that are free to the public, however, the Monumental Zone is ticketed. Like many Barcelona attractions, there are days when you can access the fee area for free.
For free access, you can visit Parc Güell before or after when the ticket patrol is on the clock. This includes daily before 9:30, and after 20:00. This is even listed as an option on the main website, so it’s completely allowed!
Time: 2 hours Cost: €10
Tickets can be purchased at the park, but they fill up fast! Buy tickets online here.
Park Güell | Source: Viator
8. MUHBA Turo de la Rovia (Carmel Bunkers)
Located west of the city, these bunkers were constructed to defend the city during the Spanish Civil War. Boasting a 360 degree view, this is the perfect spot to take in the breadth of the city.
Enjoyed by many, this is the best place to catch a sunset, so grab a jacket and some wine, and head out to the bunkers early to watch the sun paint the sky. This area is accessible by bus, with an easy walk up a paved road!
Time: 2 hours Cost: FREE
Green Tip - The bunkers are the furthest attraction from the city center. Although taxi's here are cheap, look to take a public bus to cut down your fuel consumption!
9. Montjuic Fountain
A spectacular show of color, music and water is found at the Montjuic Fountains. This fountain show compares to the famous Bellagio fountains in Vegas, and runs at various times in the day depending on the season. Be aware, it is closed in January-February, but it is completely free to experience any time after that! Shows are in the evening, and favor weekend nights, but a full timetable can be found here.
Directly behind the fountain, there are stairs leading up to the National Art Museum of Calatonia with rotating exhibits. Tickets can be purchased at the door or online here.
Located near the fountain is Montjuic Castle, an old military fortress from the 15th century. Tickets are usually €9 but admission is free every Sunday after 3 p.m., and free all day on the first Sunday of the month! Regular events and showings are held at the castle, as well as stunning 360-degree views of Barcelona!
Montjuic Fountain & The National Art Museum | Source: Rove.me
Take A Day Trip Somewhere Else!
While you could definitely fill a week seeing all the sights in the city, sometimes it’s nice to escape the city’s hustle and explore nearby.
Popular day trips include taking a train up to the Abbey in the cliffs at Montserrat, a serene European experience in Girona, or a beach day in Sitges.
Mallorca and Menorca are also two awesome options if you have a few days to spare to get out to the islands!
Green Tip - Almost everywhere in Spain can be traveled to via public transport. Look at your options on a Train so you can sit back and enjoy the country views, while saving money and fuel on a rental car!
Summary - One Week In Barcelona, Spain
Depending on your interests, Barcelona has it all. While it may be a push to see everything on this list, not everything may be aligned with you!
I highly suggest visiting Barcelona before Peak Season, between March and April. I went in March and it was starting to get a bit crowded, I couldn’t imagine it in the summer!
If you’re looking for accommodation, check out Eixample or Poble Sec. These neighborhoods offer easy access to the top attractions, which also maintain Barcelona’s authentic charm.
There are plenty of museums to visit, but if museums aren’t your thing, I suggest Sagrada di Familia above the rest, and maybe next to the Picasso Museum. The Gaudi creations are listed in order of my priority suggestions.
Take the time to get outside, explore Parc Güell (in the morning before the crowds!), and definitely get up to the Carmel Bunkers for sunset. Walk along the wharf near Barceloneta Beach, but don’t eat here! The food is cheap in quality, but expensive in price.
If you don’t have the Dolomites on the top of your travel bucket list, that needs to change. The steep and jagged peaks are impressive all the time, but if you’re in the Dolomites in winter, you’ll experience the intensity of these mountains.
Exploring the Dolomites is a life changing experience that will bring you amazement with the beauty of our natural world. Whether you’re an avid sports enthusiast, into photography, or simply a nature lover the Dolomites have something for you. These mountain peaks and narrow valleys are filled with excitement and awe, that will leave you with a sense of amazement that a place like this is real.
The Dolomites are a specific set of 18 mountain peaks in the Alps mountain range that rise over 3,000 meters. The Dolomites are distinguished by their jagged peaks and sheer rock faces. There are icy glaciers, alpine meadows and it’s all a playground for outdoor sports. They were inscribed as a World Heritage Site in 2009, due to the unique landscape and geological features.
This area draws in thousands of people a year to take in their beauty and explore the peaks and valleys they create the dynamic landscape. Comprised of volcanic and dolomitic rock, the Dolomites span across the Italian provinces of Trento, Bolzano, Belluno, Verona, Vicenza, Udine, and Pordenone. This region is often called “Sudtyrol”, or South Tyrol.
The region is almost 142,000 hectares (350,000 acres), and has a relatively recent explorative history. Although the mountains formation began almost 250,000,000 years ago during the Triassic Period, when a coral reef covered the area in the ‘Tethys Ocean’. The mountains were first explored and documented by an Austrian geologist in 1860.
Since this time 160 years ago, many climbers, cyclists, photographers, skiers and geologists have explored the remnants of the ancient world.
Dolomites In Winter
The Dolomites are stunning any time of year, but there are some major advantages of visiting during the winter. During this time, there are less crowds so you can enjoy the best views all to yourself! It allows the natural beauty of the region to sink in, since you won’t have the influences and families impeding on nature in the summer.
The steep peaks don’t hold snow everywhere, so you’ll get the impression of how much vertical they have as snow covers the rest of the landscape.
The Dolomites can be accessed through public bus, train or bus tours, however this will be limiting. As much as I will forever be a proponent of public transport due to the carbon intensity of driving, you will miss out on a lot if you don’t drive and take control of your schedule.
That’s why we rented a Plug-In Hybrid Electric vehicle so we could reduce our emissions, but maintain the reliability of getting where we needed to go. A fully-electric vehicle would have been possible as many of the destinations had charging stations available!
Green Tip - If you're going to drive a personal vehicle around the Dolomites, opt for a low emissions vehicle like an all-electric, or a hybrid vehicle to reduce your carbon footprint while traveling.
1. Ski
The Dolomites are a skier’s paradise! Most of the ski areas in the region are covered with the same ticket; Dolomiti Superski. This includes 15 major ski resorts, over 1,200 km of slopes, and over 450 lifts, all for only €74.
This includes the most famous ski route which crosses through 4 major ski resorts; the Sellaronda. Named the ‘Best Ski Circuit in 2020’, this isn’t just one resort, but a circular track of 40 km that circulates the ‘Sella Group’ of Dolomite mountains. The resorts include Alta Badia, Val Gardena, Val di Fassa, and Arabba.
You can ski this circuit in either direction. Clockwise is a bit more diverse with less time spent on the lift, which is dictated by the orange signs. Counter-clockwise is more laid back and easy, which is dictated by the green signs.
You can purchase single-day passes for just 1 resort, but the price still comes in around €65 on average. There are discounts if you purchase multiple days at a time!
Although snowfall has been dramatically low the past few years across the Alps, there is high-quality man-made snow that covers the groomed runs, so you can explore the mountains and take in all the views! This does, however, limit the ability for backcountry/off-piste skiing. Check the conditions before booking your ticket!
*Tickets are always cheaper online – purchase ahead and save.
Cost: €74 Time: 8 hours
Sellaronda Map | Val Gardena Website
2. Church of Saint John
One of the most iconic images of the Dolomites, is taken at St. John’s church. A small structure situated in the center of an open field, with massive peaks in the backdrop. It is one of those areas that has become famous, so is worth stopping for that reason, but there are a lot of beautiful spots to take in the mountains that have a more unique vantage point!
Visiting in winter has the advantage of exploring the area freely, without payment. In summer the amount of tourists is extreme, so to protect the land there is a fence that keeps visitors far back. Entry is €4 and is enforced with a 1-way turnstile.
*Note: This is a no-drone area. Please respect this as it is in a very quiet community!
To get a better view up close, check out Treffpunkt Zans Restaurant only a 10-minute drive from the St. John church!
The Dolomites can fall victim to overtourism especially more recently with social media. Way to choose to travel in the off-season to help reduce the peak season influx - be a mindful traveler and reduce your impact with these over-tourism solutions.
Church of St. John
Treffpunk Zans Restaurant
3. Seceda Ridgeline
The mountains you see at St. John Church can be explored on foot (and skis as well)! This is up at Seceda Ridgeline, which is at the top of Seceda Ski Resort. It’s not a cheap ticket either way, so if you ski maybe it’s worth it to get a full day in while you’re there!
You can ski here for the day and stop at the top to take in the views or take a cable car up just for the views (€38). If you take a cable car up to the top for the views, be aware you will have to walk uphill on the ski run for about 1/4 mile. It’s not too steep, but if you struggle with walking in snow some microspikes would be a good thing to have.
The Cadini Group is the most dramatic part of the Dolomites (in my opinion). This range of jagged peaks is both beautiful and eerie as clouds roll over the snow-covered shards. You can see this group from a couple of places, but nothing compares to the iconic viewpoint.
It’s not too hard to get to the viewpoint in summer. There is a parking lot (Parcheggio Auronzo), which costs €30 to park at (if you can even find a spot), and then it’s about a 2-mile hike along the ridge.
However, in Winter, you need to be a bit more committed (it’s worth it)! The road is closed in the winter, so the furthest you can drive is to Chalet Lago Antorno. From there, you can either hike the 5.8 km to Rifugio Auronzo where the hike starts, or get a ride from the ‘Tre Cime Service’.
Snowmobile rides go up the base of Tre Cime, where the hike to Cadini di Misurina starts. The cost is €15 one-way or €30 round trip. At the top, you have the option for a ride back down on the snowcat, or you can use one of their toboggans to zip down the 5km track! The snowmobile rides run from 9:00 am to 3:45 pm, and you can check out their website for more info!
The hike itself should not be taken lightly. The viewpoint itself is inaccessible, but there are alternative spots nearby that get the same perspective. BE CAUTIOUS and don’t approach the end of a cliff when it is covered in snow!! There were not a lot of footprints when we went, for good reason. This is only advised for experienced hikers.
Cost: €30 for a snowmobile ride, OR free if you walk! Time: 2-5 hours
Cadini Group
5. Tre Cime
When you get up to the Cadini di Misurina hiking trail, you’re also at the base of Tre Cime! This is an iconic peak in the Dolomites, which literally caused a war!
If you’re really looking for an adventure, check out the Tre Cime Grotto, an intense hike that leads through a cave in the mountain with a unique perspective of the mountains.
However, there is an even better place to view them from, with a perfect viewpoint that highlights the 3 individual pillars. This is on route 51 that runs north from Cortina d’Ampezzo, where there is a free place to pull off and park to get a glimpse of the features.
Photo by Matt Hennessy
6. Cortina d'Ampezzo
You won’t be able to drive through the Dolomites without going through Cortina d’Ampezzo. This idyllic mountain town sits in the valley of incredible mountains, with views in every direction. It’s definitely on the higher end for cost, with a lot of luxury brands and expensive accommodation options for the ritzy tourists. But that should deter you from stopping!
There is a no-car area in the center of town, where you can walk around and get a bite to eat! This town held the Winter Olympics in 1956 and will be hosting the games again in the 2026 Olympics with Milan.
7. Passo Giau & Snake Road
You can’t miss driving over the Passo Giau mountain pass, in the southeastern region of the Dolomites region. This is a perfect spot to take in 360-degree views, or catch a sunset!
Passo Giau is a mountain pass that connects some winding mountain roads with the heart of the Dolomites at Cortina d’Ampezzo. If you’re coming from the South, you will instantly feel awe as you see the valley open up with peaks in every direction. And if you’re coming from the North, you will see your horizons open up as you reach the top of the valley.
There is a restaurant at the top, with decent food to stop and enjoy the scenery. However, I recommend heading down into Cortina d’Ampezzo and exploring the scenic mountain town.
Cost: FREE Time: 30 minutes
Passo Giau
Just North of Passo Giau heading into the valley of Cortina d’Ampezzo, you’ll hit another iconic photo spot. However, this one won’t jump out at you until you’re on top of it, because it’s a road. But this isn’t just any road, this spot perfectly zig-zags resembling a snake with symmetrical hair-pin turns.
You’ll go on a lot of sharp turns driving through these mountains, but if you have a drone, I highly suggest stopping to get a few shots of this satisfying spot as cars weave down the pass.
From here you can also pan up and fly close to Cinque Torre! Although it is not mentioned as a destination in this post, it is another iconic spot in the Dolomites.
Snake Road from above
8. Seiser alm / Alpe di Suisi
Seiser Alm is the largest alpine plateau in Europe. This area is a meadow of rolling hills, where wildflowers bloom in spring, and ski runs line the gradual slopes. But it’s not just any meadow, this meadow has the most dramatic backdrop of the dolomite mountains, making it a picturesque landscape for any nature lover.
The Seiser Alm region is the furthest west towards Bolzano, so even if you’re only passing through the area briefly, you can still get to the beauty of the Dolomites with a short amount of time.
This is also a great location for beginner level skiers!
Not Mentioned
The Dolomites are world-class, and there are so many destinations here to check out. Although I didn’t name all of the iconic spots, I wanted to at least mention a few more that didn’t make it on my top list! Hopefully, this will help you plan your trip to the Dolomites, and make the decision of what to do/see.
Lago di Braies (also called Pragser Wildsee) is a huge hit. In summer the turquoise water reflects a dramatic peak that sits on its southern edge, however, in the winter it was pretty underwhelming. Parking was expensive, and without the turquoise water, it was just a shaded frozen lake (sorry).
Cinque Torri is also a well-known spot in the Dolomites, near Passo Giau and Snake Road, however, we didn’t want to take the time away from anything else to stop by. It is a unique structure standing on its own, but it’s pretty small compared to some other peaks.
A lot of World War I history lies within these mountains. There are remnants of hideouts, bunkers, and more from the Great War, as the region (previously part of the Austro-Hungarian Empire) defended itself from the Italian Army.
Summary - Exploring the Dolomites In Winter
The Dolomites are a well-known region of the Alp mountains, that every outdoor adventurist and nature lover dreams of. The dramatic peaks loom over narrow valleys, where conifers and Austrian-style homes cover the land. Although the Dolomites can be explored throughout the year, there is no better time than in the peak of winter to take in the magnitude of their beauty.
This region is ideal for skiers, paragliders, cyclists, photographers, and literally everyone else. There is so much to do and see here, and I guarantee you will leave feeling a greater appreciation and connection to the world.
Hi there & welcome to everything slow travel and sustainability. I'm here to share my best tips and tricks to help you make your travel dreams a reality, so you can explore the world while leaving a positive impact on it.
To provide the best experiences, we use technologies like cookies to store and/or access device information. Consenting to these technologies will allow us to process data such as browsing behavior or unique IDs on this site. Not consenting or withdrawing consent, may adversely affect certain features and functions.
Functional
Always active
The technical storage or access is strictly necessary for the legitimate purpose of enabling the use of a specific service explicitly requested by the subscriber or user, or for the sole purpose of carrying out the transmission of a communication over an electronic communications network.
Preferences
The technical storage or access is necessary for the legitimate purpose of storing preferences that are not requested by the subscriber or user.
Statistics
The technical storage or access that is used exclusively for statistical purposes.The technical storage or access that is used exclusively for anonymous statistical purposes. Without a subpoena, voluntary compliance on the part of your Internet Service Provider, or additional records from a third party, information stored or retrieved for this purpose alone cannot usually be used to identify you.
Marketing
The technical storage or access is required to create user profiles to send advertising, or to track the user on a website or across several websites for similar marketing purposes.