Amed, Bali is quickly becoming a favorite destination in Bali, and once you’ve been, you understand why! This region sprawls along the eastern coast, offering a different experience, so learn about the different areas to stay in Amed!
No matter where you stay, you’ll get a tranquil blend of snorkeling, views, rice terraces, yoga, and the best part; the people.
If you’re looking for beach parties, extra trendy acai bowls (although there are some here), and surfing, check out the west coast in Canggu or Uluwatu! Amed is truly a gem, and I cannot wait to return one day…I hope the shark is still there.
Every purchase through these links keeps this blog alive and thriving—thank you for being an amazing supporter, and please support small, ethical, and local!✨ Learn More.
Pocket Guide to Amed
When I think of Amed...
I'm dripping with salt water on the beach, lost in the view of Mount Agung. One drink from a coconut before diving back in the water to swim alongside the fish, turtles, and jellies.
Where To Stay
Jemaluk (Best for first-timers and social bees)
Lipah Beach (Best for snorkeling and relaxation)
Selang (Best for luxury and privacy)
Tulumben (Best for diving)
When To Visit
April-October during dry season. Best underwater visibility and weather!
Things To Do
Swim or snorkel almost anywhere on the coast
Hike Mount Agung
Go fishing on a Jukung boat
Know Before You Go To Amed
You’ll definitely want a motorbike!! The area is pretty big, with beautiful drives into the mountains and lava fields, get yourself a bike so you can freely explore!
From what I’ve seen, there is a lot of construction in Amed! Ask your host about any nearby construction that may disrupt your stay (and also ask about roosters, there are TONS OF ROOSTERS!)
There is one main road that goes through Amed, and although it was only paved in 2023, the growth is happening!
Medical services are limited, and you’re quite far removed from western-level amenities.
If you're going to Amed, you better be trying to Snorkel. Check out the 5 Best Spots in Bali to Snorkel, and don't worry, you can rent fins and a mask on shore of all these places!
Getting to Amed
The only way into Amed is by driving, and all of the routes are incredibly beautiful. We landed in Denpasar, rented motorbikes from a friend in Ubud, and made the journey east along rice paddies and the salty coastline.
You can either drive yourself (highly recommend), or hire a driver for around $55 USD. Either way, you will want a motorbike in Amed… it is not very walkable (unless you’re on the main strip of Amed Beach), and being here is 10x better when you can just go with the flow.
From Denpasar – 2.5 hours From Ubud – 2.5 hours From Padang Bai – 1.5 hours From Kintamani – 2 hours
After 3+ months in Amed, we tried a lot of food! Since everything is so close, don’t miss the chance to try these delicious, local, and unique warungs/restaurants.
Balinese & Warungs
Galanga – unique bungalow seating with traditional balinese cuisine
Aroma de la Mer – great local food with insane views of Agung
Om Karma Cafe – peaceful open air with rice paddie views
One Way Espresso – award winning coffee drinks, but a bit overpriced
1. Amed Beach / Jemaluk
BEST FOR – first time visitors / short stays / social bees
While Amed refers to a pretty big region in Northeastern Bali, but the main hub is right hear in “Amed Village”, along Amed Beach and Jemaluk beach. While the beach itself is pretty coarse (coral reefs = shells!), there are some great warungs and shops along the waterfront, and some incredible snorkeling.
This area is also the most crowded, so if you’re looking for peace and relaxation, I wouldn’t suggest staying right in the middle of town!
We stayed at Aroma de la Mer, and loved it! It was right next to Blue Earth yoga, there were great views of Agung, and super affordable. Putu, the woman in charge, is a hardworking saint of a woman, and she will make you feel right at home.
2. Lipah Beach
BEST FOR – Snorkeling / Digital Nomad
This area is prime for leisure snorkeling and beach lounging. Arguably the nicest beach in the region, there’s also an average depth of 8-10 feet, featuring a coral farm (very cool to see up close, but don’t disturb), beautiful coral, and when I was there, a shark that lived under a coral shelf!
Roughly 10-15 minute drive Southeast from Amed Beach, it’s a bit quieter, more relaxing, and a perfect place to lounge and swim.
Selang is the most private area in Amed, with luxury and affordable resorts on the elevated coastline, and pristine snorkeling all to yourself! You’ll mostly find older couples, honeymooners, and well-off travelers in this area, so get ready for good food, and the luxuries of life to add to the insane views.
As one of the closest places to the Japanese Shipwreck dive site, it’s is a perfect location to easily access dive spots and the main town.
While Amed does extend along the coastline, I don't recommend staying further east than the Japanese Shipwreck unless you want a real authentic stay and removal from the main town.
We stayed at Relang Resort, and out of all of our travels, this was the only hotel we actually went back to! Manager Wayan is laid back and will welcome you in like family, while Buddhi the receptionist is an angel reincarnate. Highly recommend Selang Resort for amaging diving off the coast, an infiniti pool, and hosts that feels like family <3
4. Tulumben
BEST FOR – scuba and free diving / short stays
Arguably the best dive site off teh coast of Bali, the USAT Liberty is on every underwater explorer’s list. While you can get here for a dive trip from anywhere, you’re in for a long day (trust me, I did a day trip from Canggu and I was exhausted after 5 hours of driving + 4 hours of diving!)
If diving is your driving force, you have a lot of time on Bali, or you’re traveling around the whole island, it might be worth staying right off the coast in the shadows of Agung.
The USAT Liberty was torpedoed by Japan in WWII, and was beached in Tulamben to salvage materials. However, the 1963 eruption from Mount Agung carried the ship back into the ocean, where it's been resting ever since. Today, it is home to thousands of aquatic species, divers, and exploration. A beautiful reminder of death coming back to life, and that gods don't want our rusty war ships on their land.
We stayed at Hotel And Rooms Naha Port the night before flying out of Okinawa, and it was perfect. Their onsens opened at 6:00am, perfect for a pre-flight soak and relaxation. This hotel is unfortunately anti-tattoos, so be aware of this in case you have tattoos that cannot be covered without a bodysuit.
Summary - Where to Stay in Amed, Bali
When faced with the decision of where to stay in Amed, Bali, you really can’t go wrong. I’ve spent weeks in Jemeluk in the hub of it all, and weeks in the outskirts of Selang! While Amed is growing FAST, there is still such sacred, peaceful regions in Amed that haven’t been touched by western influence (yet), and it is so sweet to get to experience that, even if just for a few days.
So get to booking your stay, your dive trips, and make sure your camera is charged, you’re going to need it!
Looks like you’re lucky enough to be visiting Siem Reap – you’re going to love it! I only wish you had more time to explore, but you will love spending 4 days in Siem Reap. You can’t see it all, so take it slow and allow yourself to see things fully. Check out this guide on the things you can’t miss during your 4 days in Siem Reap–I promise you’ll see just enough to want to come back!
Angkor Wat from Above
Table of Contents
Is your time flexible and you're wondering if 4 days is enough? How many days should you spend in Siem Reap to get the most out of your trip? Find out here.
Pocket Guide to Siem Reap
When I think of Siem Reap...
I'm dripping sweat but brought to tears by the magnificent ancient history, and the horrific recent history.
Where To Stay
Near Pub Stree (Best for party people)
Wat Bo (Digital nomads & chill people)
French Quarter (Best for artsy accommodations)
When To Visit
March-April is brutally hot. If you can, go during Spring/Autumn Equinox for the Angkor alignment.
Things To Do
Explore the Angkor Complex (of course)
See how daring you are with street food
Cozy crafts and history at the Lotus Silk Farm
Hold a life-saving rat at APOPO Visitor Center
Every purchase through these links keeps this blog alive and thriving—thank you for being an amazing supporter, and please support small, ethical, and local!✨ Learn More.
Day 1 // Welcome to Siem Reap
Your arrival in Siem Reap has to start with a friendly tuk-tuk ride from your drop off points. The city is small, so use day 1 in Siem Reap to get familiar with it. Once you settle in, walk around and you’ll find arts, events and shops that pull you in.
Try some delicious street food, watch the impressive local artists, and shop around…and good luck to the young men dodging the constant ‘massage’ calls, the tables have turned. Walk through Pub Street as it comes alive just to take in the madness, but don’t be out too late! Day 2 is an early one…
Angkor Wat at Sunruse
Day 2 // Temple Time
Finally, the reason that brought you to Siem Reap – Angkor Wat ( and the massive complex). This day will take some preparation and planning, since there are a few ways to experience it, and all of them start at 4am!
There are 70 major temples in the 400 square km area, and over 1,000 sites in total. So it’s important to do some pre-research to determine which ones you want to see. You can’t miss Angkor Wat, Bayon Temple, and my favorite, Ta Prohm.
Get your tickets at least a day before to save yourselves some time in the morning. Tickets can be purchased online or in person off Aspara Road. Aim to get to a good spot at least 30 minutes before scheduled sunrise, it can definitely be crowded!
1-day = $37 | 3-day = $62 | 7-day = $72
Walking the Temple Roads near East Gate
Self Guided
My favorite way to explore the complex is on a solo-adventure, moving at your own pace, admiring in peace…but I did go 5 different days! If you have a motorbike or a bicycle, you can go in the complex at any time with a valid pass. However, you don’t get the history explanation and significance that you would with a guide, (unless you listen to the history with a podcast like I did).
The small circuit can be done in a half day or a full day tour, most easily booked through your accommodation. It is great for first timers, since it goes to all the “main” sites.
The Small Circuit loop, includes Angkor Wat, Angkor Thom, Bayon, Ta Prohm, and Phnom Bakheng. You can find tours that go at different paces with different style of travel (bikes, tuk-tuk, bus with A/C).
Large Circuit
If you’re buzzing off the ancient history and architecture here, then you won’t want to miss the hidden gems on the Large Circuit. This requires at least 1 full day, probably more, and
The full day tour hits the “Large Circuit”, everything you get in the small circuit + Preah Khan (one of my faves), Ta Som, East Mebon, and Pre Rup.
I didn’t do a full-day tour, but most of the people I knew who did, were absolutely exhausted after, granted it was 110F/40C. If you’re traveling in the hottest months of March-May, do yourself a favor and plan to break up the days!
If you still have some temple energy in you, you can go back in with the same ticket! Head to the Phnom Krom Viewpoint for sunset views. Or, get a 3-day pass and go again!
Tour guides know the best photo angles
Biking through the Gate of the Dead
Day 3 // Culture, Crafts, & History
Siem Reap is famous for the Angkor Complex, but the other historic and creative aspects of the city shouldn’t be overlooked – they will be hard to miss! From painting classes in the traditional style, Khmer ceramics class, Cambodian cooking classes, or understanding the brutal (recent) history, take time to really sink into an aspect of this rich culture.
One of my favorite things I did in Siem Reap, was go to the APOPO visitor center. I first heard of the nonprofit when someone explained it as a “rat retirement home”. Obviously I was excited, but it was so much more!
There, you’ll learn about the Khmer Rouge, and how they use trained rats to sniff out the landmines.
History + humanitarian nonprofit + big rats = a great day.
A HeroRAT at APOPO
The one regret I have from my time in Siem Reap is not going to the Lotus Silk Farm. Perfect for all ages, learn how to weave a silk scarf, make jewelry out of the lotus flower seeds, and enjoy the day surrounded by a picturesque lotus farm. Through this experience, you get beautiful DIY crafts to take home, plus you help the empowerment of local women and their heritage. Don’t skip out on this, you will be left regretting it like me!
Day 4 // Temples Take 2
From the first temple day, you’ll realize that you’re only scratching the surface. Especially if you’ve done a 1/2 day or self guided tour, you’ll be left wanting more!
If you did a full day tour and you’re more tempted by the other parts of the city, then take the day to explore. There is so much more to do here to immerse in the local culture, landscape, and food scene.
While there are a lot of things for tourists to do in Siem Reap, some leave the land and people worse than before. I suggest you avoid doing these things, for ethical reasons.
This is something you’ll feel silly for wondering, because once you arrive you’ll see just how many tuk-tuks there are, you’ll never struggle to find a ride! It can cost about $5 to get across the city in tuk-tuk. If you like your driver, feel free to ask for their WhatsApp number in case you ever need to call for a ride!
If you want a motorbike, there are plenty of places to rent them for about $20/day, but do be aware that police do look for tourists and have been known to be corrupt. If you’re renting a motorbike, be sure to have your international driver’s permit.
Reminder to never carry too much cash on you, it can be extorted.
Summary - Best Way to Spend 4 Days in Siem Reap, Cambodia
There is so much you could pack into 4 days in Siem Reap. Although the city itself is pretty tiny, you could go off in any direction and explore something magical. You won’t want to skip out on the temples. I suggest at least 1 full day there, I spent 5 half days and could have kept going back!
Don’t miss the APOPO center or the Lotus Silk Farm for a full appreciation of the local history, people, and culture for an unforgettable time in Siem Reap! As always, be sure to drive safe, trust your instincts, and respect local culture <3
If you’re lucky enough to find yourself in the Italian Dolomites in winter, then don’t skip the chance to hike within the rugged terrain of the Dolomiti. The snow and ice add another element to the exploration, but don’t let it stop you from getting to the regions most scenic trails and viewpoints (with some extra preparation of course). This is a list for every level for the best winter hiking in the Dolomites.
Hiking to the Secenda Ridgeline is a must-do in the Val Gardena area. Perfect for beginners thanks to the options of gondola that take you to the top. There are a few ways to access this spot, either from Ortisei at the Seceda Cable Car, or from Santa Cristina on the Col Raiser Gondola. In my opinion, the best way to see it is during your Dolomiti Superski day, since that pass allows you full access to the Val Gardena skiing area!
*This is based on access from Ortisei on the Seceda Cable car, but there are other access points and tons of trails up top to make it as long or as short as you want!
Another famous site in the Dolomites, Cinque Torri has beautiful views and unique WWI history for an added perspective on the region. You can either take a €25 chairlift ride up, or hike from the parking lot for more movement and savings. There are 2 chairlifts you can take up, depending if you’re on the northern or southern side of the mountains.
This serene lake is easily accessible, located on the western side of the Dolomites, just an hour East of Bolzano. This well-maintained trail is a well maintained area, with idyllic views of the lush pine forests and the alpine lakes.
Distance: 2.2 miles Elevation Gain: 436 feet Time: 1.5 hours Cost: €1/hour for parking Lago di Carezza AllTrails Map
Kareresee Lake | Image by Sudtirol
Biotopo Gran Palú - Alpe di Siusi
Alpe di Siusi – Seiser Alm – is a famously idyllic region in the Dolomites. Rolling hills speckled with massive houses, with a wall of high mountains as a backdrop. This entire area is fun to explore, but this loop is the perfect route to take in all of the beauty in this high-alpine plateau
While you won’t get the dreamy blue water that you can in summer, in winter, you can walk straight into the middle of the lake and get a unique perspective of this idyllic area. The mountains on the edge are beautiful covered in snow, and while the whole area can be explored on food, there is a hikinh trail that loops around, weather permitting.
This iconic view point is a can’t miss destination if you’re willing to brave the walk for some winter hiking in the Dolomites In summer, this would be more like a beginner hike, but the snow-covered terrain adds a level of extremity, so tread lightly in the winter months! In winter, it is not safe to go onto the extended view point…DO NOT APPROACH THE EDGE. Snow can give way, taking you with it.
In the winter, the road is closed passed the Chalet Lago Antorno. But, for €30, you can take a snowmobile ride to the Rifigio Auronzo, and have the option to either snowmobile back down, or ride a toboggan! Enquire at the Motoslitte shed at the base. Save time to stop for a hot drink at the igloo bar!
My cute bf and I at the Cadini viewpoint
Tre Cime: Rifugio Auronzo
Starting from the Auronzo Refuge (same as the Cadini viewpoint), this trail takes you the opposite direction to get insane views of the “three peaks”. There is a very steep section, so crampons/microspikes are necessary. The beginning of the trail is pretty mild, with many shorter trails to get close to the peaks.
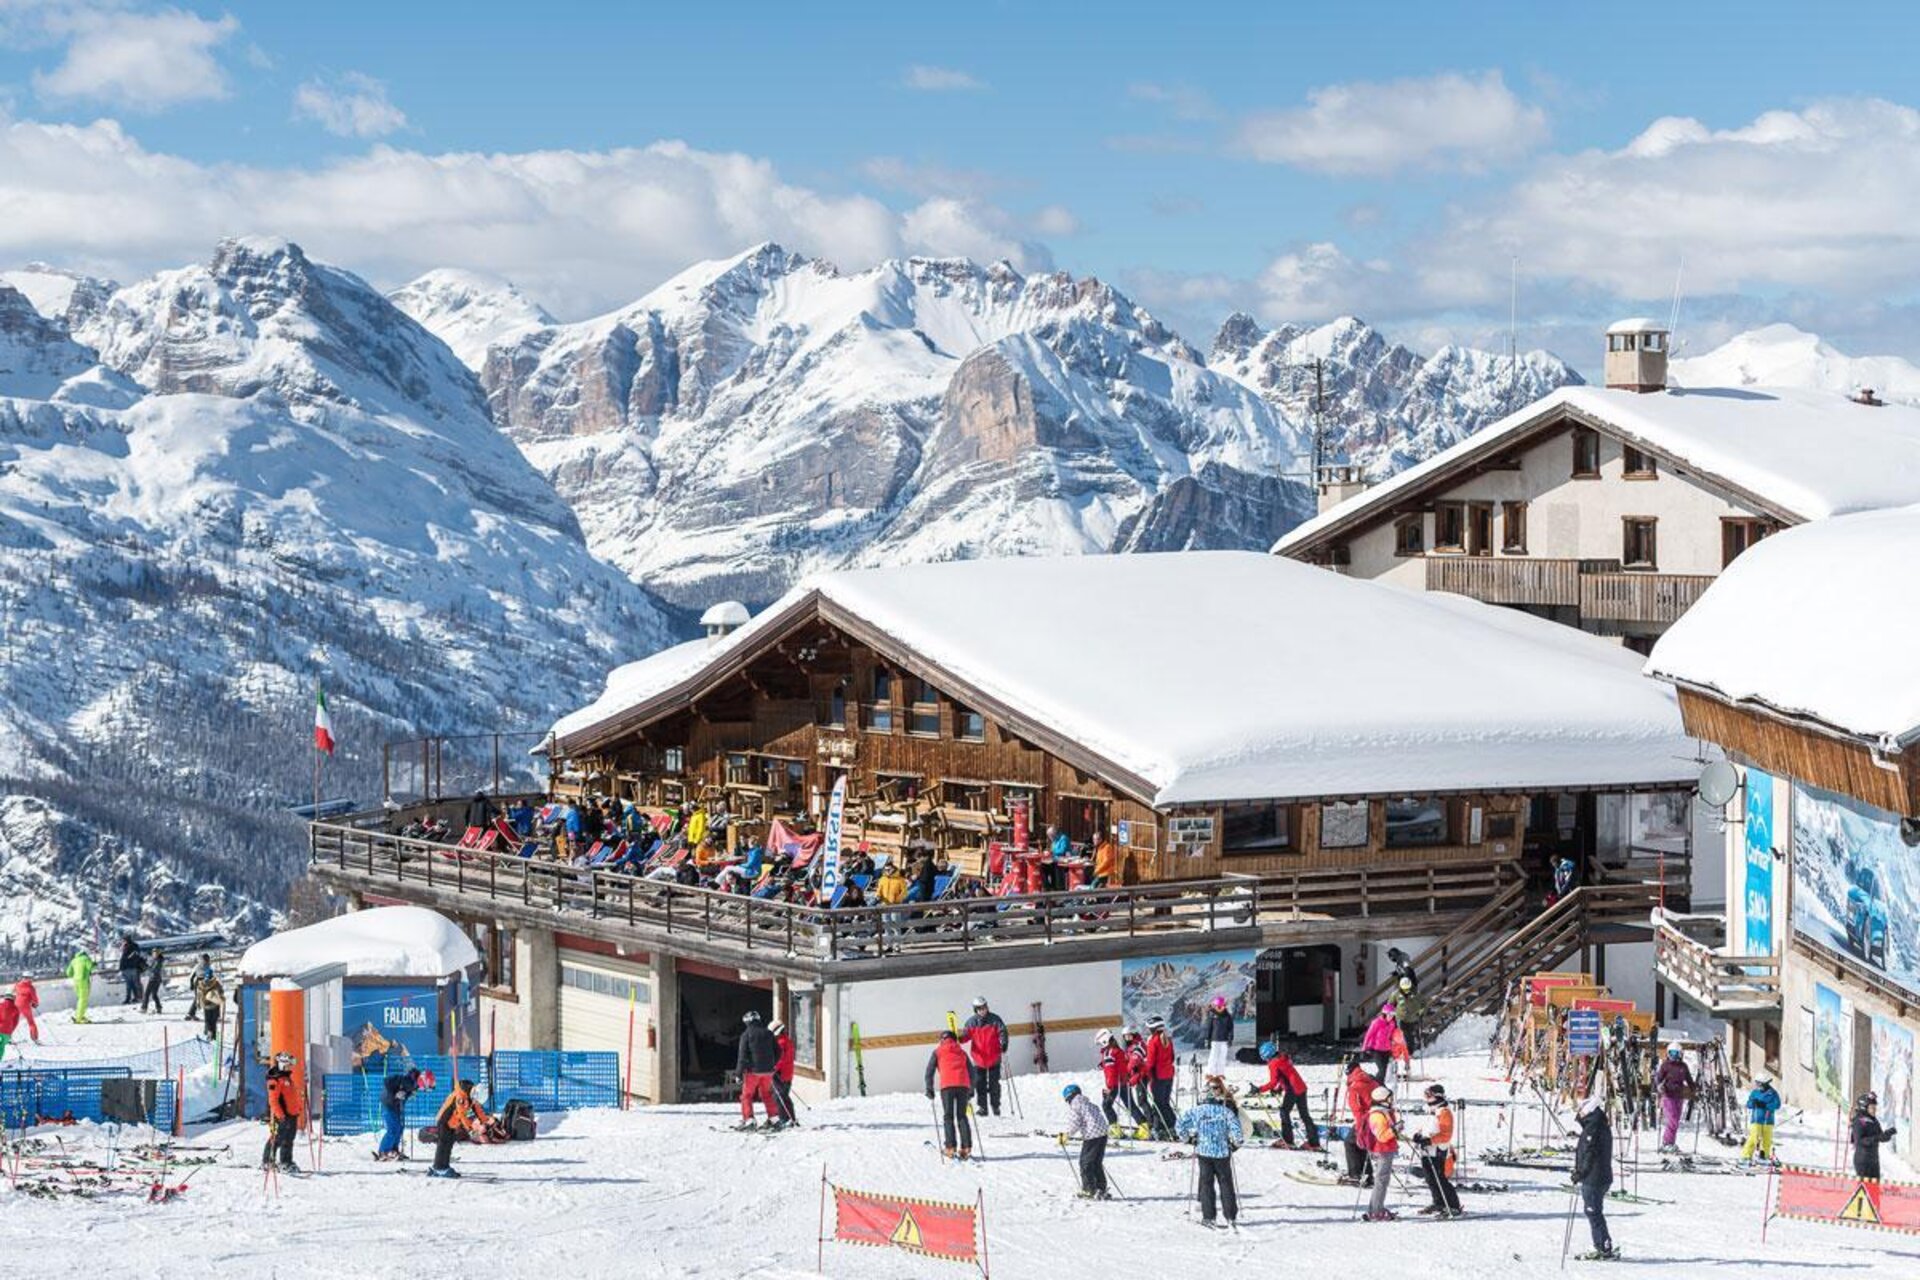
Take this scenic down to Cortina D’Ampezzo from the Rifugio Faloria Alpine Hut. Get unique views of the town, and the picturesque landscape, without any of the uphill thanks to the Faloria Cable Car. A perfect afternoon of winter hiking in the Dolomites when you’re staying in the idyllic town of Cortina.
Faloria Alpine Hut | Image from Visit Dolomite Bellunesi
Advanced Hikes
Advanced winter hiking in the Dolomites is no joke. Often needing special equipment, skills, and respect for the elements, mountaineering/remote exploration on this rugged terrain is a serious excursion, with avalanche danger, harsh weather, and technical climbing. I didn’t do any advanced hiking in the Dolomites, so I’m not going to share “top 4 advanced hikes”, because I simply am not knowledgable enough to guide this research.
Many famous treks like the Alta Via 1-8, Dollomiti Trekking Traverse, and most Via Ferratas are closed in the winter due to risk.
Essential Hiking Gear in the Dolomites
AllTrails App
You’re going to be out in the mountains, so be prepared with AllTrails downloaded, and ideally have your set trails downloaded as well! Especially while winter hiking in the Dolomites when trails may be harder to find, this is a game changer!
AllTrails is one of many Essential Travel Apps you should have before you go. Plan ahead and get the tools you need to travel easy!
Warm Boots
Would you believe most hiking incidents can be avoided with proper gear? While hiking on snow or icy terrain, good quality, warm boots are non-negotiable. All boots can be made 10x better with a pair of wool socks.
Microspikes
If you’re planning ahead for a hike in the Dolomites, I suggest you throw in some microspikes. These are easy to take on and off of any shoes to give you extra grip and are wayyy more safe to hike in. These mountains are sunny, even in winter, and sun + snow = ice.
Snowshoes
If you’re interested in longer trails, snowshoes are a must. The jagged terrain creates a lot of snow drifts, which will have you postholing every three steps (iykyk). Snowshoes can be rented from many accommodations or at the handful of rental shows across the region.
Summary - Best Winter Hiking in the Dolomites, Italy
No matter what time of year you visit, you won’t want to miss some exploration outside and in the mountains with winter hiking in the Dolomites. This area is so unique, with dramatic rugged peaks, alpine lakes, and cozy mountain huts. You really can’t go wrong with any hike from this list, so find what suits you best, and make sure you’re prepared with warm, comfortable gear!
Do you have any other hikes you recommend in the Dolomites?
Gearing up to hit the road on your next adventure? Here are the most important things to know before renting a campervan in New Zealand so you can take off prepared and excited. Whether you’re planning a two-week loop or chasing waterfalls across both islands, this guide will help you avoid rookie mistakes and make the most of your adventure.
Table of Contents
1) Size does matter
While campervan parking is allowed in many places, you might have a harder time depending on the size of your camper. Normal parking spots are 5.4 meters, which doesn’t fit most campers. However, even some specific campervan spots are for maximum 6.0 meters! Our van was 7.4 meters – definitely on the long side – so parking took some extra effort.
2) Diesel is cheaper, until the end (Additional Fee!)
If you’re in a campervan, you’re probably topping up on diesel fuel at the pump. Luckily it is typically cheaper than gasoline! However, this the savings will get overridden once you turn your vehicle back in at the end. NZ imposes a fee for every 1,000km driven in a diesel vehicle, and as of this writing that’s $76 NZD!
So if you’re doing a North and South Island tour, you can estimate between 3k-4k kilometers, adding an additional $230-$300 extra.
3) Driving takes longer than you think
Google Maps is your best bet for navigating the roads of New Zealand, but don’t be surprised when the drive takes a few extra hours than what you accounted for. If your maps say 3 hours, account for at least 4.5 hours, especially for bigger vehicles! (Yes, some of this is to account for the stops at view points and vistas).
4) Freedom Camping isn't always Free
You’ve already spent a fortune on a campervan rental, so saving money by staying at free sites sounds awesome, right?! Well, it’s not always the case. For example, some “free” sites have a nightly fee or required donation, usually no more than $15 NZD ($8 USD). If you do camp someplace you’re not supposed to, you’re risking a $400 NZD fine, and yes, they do have people checking!
5) Self Contained is essential
Of course, if you prefer holiday parks and the creature comforts of modern life, you don’t need it. But, some of the most epic, beautiful campsites are SC only. You must rent a van with a certified Self Contained sticker!
So why do you need a self-contained vehicle? Well, because that’s how you’ll get the best camping views!
6) CamperMate will be your best friend
Keep the CamperMate app updated, available, and honestly just open all the time, you’ll be using it! For any campgrounds (free and paid), petrol, LPG swaps and refills, dump stations, water refill, toilets, laundromats, and everything else you will need on the road!
Be sure to read the comments, some places are less reliable than others!
7) Recycle! But, where?
NZ is pretty environmentally aware, and they promote recycling and waste reduction…but that doesn’t necessarily mean that finding places to recycle your waste is easy. CamperMate is one of the most essential apps for any New Zealand campervan trip, unfortunately, it doesn’t tell you where public bins are.
Use the RecycleMap Website to find a map of all the recycling places on both the North and South Island, so you can keep your van clean of waste, and keep the Earth clean too!
8) Book your Ferry in advance!
If you plan to do both the North and South Island, you’ll probably be putting your van on a ferry (either the Interislander or Bluebridge) and taking the 3 hour journey to the next island. There are only so many spots available for ferrys, so don’t let your poor planning keep your plans from moving forward!
9) Leave time for the unexpected
There is so much to see and do in NZ, and you might want to pack your schedule full. But, don’t underestimate the unexpected, because not everything will go to plan. In our 3 weeks, we had to reschedule because of rain, we broke down on the side of the road, and we had to go to a mechanic for half the day. Give yourself some wiggle room!
10) Know your insurance coverage
Every rental company will offer a few insurance packages, but you probably already have coverage through a credit card or travel insurance plan. Know what you’re covered for, and if the extra expense is worth it to you.
Story time: We did not get the insurance, which cost $75/day… but I accidentally kicked out the ceiling vent in my sleep. So, yeah..our credit card coverage did not support violent sleepers, and it cost us $900!
Summary - Things to know before renting a campervan in New Zealand
Taking off in a campervan to explore the wild landscapes of New Zealand is exciting! But, go into it prepared by knowing what to expect with camping, how to take care of regular life needs, and the realistic expectations with driving! The adventure is sure to be a sweet one (or “sweet as” as the kiwi’s say), but do some research and go into it prepared!
Okinawa isn’t just another island getaway—it’s a place where centuries-old traditions meet laid-back coastal vibes. From the remnants of the Ryukyu Kingdom to hidden beaches far from the tourist crowds, Okinawa offers a unique mix of history, nature, and culture that’s worth exploring on its own terms. Whether you’re here to dive into its turquoise waters, uncover the story behind its UNESCO-listed castles, or simply slow down and enjoy the island pace, this guide will help you find the best things to do in Okinawa, so you can experience it like a local.
Every purchase through these links keeps this blog alive and thriving—thank you for being an amazing supporter, and please support small, ethical, and local!✨ Learn More.
Pocket Guide to Okinawa
When I think of Okinawa...
I'm warm on a beach, still wet and salty from the crashing waves, enjoying a sweet sunset date with Matt & fresh sashimi. so happy 🙂
Where To Stay
Naha (Best for first-timers and city lovers)
Onna (Best for beaches and diving
Nago (Best for families)
Yomitan (Best for culture)
When To Visit
Late march to early may / October to November. Summers (June-August) are hot and humid, with typhoons in late summer.
Things To Do
Swim or snorkel almost anywhere on the coast
Visit Churaumi Aquarium
Enjoy local food like Okinawa traditional soba & sata andagi
1. Snorkeling & Diving
You simply cannot venture to Okinawa without prioritizing some time in the water. Whether you’re a seasoned diver here to explore the mysterious Yonaguni Monument, or snorkeling the surface, you will be amazed!
The reefs around the main island are one of the best things to do in Okinawa, so check out some of the best snorkeling spots that you can explore for free! But, if I were you, I would head out to the Kerama Islands National Park, where the reefs are untouched and bubbling with life.
For those wanting to take things a bit deeper, check out these other tours for intro to diving, and for certified SCUBA.
The northernmost point of the island has insane views and history. Daisekirinzan is a low-cost way to explore the unique topography of the area and learn about the people who used to live here. Further north is Cape Hedo, a great lookout and viewing area to see the insane geography of the area you just hiked! Down on the beach is popular for surfers, but waves can get pretty big so beware!
Unless you have your own vehicle, this part of the island is inaccessible. So, it’s best to take a tour to see all the main highlights like the unique landscape of Daisekirinzan, some waterfalls, and the best viewpoints on the island!
3. Churaumi Aquarium
dThe Churami Aquarium is definitely up there in the best things to do in Okinawa – in fact, it might be one of the best aquariums in the world! Their commitment to ecological restoration, biodiversity, and investigating the human impact on marine life is all impressive and respectable, but really it’s the whale shark that pulls in the crowds.
As an animal that many people will try their whole lives to see in person, you can’t pass up the chance to see it up close. When you’re there, ask an employee when feeding time is, and get there early to get a good spot. It’s crazy to see!
There are public busses that can get you there for a low cost, and entry is ¥2,180 / $14.69. However, if you want a no-thought approach, check out this tour of Churaumi Aquarium.
All of the animals that are on exhibit either cannot be released into the wild due to injury or human habituation. The dolphins that are in the show are never forced to perform and only spend a few years in the aquarium before being released (with a few extra tricks to show off to their pod)!
Churami Aquarium Okinawa Japan
4. Whale Watching Tour
If you’re in Okinawa during one of the best times to visit Okinawa, during the winter months of January-March, you’re in luck to spot some Humback whales on their migration route. They typically put on quite a performance, featuring dramatic wat sprays, tail slapping, and breaching out of the water just to make a splash. Sometimes, you’re able to spot them from the shore (try out Cape Zanpa from the top of the lighthouse)!
To get real close, nothing beats a whale watching tour. The whales swim closer to the Kerama Islands, so getting out on the water is your best bet!
Okinawa has a rich history of cultural practices. From traditional kimonos, using coral to dye fabrics, calligraphy, and the birthplace of Karate, there is so much to try! The island is more recently recognized for their beautiful glass blowing techniques, teas, and Kendo martial arts.
Check out what’s near to you, and try of the arts of Okinawa, Japan, and the Ryukyu Kingdom. When you’re visiting Shuri Castle (another must-see), check out this unique art of dyeing fabrics with coral!
Coral Dyeing, image from Klook
Summary - Best Things to do in Okinawa
Explore Okinawa’s beauty both above and below the water. Snorkel or dive vibrant reefs, visit the Churaumi Aquarium, and take a scenic drive through Cape Hedo and Yanbaru National Park. Try traditional arts like pottery or weaving, and, in winter, go whale watching to see humpbacks up close. Okinawa offers a perfect blend of adventure, culture, and natural wonders.
Rishikesh has been getting attention for decades for its spiritual exploration, with the sacred Ganges and Himalayas adding to the allure. With so much happening in this small city, check out the 10 best things to do in Rishikesh to experience some of the charm in the region.
From historical mediation centers that inspired worldly love, Himalayan views from holy places, and new age teachings and practices to expand your body and mind, Rishikesh has so much for you! Rishikesh is a place to open doors you didn’t know were there, and see what pulls you in.
Before diving into ‘the best things to do in Rishikesh’ with no other thoughts – a note on safety, because that’s most important.
Rishikesh can have a really safe and welcoming feeling, it can be easy to see the world through peace, love and light after so much spiritual exploration. But not everyone is in that space, not everyone has the same values, and even Rishikesh has all types of people. No matter what you do, these are some tips to stay safe!!!
Don’t walk around late at night, especially by yourself!
Protect your personal space, you can say no to photos, food, or anything that makes you uncomfortable.
Avoid revealing clothing, in the heat wrapping a light scarf around goes a long way.
Watch your bags and your pockets.
Be aware of your surroundings, there is a lot happening, but don’t just float through unaware.
Okay... now for the fun stuff
1. Swim in the Ganges
I don’t think any trip to Rishikesh would be complete without taking a dip in the sacred river, Mother Ganges. Cascading from a small spring in the Himalayas, this river is a sacred place. People swim in it throughout India, and trust me when I say you probably don’t want to go in further downstream… especially in Varanassi.
In the dry season, the river is an inviting blue color, however the monsoon rains wash in silt from the hills and dulls the vibrant color. The intensity of the flow picks up and the rapids can be quite intense!
Always dip while hanging on to the chains that line the river’s edge, and don’t plan to wear your bikini! Especailly as a traveler, you will garner some attention, so stay covered, wearing a t-shirt and long shorts since this is a sacred act.
Ganges dips with the Yoga Family
2. Aarti Ceremony
Speaking of the Ganges (pronounced: Ganga) , you can’t miss the nightly Aarti Ceremony – where fire and dance come to life along the river’s edge for a sunset celebration of Mother Ganges and honor Lord Shiva. It is a celebration of unity and devotion that will make you smile, dance, and make offerings of light.
There are multiple Aarti ceremony locations, so enjoying the one closest to you is always a great option. They tend to get a bit crowded, so arrive early, bring some money for donations and offerings, and get ready to celebrate the life force of the Ganges!
My beautiful friend Chloe at the Aarti Ceremony
3. Sunrise at Kunjapuri Temple
Being in the foothills of the Himalayas is a special place to be… but imaging seeing the snowy sharp peaks of the Himalayas! Kunjapuri Temple can be a perfect place in the right time of year. During the dry season, visibility expands
Journeying up to the Kunjapuri Temple should be on everyone’s list. Only 15km from Rishikesh, but don’t underestimate the drive. It’s best to find a bus, go with a group tour, or drive carefully by motorbike.
Although when I went the moisture in the air limited the view, it was an energetic place. Our group of 30 from Mimamsa YTT went for sunrise, where we danced with locals, enjoyed a cup of chai, and took in the view.
Kunjapuri Sunrise Views
4. Drop-In Classes
This is Rishikesh we’re talking about – the birthplace of yoga and home to so many eastern spiritual practices. Rishikesh is renowned for its offerings in spiritual teachings, with Yoga Teacher Trainings being the biggest – read about my YTT experience.
From classic practices like Hatha yoga, Tibetan Sound Healing, Meditation, Kirtan, Kundalini and more… to the more new-age practices of aerial yoga, Ecstatic Dance, Flexibility, and anything else you can think of! Rishikesh has a place to try it, and maybe even become a master of it.
My favorite was the 'Body-Opener' class at Japam (next to Secret Garden). Intense flexibility training with no pain!
Sound Healing training at Mimamsa Yogshala
5. Events @ Monk's Hostel
If you’re hanging out in Tapovan for awhile, which is where most travelers choose to park and explore, you can’t miss what’s happening at Monk’s Hostel. This party place may not be ideal for sleeping, but drop in for a sound healing session, DJ events, ecstatic dance, traditional instruments and more!
This should be your first stop if you are exploring night life in Rishikesh, since they always have something going on. Also, say hey to my friend Daisy who helps run the place! <3
There are so many events and gatherings in Rishikesh that it can be hard to know where to go or what to do when you arrive.  </p
Rishikesh is a very special place for so many people around the world, including the Beatles! Their meditative retreats here with Maharishi Mahesh Yogi, Guru of Transcendental Meditation, inspired many of their greatest hits. Although the Ashram they stayed was not maintained after his death, the abandoned infrastructure, beautiful grafitti artwork, and peaceful grounds are worth a visit.
Yes it can be a little bit touristy, but I really loved the peace and quiet you can find here. Plan to have a few hours while you slowly walk, sit and meditate, and maybe sing a couple of Beatles jams while you explore the place that fueled their greatness.
Tickets are 1200 Rupees ($14) for foreigners – definitely pricier than most spiritual places, but I think it was worth the visit! Cover your shoulders and knees, as it is still an Ashram!
Meditation domes at the Beatles Ashram
Let it Be - Beatles Ashram
7. Inked Memory at Kalka Tattoo
It seems like many travelers are picking up body art souvenirs, and I love that idea. Especially in Rishikesh, if you did a training or had a spiritual experience, what a great way to comemorate your time in this sacred land.
If you’re going to get a tattoo, it’s got to be at Kalka Tattoo. This is where all of the locals go, and the foreigners have been seeking his amazing skills for years.
Most YTT don't allow tattoos during training, so plan for some time after to let the ink heal! Also, pop over to see him to get in his schedule before he fills up!
8. Patna Waterfall
Rishkesh has so many waterfalls to explore, most tourists head to Secret Waterfall or Neer Waterfall. Both are great, but definitely crowded and the opposite of secret. If you’re looking for a nature escape with fewer people, less trash, and some silence to enjoy, Patna Waterfall is the best.
You’ll have to take a motorbike or taxi to get here, but the drive is easy and straightforward. During the monsoon season there are rangers that may patrol the area, not allowing tourists due to the flood risk (and sometimes elephants), so it’s best to go with a local if you can!
Patna Waterfall in dry season
9. Tatwala Baba Cave
If you’re looking for some peace among the noise, to meditate and quiet your mind, the Tatwala Baba Caves are the place to go. As a lesser-known ashram, these caves have little traffic, and a lot of good energy.
There is a Sandhu that resides in the cave, looking after it and helping to maintain the peaceful vibration that others can come and enjoy respsectfully.
Unfortunately, I was supposed to go to the caves, but food poisoning hit me hard and I missed the chance. Although I didn’t see it myself, I gathered all the incredible details from my many friends that got to explore.
10. Bhootnath Temple Rishikesh
On the Southern side fo the Ganges, a seemingly small temple sits up on the hill. Bhootnath Temple draws in the masses of devotees of Lord Shiva. Bells are rung as you ascend the spiral temple to the top floor, with impressive views expanding through Eastern Rishikesh.
I got to see this temple everyday from my yoga hall, and the journey up to the top of it was definitely worth it!
Temples unfortunately are known to charge more for tourists. There is an entry donation (20-50 rupees), and a donation if you would like a blessing (20-200 rupees). Pay what you're comfortable with but don't get ripped off!
Chloe exploring the depths at Bhoontooth Temple
Other Things to do in Rishikesh
White Water Rafting on the Ganges
Rajaji National Park & Tiger Preserve
Lakshman Jhula Temple
Summary - 10 Best Things to do in Rishikesh
Rishikesh brings people in for many reasons – for the yoga culture and spirituality, the adventure, and the Himilayan proximity. No matter what calls you in, there are so many things that beg you to stay. Take the time to explore the religious history, the natural wonders and wildlife, and the offerings to explore – there are endless things to do in Rishikesh.
This list is just the top 10 from my short 45 days there. What things call to you?
Okinawa is Japan’s hidden tropical gem. This vibrant island belongs on the travel list of every explorer, beach bum, and .
While you’re planning your perfect holiday, explore the options of where to stay in Okinawa. The diversity on the island – and in the ocean around it – has something for every traveler, so find the best spot for you!
This list will go over the 5 best areas to stay in Okinawa: Naha, Yomitan, Onna, Nago, and Nakijin. Plus, an honorary mention of the Yanaburu Forest – it’s not a region you can easily stay, but you won’t want to miss exploring the history and beauty of this unique area!
Every purchase through these links keeps this blog alive and thriving—thank you for being an amazing supporter, and please support small, ethical, and local!✨ Learn More.
Pocket Guide to Okinawa
When I think of Okinawa...
I'm warm on a beach, still wet and salty from the crashing waves, enjoying a sweet sunset date with Matt & fresh sashimi. so happy 🙂
Where To Stay
Naha (Best for first-timers and city lovers)
Onna (Best for beaches and diving
Nago (Best for families)
Yomitan (Best for culture)
When To Visit
Late march to early may / October to November. Summers (June-August) are hot and humid, with typhoons in late summer.
Things To Do
Swim or snorkel almost anywhere on the coast
Visit Churaumi Aquarium
Enjoy local food like Okinawa traditional soba & sata andagi
Choosing Where to Stay in Okinawa
Okinawa is a historical island with a unique history. It’s roots with the Ryukyu Kingdom and more recent role in WWII adds so much context to the beautiful island. In the north you’ll find lush rainforests, and a ring of coral reefs that encompass the island – a diver’s paradise.
In order to make the most of your time in Okinawa, where you stay in Okinawa depends on a few things:
Are you traveling with kids?
What’s your budget?
Will you have your own transportation?
Do you prioritize culture, nature, or history?
How much time do you have on the island?
Do you have tattoos that can’t be covered (this may determine some accommodation choices)!
If you only have one week in Okinawa, you’ll have to be selective about where you go, since you can’t see it all! Even in the 45 days we spent on Okinawa, there’s so much we couldn’t do that we really hope to return to. Okinawa was a paradise island without feeling to remote or removed from the world.
Depending on your travel style, your budget in Okinawa can either be top-tier luxury or a complete shoe string. Japan is typically a more expensive country to travel to, but the exchange rate of the Yen to the Dollar is really favorable right now, which is why so many people are flocking to the islands!
We stayed for 45 days in Okinawa, and each spent about 1,750 for everything – minding that we split the cost for the 1 month car rental and accommodation.
You can find accommodation anywhere from $18/night to $800/night, with many great options in the $35-65 range. There are some regions that are more high end than others, so the budget, mid-range, and luxury options listed below are relative to the area, not the whole island!
1. Nago
BEST FOR – families / first time visitors
Nago is a perfect blend of nature, family fun, and cultural experiences. It’s central location makes it relatively easy to get anywhere on the island, especially out to some of the best snorkeling spots in Okinawa. This is a great option for the opportunities of city life, with easy access to nature.
During our one month in Okinawa, we came to Nago often during our stay in the small town of Onna. We found the best fresh fish markets and great cafes to work remotely. If you plan to stay home often, I wouldn’t say it’s the best place to stay. However, if you’re keen to get out an explore, Nago is the best place to stay in Okinawa to make the drives easier.
We stayed at Guest House Sumire for a few days while waiting for our long-term rental in Onna. Here you're hosted by Koichiro, a kind-spirited, laid-back man who loves surfing, traveling, and great conversation. We saw him many times during our stay in Okinawa, and he was such a highlight of the island. <3
2. Nakijin
BEST FOR – nature / tourism / kids and families
Nakijin is a gem of a region on the island with accessibility to some of the highlights. This area has it all – nature, ancient history, and modern charm making it perfect for any traveler! One of Okinawa’s greatest claims to fame is their renowned Churami Aquarium, and it’s jsut around the corner from Nakijin.
Our favorite thing in this area was driving across the bridge to Kouri Island – a fun destination with cozy cafes, remote beaches, and a shipwreck dive site that we will have to return for. In the center of the peninsula where Nakijin resides, there are hidden gems of stunning cafes, viewpoints, and hikes you won’t want to miss.
BEST FOR – beaches / water sports / luxury / couples
Onna is Okinawa’s resort region, where impressive resorts are speckled along the coastline, offering gourmet dining, spa treatments, and incredible views. This area has some of the best beaches on the island, many are privately owned by resorts and complexes (but nothing is ever that inaccessible).
We stayed in Onna for one whole month, and loved the relaxed vibe and the easy access to both the far ends of the island. Our days were filled with surf-skating along the coastal roads, morning dives along the reef, and sunset picnics with a Lawson’s meal.
For a laid back & affordable area close to the beach, look near Kibougaoka Beach - a quiet beach with reefs, soft sand, and perfect for an evening fire.
Our favorite beach in Onna with our hosts' dog, Kuro <3
We stayed at the Tropical Surf House and loved it. It was affordable, easy going host who is a kick ass kite board instructor, and close walk to the beach & Lawson's <3 Plus, he had the cutest dogs, Shiro & Kuro, who loved coming to the beach with us, (see Kuro featured above).
4. Yomitan
BEST FOR – cultural heritage / local life
Yomitan is a quaint region near to some of the island’s best highlights. Located just north of Naha, you get easy access into the city, without the noise and traffic with it. It’s coastal location hosts the island’s most famous lighthouse, a great point to spot humpback whales during migration!
Whether or not you stay in Yomaitan, it is definitely a necessary day trip worth exploring. During my stay in Okinawa, I fell in love with the Shisas you’ll see everywhere, and Yomitan is home to the largest Shisa of them all! These fox-like creatures are protectors against evil, and an integral part of Okinawa’s unique culture.
BEST FOR – nightlife / foodies / quick travel / digital nomads
Naha is Okinawa’s capital city, with a mix of history, culture, and modern conveniences. This is where the island’s main airport is, so you’re bound to drive through Naha at some point – or use their rail system for easier, more affordable, and eco-transport option!
There is so much to see and do here, but don’t neglect the rest of the island! It would be best to spend at least a few nights in Naha before heading north. Naha is also the jumping off point for most of the neighboring islands.
Shuri Castle is the biggest cultural sight in Naha. Unfortunately, it was burned to the ground in a tragic fire in 2019. It has been under reconstruction since 2022 and won't be finished until at least 2026. Great thing you're reading this blog and know ahead of time (unlike me who didn't learn until I got there).
We stayed at Hotel And Rooms Naha Port the night before flying out of Okinawa, and it was perfect. Their onsens opened at 6:00am, perfect for a pre-flight soak and relaxation. This hotel is unfortunately anti-tattoos, so be aware of this in case you have tattoos that cannot be covered without a bodysuit.
6. Yanbaru National Park
Too many travelers never make further north than the peninusla of Nago and Naikijin, but they’re missing some of Okinawa’s true gems! The lush waterfall hikes, intense cliff viewpoints, some of the best diving around, and secluded white sand beaches.
Plus, you’ll have the chance to see an elusive Rail, Okinawa’s cultural bird that runs through the brush. If you love the outdoors, don’t miss the Yanabru Forest
You will need a vehicle to explore the Yanbaru National Park - there are no public buses or transport options!
Summary - Where to Stay in Okinawa
No matter where you stay in Okinawa, you’re in for a magical paradise destination. The abundant and diverse nature surrounds the island, while the traditional culture permeates the modern society. Depending on what your travel style, plans, and timing are, where to stay in Okinawa can look so many different ways.
No trip to Okinawa would be complete without exploring the diverse nature under the water and amidst the dense canopy of the Yanabaru Forest. Cultural destinations are hard to miss, from castles, traditional arts, and of course – the fresh food that has brought the Okinawan diet so much notoriety.
At the end of the day, where you stay in Okinawa will still bring so much exploration. Once you decide which option is best for you, it’s time to book! So what things are going on the itinerary?
Rishikesh is quickly making its way to many traveler’s destination dreams for its offerings of yoga and spiritual teachings, and adventure along the sacred Ganges river. No matter what you’re traveling for, these top 10 things to know before going to Rishikesh will help prepare you for your exploration in Northern India’s most famed destination.
After having spent over a month in this city, I can honestly say it was one of my favorite destinations in Asia so far! The ability to learn so openly and connect with like minded people is a special part of Rishikesh’s charm, and the amazing and affordable food tops it all off.
Table of Contents
1. Yoga Capital of The World
Rishikesh’s connection to yoga is rooted in the ancient practice that originated over 5,000 years ago. Scripts speak of sages and yogis who meditated along the sacred Ganges, seeking enlightenment.
This rich history, coupled with its breathtaking natural setting, has transformed Rishikesh into the global epicenter of yoga today, drawing seekers and practitioners from around the world to experience the essence of this timeless practice.
Today, there are hundreds of schools available to learn the practices of teaching yoga, sound healing, meditation, reiki, pranayama, mantra and chanting, Ayurveda, philosophy, Vedic astrology, and so much more!
2. Adventure Capital of India
While many visitors venture to Rishikesh for the spiritual teachings available, just as many Indian tourists visit for the adventure!
The city’s location amidst the Himalayan foothills provides exploration in the mountains and rivers for the adrenaline seekers. From the rafting the rapids of the Ganges River, to the challenging cliffs ideal for rock climbing, Rishikesh caters to a diverse range of adventurers.
Rishikesh is also home to India’s tallest bungee jump, and a perfect place to stay if you’re interested in doing a wildlife safari. Maybe you’ll be lucky enough to spot a wild Asian Elephant or elusive Tiger (from the safety of a safari jeep).
The adventurous and spiritual sides of Rishikesh
3. Be prepared for the local paparazzi
The photographers are everywhere, and the subject is you! Many tourists in Rishikesh are from other parts of India, and they may have never seen a foreigner before. During my visit in July (low season), I never had less than 5-10 selfie requests a day, so get used to it!
Ultimately, you have to protect your personal space and boundaries. It’s okay to take a few photos for them to have some memories, but you definitely don’t need to. If you like being under the radar and avoiding the attention, a headscarf and sunglasses go a long way.
Or, take the tactics of my friend and charge 100 rupees per photo ($1)! She mostly charged the men, and made enough for a few free coffees while bringing light and enjoyment to the daily occurrence.
'No' doesn't always mean No in India. However, a stern 'Abhi Nahi' (Ahbee Nay) will be better received - it is Hindi for 'not now / no'
4. ATM's are Unreliable
Many places in Rishikesh do take card, but not everywhere! Always keep some cash on you when traveling, you never know when you’re going to need a taxi ride, quick meal, or a drop in class with your new-found yoga buddies.
There are 3 ATM’s in Tapovan (north side of the river), and 1 ATM in Ram Jhula (south side of the river). All of them have failed me at least one time within the month, so beware! If a location doesn’t accept card, they probably accept Paytm transfers, which you can set up beforehand so you’re never limited.
5. Vegetarian Only
Here in Rishikesh, you won’t be finding any chicken wings or burgers. As the homeland of yoga and a destination for Eastern spiritual practitioners, it is a vegetarian city.
While vegetarian food is everywhere, it is not the same for vegan food options. Many restaurants will have great vegan options, while others will require a rough translation with the staff… and still may be non-vegan.
The best Indian dish: Navratan Korma
6. Dry City
To further maintain the sacredness of the region, it also restricts the consumption of alcohol within city limits. There are a few bottle shops on the outskirts of the city, but the cleanse is refreshing, especially with the satisfying street-made chai teas.
The ban on alcohol doesn’t impact the accessibility of other substances in the city… if you know what I mean 😉
7. Get an eSIM
On the note of preparedness, set yourself up with an eSIM before you arrive without data. The city is chaotic – filled with bikes trying to pass cows laying in the street, slow moving tractors and tuk-tuks trying to take you for a ride.
Know where you’re going with ease, with an easy-to-install eSIM. Learn more about the intricacies of international phone plans so you can stay connected while saving money, wherever you go.
Use code 'TAYL58RX' for Nomad eSIM, or 'TAYLOR8492' for Airalo eSIM to save $3!
8. Take Preemptive Probiotics
…and you still might get sick.
India isn’t known for its food hygiene, in fact it’s quite the opposite. A majority of foreigners do get some type of food sickness here. The new spices, ways of preparation, and sanitation can definitely throw your body for a loop. Prepare in advance with some probiotics, or else you’ll end up like the 12 people in my yoga training that got sick in the second week.
Luckily, there are loads of Ayurvedic and pharmaceutical stores around to stock up on anything you might need. Ginger chews, activated charcoal, and some electrolytes go a long way!
Ayurvedic remedies
9. Be Aware of the Spiritual Scams
If you’re coming to Rishikesh, it probably is focused a bit around eastern spirituality, yoga, healing, and learning. And while it’s great to have your big eyes ready to accept what is meant for you, not everything is legit.
A good rule of thumb is if someone is seeking you out to ‘help heal you’ for free, there is a cost… it’s just not money. It doesn’t necessarily mean it’s sexual either, but the blurry lines and vulnerability can easily make your experience feel a bit skeptical.
There is a lot of beautiful things to discover in Rishikesh, but it’s probably not a ‘shaman’ named Aman who approaches you in a western cafe to ‘heal your lower chakras and work through the traumas of your relationship’… I met 6 other girls with that experience, so watch yourself and your friends!
10. Don't Trust the Monkeys
Monkeys always look so cute… until they swing down to steal your sunglasses and bargain to trade for food, or run at you with their teeth bared for looking at them wrong. All monkeys should garner caution, but these monkeys are downright criminals.
In all seriousness:
Never look a monkey (specifically the macaques) in the eyes. It is a threat and they never turn down a challenge.
Stay far away from a mama with her baby.
If you’re carrying something in a plastic bag, it’s fair game to steal since it’s probably fruit. Always have a bigger big to store things in out of sight.
Never feed the monkeys! Not just for your safety, but also for theirs. Try to let the wildlife stay as wild as possible.
There are 2 species of monkeys in Rishikesh: The Rhesus Macaques (evil incarnate), and Grey Langurs (spiritual teachers of peace). Do not feed either, and don't even look at the macaques.
Macaque family with their stolen goods
Peaceful Grey Langur
Summary - 10 Things to Know Before Going to Rishikesh
Rishikesh is a perfect destination for every traveler – the affordable prices, scenic views of the Himalayan foothills, the spiritual energy that surrounds the Ganges, and the people that make you feel welcome and at peace.
There is so much to explore in the area that one could never get bored here. And, with such a heavy focus on internal growth and exploration, you can find wonder and curiosity without ever leaving the comforts of an ashram or school you choose to spend your time.
Whether you’re a wanderlust explorer or a spiritual seeker, these 10 things to know before going to Rishikesh should help you prepare your journey into Northern India’s most famous region.
What things are luring you in?
Explore the other destinations waiting for you in Asia!
Explore the beauty of Ta Van village, a hidden gem in Northern Vietnam. The lush terraced rice fields, welcoming local people, and vibrant Black H’mong community make this area truly unique and a must-visit when you explore the mountainous countryside.
Unlike neighboring Sa Pa, the true charm of Ta Van is still intact making it a perfect destination. Over my past 2 years of traveling full-time, this has been my absolute favorite location – keep reading to find out why!
Table of Contents
Is Sa Pa worth it? Learn how the area has changed and if it should still be on your itinerary.
Why Ta Van over Sa Pa
Sa Pa is great, don’t get me wrong. This mountain town has been a common destination for decades, and with the construction of an international airport, tourism is only growing.
But personally, I wouldn’t stay there. We came from Hanoi with some friends and landed in Sa Pa for 4 nights, and while it was a cool city, it didn’t have the mountainous charm that we were looking for.
Walking around the streets we felt like a target. It borderline felt like harassment from the locals trying to sell us a trekking tour or their handmade crafts (which were beautiful, but it was a lot).
Unfortunately, that is a result of overtourism. Many of the local people have found lucrative ways to make money off the tourists, and it has changed the essence of the place completely. Sa Pa has been compared to an amusement park, and I completely get why.
The tourism impacts in Sa Pa have been unfortunate, which is why Ta Van is such a gem of a location that still provides the authentic experience you’re probably looking for.
“Sa Pa started to change once the government put in the highway in 2015. It used to be a nice mountain town, where people cared, but now there are so many tourists that the owners just want your money. They don’t care about making it a nice experience. It’s so fake now. Every place sells salmon and acts like it’s caught here, but it’s not. It’s from a freezer.”
– Vu, owner of Ginn’s Homestay & employee at Sa Moc cafe.
Getting to Ta Van Village
Ta Van Village is only 10 km outside of Sa Pa – 25 minutes down a winding scenic road into the valley. To get to Ta Van, you will have to separate the journey by first getting to Sa Pa, and then hiring a Taxi.
Since Sa Pa is so popular, it is easy to get to from Hanoi. There are buses and trains daily for less than $20 that take you the 5.5-hour journey into the mountains.
I took a sleeper bus for $17 through Grouptour, found on 12Go.com. The bus was *nice* – it was my first experience with a sleeper bus in Vietnam and I get what the hype is about.
Once you arrive in Sa Pa, you’ll have no problem finding a taxi… they will be waiting for you! The ride to Ta Van shouldn’t cost more than 250.000 VND ($10) so don’t get ripped off!
My comfy sleeper bus bed from Hanoi to Sa Pa
Getting Around in Ta Van
Once you get to Ta Van, there are limited transport options. There is no Grab. There is 1 motorbike rental in the town (and the bike they gave us died while driving it). So, you have 2 main options: using a taxi driver from Sa Pa, or renting a motorbike in Sa Pa and using it during your duration.
There are a lot of fun mountain roads, waterfalls, and beautiful drives you won’t want to miss in Ta Van village. Having a motorbike is one of the best ways to get around! However, it is illegal to drive without an IDP. Luckily there hasn’t been a police officer in Ta Van for years probably, so don’t stress too much!
Save your taxi driver's info - once you're in Ta Van, there aren't any taxis around. If you need to go anywhere else, you'll need to call a taxi from Sa Pa to come for you! Your homestay will also be able to help set up a ride.
Things to Do in Ta Van Village
As soon as you arrive in Ta Van, you’ll realize that one of the best things to do in this town is just enjoy it. The people are some of the friendliest we’ve ever met. The views are BEAUTIFUL, and the restaurants and shops are so cute.
While Sa Pa has neon lights and an overwhelming amount of things to do, Ta Van is a breath of fresh air.
1. Hike to the Bamboo Forest & Waterfall
The bamboo forest is an easy (yet steep) walk up the valley. The rice fields suddenly transition into a dense forest of tall bamboo, filled with wildlife. If you continue to trek past the Black H’mong housing, you’ll arrive at a roaring waterfall perfect for taking a swim!
2. Rice Trek with the Local Black H'mong Women
You don’t have to go too far before an eager local woman approaches you ready to take you on a rice trekking tour. This land has been their home for hundreds of years, and they know it best! Depending on how far you trek, they will show you the scenic routes and best photo spots.
3. Herbal Bath at the Charm Spa
The region is known for their use of herbs for medicinal healing, consumption, and relaxation. Enjoy a spa day with an herbal bath and massage at the Charm Spa, a proper local experience!
4. Batik Workshop
You will notice the dark blue fabric with intricate white designs made by the Balck H’mong people. These are batik creations, an intricate process of using a honey material to prevent the indigo dye from coloring the fabric. You can try it yourself with local women at the Ta Van Batik Workshop.
5. Live Music at Wildbeast Restaurant
Wildbeast is in the center of town, a laid-back restaurant with the best drinks and a chill atmosphere. The views over the valley are beautiful, and the place lights up Friday nights weekly for live music. This is the best way to get a sense of the artistic and authentic local way of life.
Where to Stay in Ta Van
Although Ta Van Village is small, there are quite a lot of options for accommodation. The entire town is accessible on foot, so don’t worry too much about the location. However, if you want to be in the middle of the best area, then you’ll want to look Southern side of the village.
Ginn's Homestay
For an authentic stay in this beautiful town, Ginn’s Homestay is the best choice. The family is so sweet, the rice field views are amazing, and the hospitality is unmatched.
Sa Moc Bungalow's
Not only are these bungalows spacious, affordable, and extremely comfortable, but the food at Sa Moc cafe is our favorite in town – and it’s right at your doorstep. The team at Sa Moc is so down to earth, and the owner’s artistic style is infectious!
Music Garden Cafe
This is where I stayed for my entire month in Ta Van, and I loved it! Quyen the owner is really kind, the space is quiet and natural…. and there is the CUTEST puppy ever named Lucky that lives here. Even if you come in 5 years, he is a puppy (he is 2kg max!). Even if you don’t stay here, stop by and give Lucky some pets for me <3
Views from Music Garden Cafe in Ta Van Valley
Summary - Guide to Ta Van Village in Northern Vietnam
If you’re exploring any part of Northern Vietnam, don’t miss Ta Van Village. This town is a hidden gem close to the well-known city of Sa Pa, but has much more charm and authenticity you won’t want to miss.
The ethnic communities and their vibrant creations, the welcoming local people with restaurants and homestays, and the scenic environment of rice fields creates your perfect destination tucked in the mountains.
Have you ever heard of Ta Van or Sa Pa?
Explore the other destinations waiting for you in Asia!
Sapa is a top destination in Northern Vietnam’s mountainous landscape. There is so much to do there, from trekking Indochina’s tallest mountain to learning about the unique ethnic communities, and exploring the endless rice terraces… but is Sapa worth it?
This article will go over everything there is for you in Sapa, and help determine if Sapa should be added to your travel itinerary!
But, first things first, it is spelled ‘Sa Pa’, so from here on out that is how it will be spelled to honor the local cultures! Let’s dive in.
Sa Pa City Center, Vietnam
Table of Contents
Where is Sa Pa
Sa Pa is a mountain town located in the Hoang Lien Son mountains (also called the Tonkins Alps) Northwest of Hanoi. To get to Sa Pa it is about a 5.5-hour bus ride from Hanoi, or a train ride into the neighboring city, Lao Cai.
Since Sa Pa is a popular tourist destination, there are plenty of options to get into town and explore. Once you’re there, you can easily rent a motorbike to explore, or rent a taxi and head onto the mountain roads.
Cultures in Sa Pa
Sa Pa has been home to three diverse ethnic groups; the Black H’mong, Red Dao, and Dzay people, all with their own vibrant styles and ways of life. The local people will instantly bring a unique sense of life to the area, which is often covered in mist and clouds. Their vibrant textiles and complicated patterns are hard to miss!
What to Expect in Sa Pa
When you arrive in Sa Pa, you’ll be greeted by a lot of people offering to take you by taxi to your accommodation, which is a welcome offer after a long ride. The next thing you’ll hear is ‘do you want to go trekking?’
The town is a hub for backpackers to come for 2-3 days, go on a mountain trek, and then leave. And the locals cater to that travel style by churning out excursions and souvenirs before you move on. You can’t blame them, it is how they have found to make a living with the influx of visitors, but it can definitely skew your experience.
Unfortunately, many young kids are put to work to bring in buyers. Thy will sell you souvenirs, or come looking to take photos while in their traditional clothing. DO NOT support this, as it conveys that child labor is a way to make money.
Sa Pa is Great For You If...
Sa Pa may be the perfect place for you if you only have a few days, or have a specific trek you’re planning. For example, if you’re coming here to climb Mount Fanispan, the tallest mountain in Indochina, then where you stay doesn’t matter since you won’t be in town much anyway.
If you love tourist centers and want to get a photo of all the iconic spots that every tourist goes to, then Sa Pa is a great landing point! It is a common destination, and there are plenty of things to do in town.
However, if you’re traveling for a more authentic experience and enjoy getting deeper into nature and the local culture, then is Sapa worth it? Probably not, but somewhere else is.
The Ta Van Valley
I’m not surprised you were drawn to Sa Pa for the misty mountain views, unique local cultures, and laid-back way of life. However, if being at the center of town that has been taken over by tourism makes your skin crawl, then the Ta Van Valley is perfect for you.
Only 25 minutes from Sa Pa, is a small town of 3,000 people that is idyllic, comfortable, and so welcoming to travelers. There are cozy cafes filled with books and games, homestays that make you feel like family, and the world’s sweetest dogs (which we have found is an accurate reflection of the people)!
5 Reasons To Stay in Ta Van Instead of Sa Pa
1. The Small Town Feel
One great thing about a small town is that you get to know everyone pretty quickly. But here, you also recognize their children, and their dogs who you might spot on the other side of town. Neighbors feel like family and everyone is a friend. In Ta Van, nothing gets lost in the hustle and bustle of city life.
2. The Locals
Everything is more relaxed and usually safer in a small town. While walking along a steep road, a young girl came up out of nowhere and just held my hand while we walked, it was so precious. The boys come to sit on my lap at dinner and bring their trucks and books and we play! No need for language here.
3. The Views
Of course, there are views in Sa Pa as well, but often those views are masked by a blanket of mist and clouds. On the cloudy days in Ta Van, you can still see across the valley rather than a wall of white.
4. The Restaruants
The food in Ta Van is insane, plus every restaurant and cafe has a quaint and comfortable aesthetic that makes you want to hang out all day. The food is cheap, but the quality is insane. Not to mention that many of the restaurants are vegan, organic, and use locally sourced ingredients from the valley!
5. The Immersion
While Sa Pa offers cooking classes and handicraft lessons, you’re always a client to them and it’s tough to break through that seller/buyer relationship. The locals in Ta Van see way fewer travelers every day, so give more time and attention to conversation. They will sit and eat with you, introduce you to their family, and teach you so much!
Summary - Is Sa Pa Worth it?
Almost everyone traveling Southeast Asia has heard of Sa Pa – the hidden gem in Northern Vietnam’s mountains. However, when too many people ‘find’ the same hidden gem, it loses its charm. Unfortunately, that’s what feels like has happened in Sa Pa.
While the region is still breathtaking, the city of Sa Pa itself was a pass for me. I felt like people saw me for my wallet more than my mind, and I felt like just another number of people passing through.
As a slow traveler, where I stay somewhere for 1-month minimum, Sa Pa would have been a nightmare. However, after finding Ta Van, I could stay here for a year! The people, the views, and the slow living pace were peaceful, welcoming, and so beautiful to be a part of.
So to answer the question: Is Sapa worth it? No. But that doesn’t mean there aren’t other hidden gems near Sapa that will sway you to stay here for longer.
Maybe you’ve heard of the tropical paradise of Okinawa, and if you think you know what to expect then this post might surprise you! Learn 20 of the top things to know before going to Okinawa, so you are ready for everything this island has to offer.
Explore the lush jungle, ride the ocean waves, and dive into the best local food fully prepared. While Okinawa is a part of Japan, it so unique and different that you’ll often forget you’re in Japan at all!
Table of Contents
Pocket Guide to Okinawa
When I think of Okinawa...
I'm warm on a beach, still wet and salty from the crashing waves, enjoying a sweet sunset date with Matt & fresh sashimi. so happy 🙂
Where To Stay
Naha (Best for first-timers and city lovers)
Onna (Best for beaches and diving
Nago (Best for families)
Yomitan (Best for culture)
When To Visit
Late march to early may / October to November. Summers (June-August) are hot and humid, with typhoons in late summer.
Things To Do
Swim or snorkel almost anywhere on the coast
Visit Churaumi Aquarium
Enjoy local food like Okinawa traditional soba & sata andagi
1. Okinawa is Not Just One Island
Okinawa is an archipelago south of mainland Japan, with over 150 islands! The main island, Okinawa Island, is where you’ll find the bustling capital city of Naha and many popular tourist destinations.
However, venturing beyond the main island unlocks a treasure trove of experiences. Miyakojima Island offers pristine white sand beaches and crystal-clear turquoise waters, perfect for relaxation. Yaeyama Islands, a chain further south, exudes a more remote and traditional island charm, with stunning natural beauty and a slower pace of life.
2. Okinawa Has a Unique Culture
You may have been to mainland Japan, but Okinawa has a culture that is distinctly unique. This is one of the biggest things to know before going to Okinawa since I was completely surprised! The Ryukyu Kingdom, an independent kingdom for centuries, has left a strong mark on Okinawa. You’ll find influences in everything from the local dialect (Ryukyu-go) to traditional music and dance.
Around the island, you’ll notice these cute fox-like statues called Shisa, which bring protection against misfortunes and evil spirits. See if you can find this massive one on the island!
The largest spiritual protector of Okinawa
3. Get to Know the Locals
Okinawans are renowned for their warmth and hospitality. A friendly “Haisai” (hello in Okinawan) can go a long way. Many locals are happy to share their island with visitors, offering insights into the culture and hidden gems off the beaten path.
4. Tattoo-Free Zones
If you’ve got some ink, be aware. Japan’s views on tattoos are slowly modernizing, but a big emphasis on slow. There is a historic association of ink with gang membership, and exposing them is forbidden in many areas you’ll want to go to, including temples, shrines, onsens, and even some hotel or restaurant properties!
If you’ve got ink, look for any restrictions at places you want to go and have a way to keep them covered just in case. This is one of the helpful things to know before going to Okinawa incase you’re inked, so you can bring appropriate clothes or a scarf to cover your tattoos and not be held back!
5. Okinawa is the Cheapest Prefecture
A perfect destination for budget-conscious travelers. Accommodation, food, and transportation tend to be more affordable in Okinawa compared to other parts of Japan. This makes it a fantastic destination for those seeking a memorable vacation without breaking the bank.
You’ll find a wider range of budget-friendly accommodation options, from charming guesthouses to hostels, compared to pricier options in major Japanese cities. Since much of the draw to Okinawa is the tropical landscape, you’ll find affordable things to do like snorkeling (free), hiking (free), and exploring mountain waterfalls for less than $3!
Outdoor adventures in Okinawa
6. Keep Cash on You
While credit cards are becoming more accepted in major tourist areas, carrying cash is still essential for smaller shops, restaurants, and transportation (especially taxis). ATMs are readily available in most towns and cities, but it’s always a good practice to withdraw enough cash beforehand, especially if you’re planning to venture outside of the main tourist areas.
It is NOT customary to tip in Japan, and it can be seen as an insult. However, be sure to offer a polite ‘arigato gozaimasu’ before you leave!
7. WiFi is Everywhere, But Not for Digital Nomads
Finding free WiFi in cafes and restaurants won’t be a problem in major tourist areas. However, many cafes and restaurants strictly prohibit any laptop work, reading, or journaling. This was the most surprising of all the things to know before going to Okinawa, since we are digital nomads we thought it would be easy to work remotely!
Especially outside of the capital of Naha, your options for working are a bit harder to find. If you work remotely, choose an accommodation that offers a comfortable space, and also consider purchasing a mobile hotspot during your stay to ensure you stay connected.
8. Don't rely on Public Transport
Public transportation options outside of Naha, the capital city, are limited. Renting a car or scooter is the best way to explore the island at your own pace and reach those hidden beaches and off-the-beaten-path locations.
Especially if you want to explore north of Nago you will need a vehicle as there are no public transport options! Be sure you have your international driver’s license!
Mountains of Northern Okinawa
9. Embrace the 'Blue Zone' Food
Okinawa is one of the world’s famed “blue zones,” where people live exceptionally long lives. The secret to their longevity might lie in their delicious cuisine! Freshly caught fish, seaweed, and plenty of vegetables form the backbone of the Okinawan diet. Be sure to try local specialties like Okinawan Soba, a thin noodle soup, Okinawan tofu, or bitter melon!
Don’t underestimate the magic of Japanese convenience stores, like 7-Eleven, Lawsons, and Family Mart. From perfectly cooked rice balls (onigiri) to an array of hot and cold snacks, you’ll find delicious and affordable options for every meal. These shops are lifesavers, especially during late-night cravings or when you’re on an ultra-diet.
This is my favorite of all the things to know before going to Okinawa since it is a game changer. The food is high quality, affordable, and absolutely delicious! You’ll have to see for yourself if you’re team Lawsons or 7-Eleven.
11. Enjoy an Izakaya Experience
Experience the heart of Japanese nightlife at an Izakaya, a casual pub serving small plates and a wide variety of drinks. These vibrant establishments are a fantastic way to immerse yourself in the local culture. Order a round of refreshing Orion beer, a local Okinawan brew, and sample a variety of delicious tapas-style dishes.
Izakayas are also great for socializing, so be prepared with some Japanese language skills!
Okinawa is a haven for thrift-shoppers! From vintage clothing stores overflowing with hidden treasures to local markets with handcrafted souvenirs, there’s something for every traveler.
My favorite store was any of the ‘Hard Off / Off House‘ locations where I purchased a traditional formal Kimono for only 2000 Yen!
13. Snorkeling is Best Without a Tour
Okinawa has some of the most stunning coral reefs in Japan, teeming with vibrant marine life. While guided snorkeling tours are readily available, the calm, clear waters are perfect for independent exploration. Explore the best snorkeling spots on Okinawa island!
Many beaches offer snorkel gear rentals, so you can easily grab a mask, fins, and waterproof map and discover the underwater wonders at your own pace. Swim alongside colorful fish, marvel at towering coral formations, and create unforgettable memories beneath the waves.
Gorilla Chop Coral Reef
14. Earthquake Awareness
Welcome to the Ring of Fire, where tectonic movement is regular, volcanoes are active, and there is always a general risk! While not common, the impacts can be devastating.
You’ll see tsunami evacuation routes near the coast, as well as elevations so you know the risk where you are. Be sure to download some EarthQuake response apps, one of the many travel apps you need in Japan.
Just in case there is any issues, it's essential to have quality insurance to keep you covered. Learn everything you need to know about Insurance Abroad.
15. Be Aware of the Wildlife
While Okinawa is generally a safe destination, there are a few things to keep in mind regarding wildlife. Habu snakes which are venomous pit vipers are present on the island. It’s best to stick to designated trails and avoid venturing off the beaten path at night.
Additionally, be mindful of the ocean as you may be swimming with box jellyfish, stonefish, and lionfish. Many beaches have designated swimming areas with nets to keep swimmers safe, so be sure to pay attention to posted signs.
As always, respect wildlife and keep your distance!
16. Stay For At least a Week
See it all in the perfect one-week itinerary of Okinawa, taking you to the best snorkeling spots, hidden gems that I found with locals, and insane restaurants and hole-in-the-wall places that won’t forget!
From the historic Shuri Castle in Naha to the intense mountains and waterfalls in the Yanbaru National Park, you need at least a week to see it all! One week allows you enough time to move slowly to take in the historic sites while getting a full taste of the unique and vibrant culture here.
Learn more about the benefits of Slow Travel so you can connect more with the people and places you explore while nurturing yourself.
17. Avoid Peak Tourist Season
July and August boast beautiful sunny skies and warm waters, perfect for beach bums. However, these months also coincide with peak tourist season, leading to crowded beaches and higher prices. Not to mention this time overlaps with typhoon season, posing a potential threat for travel disruptions.
Consider visiting during the shoulder seasons (April-May, September-October) for a more pleasant experience. You’ll encounter fewer crowds, potentially lower prices, and generally calmer weather.
Beautiful beach sunsets in Okinawa
18. When You Go Matters
You will have a completely different experience depending on when you go! Whether you want the Japanese experience of the cherry blossom blooms, or supreme diving and wildlife encounters.
Read more on the best times to visit Okinawa for a full idea of what to expect throughout the year. The weather, crowds, and natural events change a lot!
19. Learn To Surf
Okinawa is the perfect place to learn to ride the waves! The coral reefs create a perfect break offshore so you can learn in great conditions and stay up for awhile! If you’re already a surfer, give kiteboarding a try! Okinawa is home to Japan’s number-one teacher, and you may find your new favorite ocean sport.
The atmosphere in Okinawa is very laid back and relaxed, mostly because a lot of locals spend their free time surfing the waves or diving below them. Don’t miss out on all the fun!
20. World's Best Aquarium
If you can’t tell by now, everything in Okinawa is shaped by the ocean, including the local hobbies, food, landscape, and culture. Luckily, they brought the beauty of the sea to land in the world’s best aquarium – the Okinawa Churami Aquarium.
The best part is this aquarium prioritizes ethical animal encounters and only holds animals that are in rehab or cannot be released into the wild. There is an emphasis on education and human impact, highlighting how our actions greatly impact the ocean, and thus the rest of the world.
Summary - 20 Things to Know Before Going to Okinawa
There are over 100 reasons to go to Okinawa but by now you’re probably already convinced. This island is a gem of the Pacific, and you won’t want to miss it. From over 20+ destinations I have explored, Okinawa stays at the top of my list because of the people, the landscape, and the food.
Although Okinawa is a part of Japan, it has a culture and experience that is completely unique. Be ready before you go with these things to know before going to Okinawa so you are ready for a perfect trip!
Explore the other destinations waiting for you in Asia!
If you’re craving rugged adventure in one of the most beautiful landscapes, then this is for you. Driving the Ho Chi Minh Road was a favorite travel adventure, exploring remote landscapes, meeting local people, and taking in the best views.
The Ho Chi Minh road weaves between mountains and fields hugging the Laos border. Here you will spot elusive wildlife, pristine waterfalls, and limestone karsts that feel like you’re in King Kong’s Skull Island (maybe since it was filmed back here). From the caves of Phong Nha, the war history in Khe Sahn, and the peaceful villages and landscapes in between, you won’t want to miss driving the Ho Chi Minh road!
Table of Contents
Before speeding off on any adventure abroad, be sure you have your International Driving Permit. This will avoid any issues with the local police, ensure insurance protection in the event of a crash, and give you one less thing to worry about!
To clarify, this is NOT the Ho Chi Minh Trail – the secretive trail used to move weapons and products into Southern Vietnam during the war. That trail is mostly in Laos and is better suited for bicycles or dirt bikes. Although an amazing adventure for another time, this article is on the Ho Chi Minh Road, a paved road that weaves between rural fields and limestone karsts in some of the most remote areas of Vietnam.
This drive isn’t for everyone. It will require some motorbike driving skills, and a desire to push yourself to get out of your comfort zone while diving into the local lifestyle. This is not a heavily populated route, which is hard to find nowadays in popular tourist countries.
Although driving the Ho Chi Minh road doesn’t technically start until much further inland, there are some amazing sights to see along the coast you won’t want to miss. This beautiful drive starts in Hội An, a gem of a city filled with lanterns, textiles, and happy cyclists. We spent 2 weeks in Hội An and loved every second of it!
There are many options for bike rental companies to choose from and I suggest stopping into all of them to chat with the shop owners, see the bikes, and pick up some info.
We talked with Style Motorbike, and Tuan Motorbikes, both of which have shops all over Vietnam and offer one-way rentals. You can also start your journey in Đà Nẵng, and check in with Tigit Motorbikes also!
Our Set-up
We went with a Honda XR-150 L from Tuan Motorbikes, and it was perfect. It was a manual, with a small luggage rack, extra tires, and great customer support should we need it (and we did).
I don’t drive manual (yet), so we loaded 2 people, 1 big backpack, and 2 small day bags on a single bike. We were careful to pack everything we could need in Southeast Asia, and especially loved having sunscreen, a water filter, and a water bladder to use while driving. Thankfully my boyfriend Matt is a great driver and loves the adventure!
The total cost was $20/day + $50 one-way rental fee. They provided bungee straps for our bags, 2 free tires that we would only pay for if we used them, and 2 full-face helmets.
If we did it again, we would upgrade to a bike with storage built onto the back that locks, and ideally get 2 bikes instead of 1 (time for me to learn to drive)!
Honda XR 150L
Day 1 - Đà Nẵng & Son Tra
As we left the old city of Hội An, we started North towards Đà Nẵng & Son Tra Mountain. While Đà Nẵng is a beautiful city with nice beaches for Vietnam’s coastline, the true beauty lies on the Eastern peninsula of Son Tra.
This protected landscape hosts mountains that seem to climb into the clouds, hidden beaches with coral reefs, and elusive monkeys swinging in the trees! There are 25 species of monkeys across Vietnam, but the red-shanked Douc is renowned for its vibrant colors and other-worldly dark eyes.
Although there are only 2,000 left due to habitat loss and poaching, you have a good shot at seeing one! The road is called Monkey Road, and while you’re there, you can stop at the more touristy ‘Monkey Mountain’. But, if you drive slowly and keep your eye out for moving branches, you may be lucky to spot a rare troop munchin’ on some leaves.
Be sure to drive by the Lady Buddha statue (free entry), and up to the top of the mountain for 360 views!
Highlights
1:30 / 40 km
Endangered Red-Shanked Douc Monkeys
Lady Buddha Statue
Marble Mountains
Red-Shanked Douc spotted in Son Tra
Day 2 - Hai Van Pass & Hue
As you leave Da Nang, you’ll quickly come to the Hai Van Pass – often named Vietnam’s most scenic road. The winding drive creeps along the coast, through rural towns and ocean views.
If the weather is good, take some time to swim under the Cầu Tràng bridge. It can sometimes be closed with a lot of rainfall, but it seems like the best place to stop and enjoy a dip. Unfortunately during our drive, the fog was pretty dense and it was tough to see the mountains and coastline, so we didn’t make any stops. Not to mention we lost some time due to a flat tire.
Once we made it to Hue we were ready to chill for the night. This is a great city to prepare before heading into the mountains. The city itself was the seat of the empire and showcased a lot of history for their ancient rulers.
Take some time to explore Hue, including the gated Citadel, Thien Mu Pagoda, Tu Duc Tomb, Minh Mang Tomb, and Khai Dinh Tomb! There are plenty of tours that take you to the best sights in town – many of which can be seen from the road with a simple drive-by if you’re short on time.
Things will be much more remote from here on out, so be sure your bike is ready to go, top up on petrol, hit an ATM, and bring plenty of water!
Not even 15 minutes after leaving Da Nang, we blew a tire on the highway. There were so many people on the road pointing us to a shop, which was able to repair it in 1.5 hours for only 150.000 VND ($6). It was a lucky spot to happen and a good reminder that anything can happen on the road!
Travel with extra tubes incase this happens to you!
Highlights
2:15 / 102 km
Hai Van Pass scenic highway
Thien Mu Pagoda & Citadel
Hue Walking Street (nightlife)
Thien Mu Pagoda seen from the road
Day 3 - Khe Sanh
You’re now well on your way to some of the most scenic views of the drive! The journey to Khe Sanh takes around 4 hours to drive 176 km, with stunning mountain views, a rural landscape, and a refreshing waterfall to break up the drive.
There are plenty of gas stations along the way, towns with restaurants and street food, and internet connection the majority of the time. The roads are in great condition, but the closer you come into Khe Sanh, the more gravel patches and potholes you’ll hit, so drive carefully!
Stop in the town of Hồng Thượng to grab a bite to eat or a bahn mi for the road, and head over to Thac Anor for a mid-day picnic at the waterfall. Parking was only 10.000 VND, and there was an easy paved path to the falls. A great place to swim and stretch your legs.
Try to arrive in Khe Sanh well before sunset and explore the Ta Con Airport Relic Museum. This is a preserved military base used during the Vietnam-American War. Only 50.000 VND for entry ($2), and you can see where soldiers fought and died, along with warplanes, tanks, explosives, and a small museum showcasing the history of the battle fought here.
Highlights
4 hours / 176 km
Thac Anor Waterfall
Ta Con Airport Relic Museum
Thac Anor Waterfall
Day 4 - Long Sơn Valley
You’re now in the best part of driving the Ho Chi Minh road. Many people crush a drive from Khe Sanh to Phong Nha in one day, but, we like to move slowly and not rush exploring this beautiful landscape so we broke it up, and we are so happy we did! If you’re on a time crunch, combine days 4 & 5 into one day and get an early start.
We also didn’t get into Khe Sanh until after the war museum closed, so we went in the morning and didn’t leave Khe Sanh until 11 am.
The landscape kicks up another level on this leg of the journey as the limestone mountains get taller, steeper, and more densely forested. We stopped shortly after leaving Khe Sanh at Thác Tà Puồng waterfall, a quick walk off the road, only 10.000 for parking, and an insane turquoise waterfall!
When we arrived, we were greeted by the friendliest locals yelling ‘hello hello’, offering cold beers, cooked fish, and fresh fruit. We were happy to take it slow and be able to enjoy our time here.
We cruised into Long Sơn just before sunset and we were happy with our timing since this valley was beautiful! It is a small town with 1 hotel, 1 restaurant, and many locals who were welcoming and friendly.
Highlights
3 hours / 135 km
Thác Tà Puồng Waterfall
Long Sơn Valley Exploration
Thác Tà Puồng Waterfall
Day 5 - Drive to Phong Nha
The drive to Phong Nha is a quick one from Long Sơn allowing more time to explore side roads, swim with locals, and enjoy the journey. We thoroughly explored some valleys and swimming spots in the area before heading out at 12. There was only 1 other traveler in town, and we were both amazed at the untouched beauty of the area.
Phong Nha national park is the most famous part of driving the Ho Chi Minh road, and maybe all of Vietnam since it is home to the world’s largest cave! Often called the ‘Kingdom of Caves’, you will want to be prepared to settle in for a few days to thoroughly explore it all.
The roads continuing north are very safe, except for the fact that it’s hard to keep your eyes on them – the views are too good. Be sure to stock up on petrol, water, food, and anything else as there are no other stops in between. This is about as remote as you can get in Vietnam, so enjoy the serenity of it!
Take some time to stop at the Phong Nha Botanic Gardens on your way into the park. This will get you out into the jungle for a small hike, take a dip in a waterfall, and learn about the creatures of these jungles! There aren’t any other stops on this leg of the drive, but you’ll have plenty to do once you’re in the National Park.
Highlights
2:15 / 100 km
Enjoy a slow morning in Long Sơn village
Phong Nha Botanic Gardens
Views of Phong Nha
Day 6 & 7 - Phong Nha Cave Exploring
Depending on when you arrive and can explore on your way in, 2-3 days in Phong Nha is a good amount if you only have day treks planned. This town is very touristy since everyone travels here to explore among the largest caves in the world!
I suggest staying towards the town center (not along the river), and thinking about the caves you want to see early into your arrival. The most popular are Phong Nha Cave (boat access only), Paradise Cave, and Dark Cave. On a tour (~$60), you get the full tourist experience with zip-lining, mud-bathing, and cheezy photos. It’s not our thing, so we found some areas to explore without a tour.
Different tour companies have exclusive rights to certain cave areas. This gives them ownership in the experience there, the protection of the area, and keeps things a bit more organized.
For a self-guided excursion, check out Paradise Cave, Dark Cave, Botanic Gardens, or Tien Son Cave. Keep cash on you for parking and entry (usually not more than 100.000 VND), water, and waterproof shoes.
Take your motorbike across the Phong Nha Ferry Service (20k VND)
Explore Jungle Roads, keep an eye out for Hatinh Langur primates!
Leaving Phong Nha
Leaving Phong Nha, you have a few options.
Option 1: Continue driving along the Ho Chi Minh road North towards Hanoi, stopping in Pho Chau, Mai Chau, and Hanoi. This route is roughly 13 hours of driving across 652 km and will add 3-4 days to your bike journey.
Option 2: Head to the coastal city of Đồng Hới, return your bike by putting it on a train, and head to your next location. You can find many rides out of the city on 12Go Asia.
We went with Option 2, mostly because the best part of the drive was over as the road returned into the valley and coastal cities. We love the slow pace, but these days would have felt like a grind to do it, so we headed to Đồng Hới for some train travel north!
On the map above, I have included the potential stops you can use if taking Option 1. However please note that I have not done this drive and these pins are just from my research and talking with other travelers! If you go this route and have suggestions to add, please let me know in the comments below.
Day 8: Đồng Hới
We left Phong Nha mid-day for the easy 45-minute drive to Đồng Hới. On the way you can swing north on the coast to Con Cat Nhan Duc, well-known dunes where you can rent a quad and rip around for a few hours!
As fun as this would have been, this day for us was 108 F (42 C), making it tough mentally to go into the scorching sand.
We ended our trip by sending our bike on a train to Hanoi for $40. Since we work remotely, we stayed in Đồng Hới for 3 nights to catch up on some work, wait out the holiday high prices, and do some much-needed laundry!
Highlights
Nhan Trach Dunes
Ocean Views
Laundry & resetting 🙂
Lessons Learned After driving the Ho Chi Minh Road
Do not underestimate an early start, especially during hot weather!
Refill water every chance you get, and bring a water bottle with a filter so you can refill at the many waterfalls!
The driver should definitely have an International Driver’s Permit – although you can usually rent a bike without one, cops on the road have been known to extort money (up to $300) if you don’t. Also, medical insurance will not cover you if you’re not permitted to drive!
Be sure you know where you’re going. Not all roads are accessible by motorbikes, and there are intricate spelling differences that can throw off your maps.
Knowing some local language goes a long way. In some of the remote towns, you won’t see other travelers for hours. Get to know the locals, they are mostly very curious and excited about visitors, but be respectful of their space and privacy – their home is not a museum.
Don’t plan too much, you never know what to expect. From a broken down bike, road closures, bad weather, or personal things… keep your plans loose with a good idea of your goals.
Phong Nha is touristy. If you have a lot of goals in the area, plan in advance. There are some cool 2- or 3-day treks that need to be planned early, so don’t wait until the last minute!
Enjoy the journey. These are some of the most beautiful drives we have ever done. Don’t crush out every day, stop to take it in, and enjoy the moment!
Summary - Driving the Ho Chi Minh Road
You will not regret driving the Ho Chi Minh road. Unlike many other drives in Vietnam, this is remote, authentic, and relatively easy compared to other multi-day drives! The road conditions are great, the people are friendly, and the views are insane.
Although this is a very doable drive, don’t underestimate how remote you will be. Sometimes we didn’t see anyone else on the road for over an hour and we could go multiple days without seeing another traveler!
With the right preparation and mindset, you’re in for an amazing week of driving through Vietnam’s most pristine landscape of limestone karsts and remote villages. If it’s not on there yet, add driving the Ho Chi Minh road onto your bucket list!
Explore the other destinations waiting for you in Asia!
Hi there & welcome to everything slow travel and sustainability. I'm here to share my best tips and tricks to help you make your travel dreams a reality, so you can explore the world while leaving a positive impact on it.
To provide the best experiences, we use technologies like cookies to store and/or access device information. Consenting to these technologies will allow us to process data such as browsing behavior or unique IDs on this site. Not consenting or withdrawing consent, may adversely affect certain features and functions.
Functional
Always active
The technical storage or access is strictly necessary for the legitimate purpose of enabling the use of a specific service explicitly requested by the subscriber or user, or for the sole purpose of carrying out the transmission of a communication over an electronic communications network.
Preferences
The technical storage or access is necessary for the legitimate purpose of storing preferences that are not requested by the subscriber or user.
Statistics
The technical storage or access that is used exclusively for statistical purposes.The technical storage or access that is used exclusively for anonymous statistical purposes. Without a subpoena, voluntary compliance on the part of your Internet Service Provider, or additional records from a third party, information stored or retrieved for this purpose alone cannot usually be used to identify you.
Marketing
The technical storage or access is required to create user profiles to send advertising, or to track the user on a website or across several websites for similar marketing purposes.